Craig Stocks Arts Fine Art Photography and Artwork Duplication Services in Peoria and Central Illinois
This page has been moved to www.craigstocksarts.com/blog.
You will be redirected there in 3 seconds or use the link above.
Thanks.
Be sure to check out my other blog at www.playingpeoria.com. Each week I post a new photo and an article featuring a local Peoria, Illinois artist or entertainer.
September
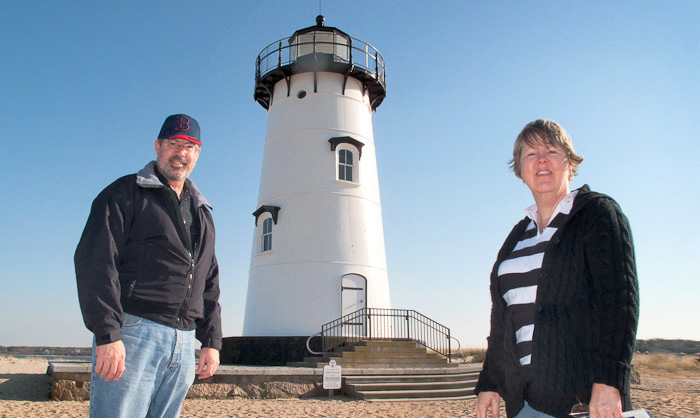
I recently did a photo shoot with Peoria, Illinois photo artists Doug and Eileen Leunig. The photo was for my website, Playing Peoria, where I post an article each week featuring a local artist or entertainer.
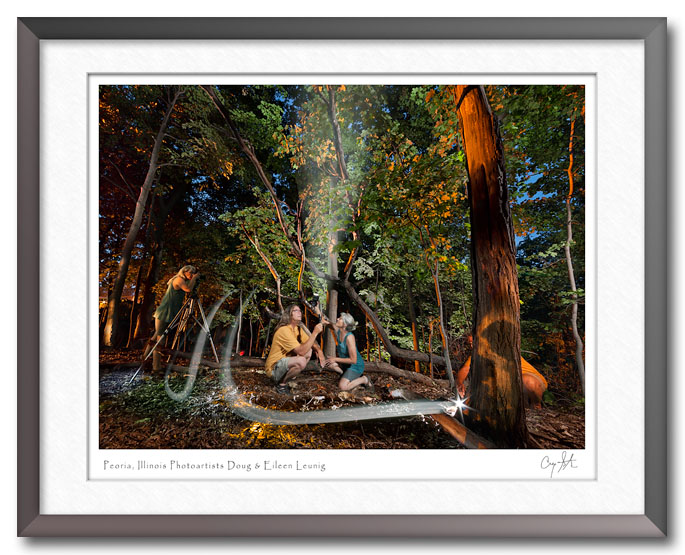
Doug and Eileen are known especially for the light paintings. Their approach is very time consuming, starting with many hours in the field capturing between 300 and 1000 individual frames. They then spend up to 100 or more hours using Photoshop to pick and choose individual elements from the those frames to create a final composite image.
I created the short video below to give a quick look into the process of combining the frames in Photoshop.
September
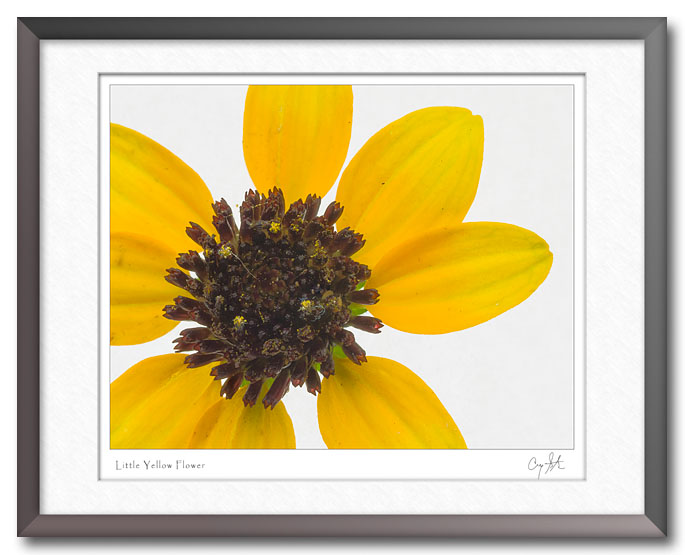
Lately I've been intrigued with macro photography. I've never been much of a flower photographer, but when I saw these little yellow flowers along the edge of the yard (yes, I was mowing) I thought they'd make a good subject. They're really quite small - the entire flower is a little smaller than a quarter. I've go no idea what they are, I just liked them.
The photo setup I've been using is pretty simple. The flower is resting on a piece of frosted Plexiglas that is lit from below. Then, I have a large softbox just above the flower to light the foreground. Then, it's just a matter of balancing the two lights to get the right exposure from each.
September
I've entered the Morton, Illinois Pumpkin Festival Photo Contest each year for the last several years. It's a tradition started by my mother in 2007 when she took three of my photos off her wall end entered them in my name. I was really surprised when she called to tell me I'd won a ribbon, since I didn't even know I'd entered. Each year since then she's been eager to see what I'm going to enter. I always enter in the Professional Division, and last year, one of my entries won First Place.
This year, I again entered the maximum of three photos. There were around 150 entries in all, with roughly 1/3 in the Professional Division.
The Results:
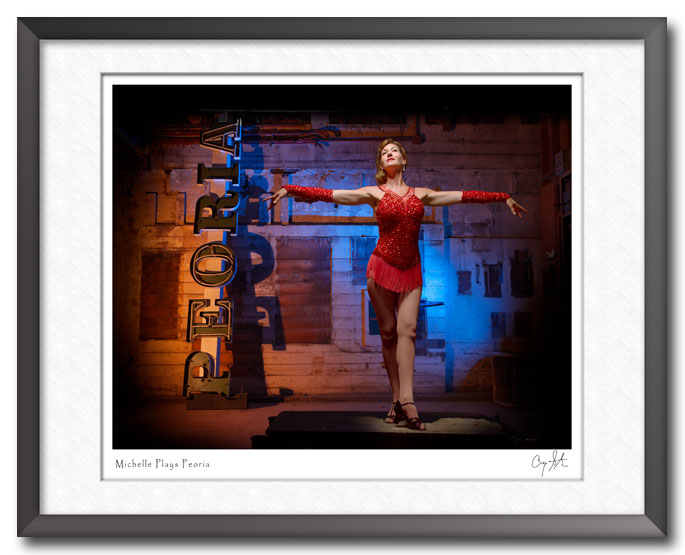
The photo "Michelle Plays Peoria" (above) took 3rd place. I did the photo for my Playing Peoria website where Michelle Rouland was the featured entertainer in last week's post. The photo is also being used by ArtsPartners of Central Illinois during October for the "All About the Arts" marketing campaign.
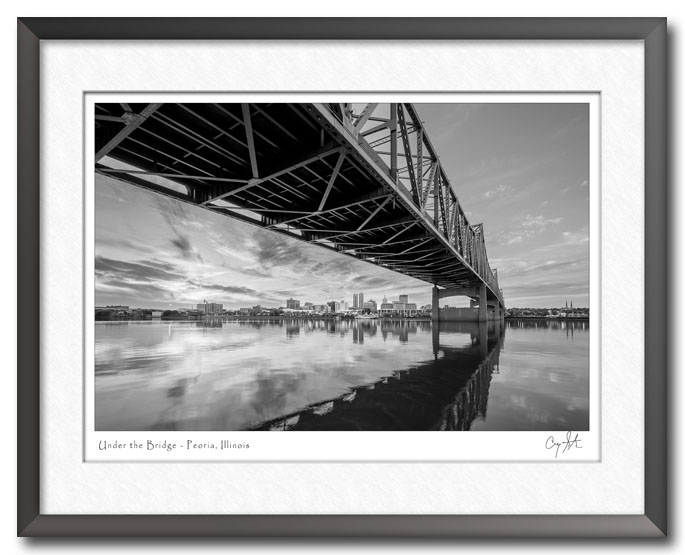
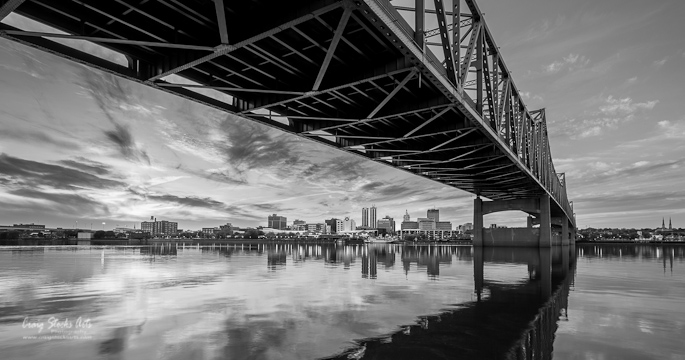
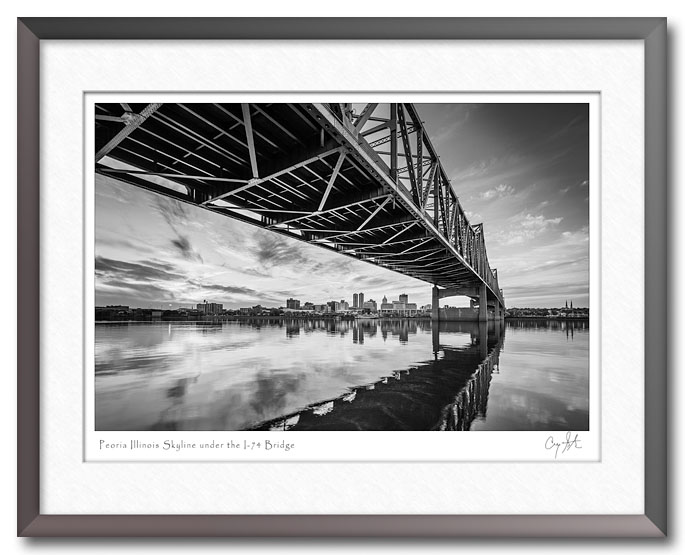
"Under the Bridge" won 1st place. I did the photo to use as a banner image in the "Playing Peoria" website. It's a pretty treacherous climb down the bank to get right along the river, but it was worth the effort.
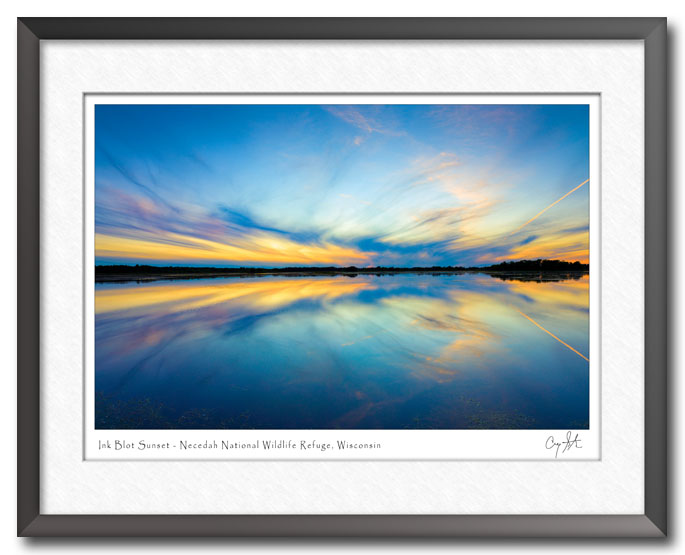
Finally, "Ink Blot Sunset" was awarded the Best in Show ribbon. I took this photo last year during my time as the Artist-in-Residence at the Necedah National Wildlife Refuge in Wisconsin. The photo was at Goose Pool, which became one of our favorite spots. Every evening at sunset, the geese and cranes would fly in to spend the night in the safety of the water. This particular night, we had really dramatic clouds, and the water was like glass. In fact, I have to be a little careful when I hang the photo that I don't hang it upside down.
August
I occasionally submit photo to stock agencies, mostly to iStockphoto. You don't make a lot of money, but you do get some income. One of the downsides is that you rarely know where your photo is used. So, imagine my surprise when opened the Yahoo! page and there was my photo of Phoenix used to illustrate a news story about home prices.

You can see the photo on the Craig Stocks gallery on iStockphoto and other Getty stock sites.
August
It's summer time, so once again I'm on the lookout for our surprise lilies. I did a photo of a surprise lily a couple years ago that I was happy with, but I'm always looking for a way to improve.
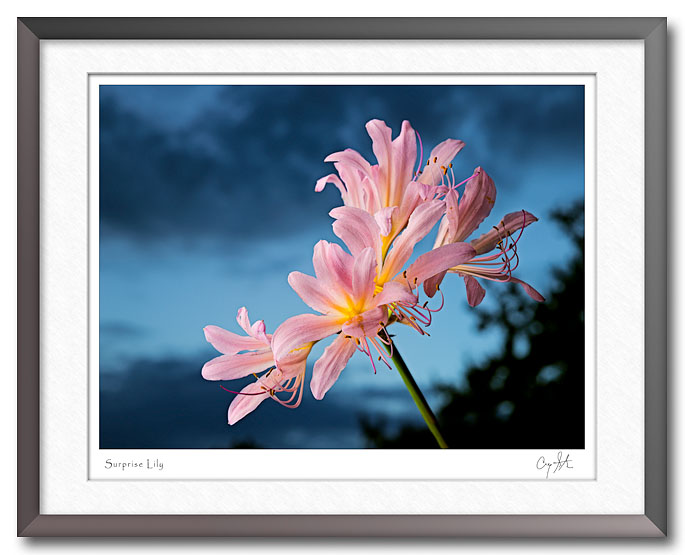
As before, I found this one while mowing the back yard. I did some photos in the studio, but the clouds looked like we might have a really nice sunset. So, dinner was delayed while I dragged the camera, tripod and a strobe with a softbox out onto the driveway. My goal was to photograph the lily against the sunset colors in the western sky. As it turned out, the colors never developed, but I still like the cool blue colors and the shapes of the clouds.
July
Did you ever wonder what you look like to a bug when you're looking at him through a magnifying glass?
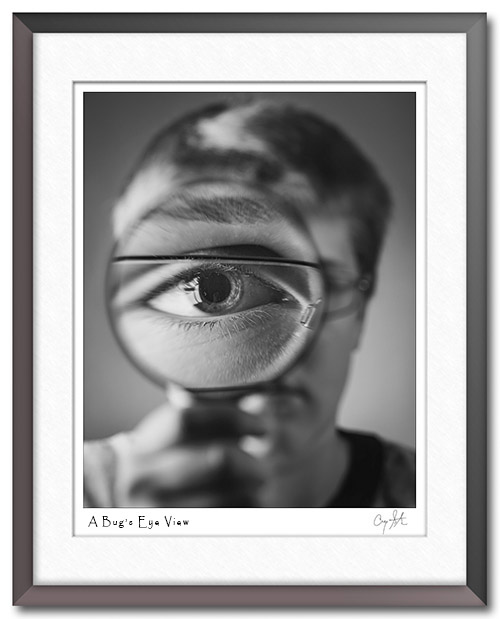
Grandson Chase spent most of the day using this magnifying glass to sort through old coins, and I immediately thought of fun photo opportunity. I thought it might be tricky to focus, but I didn't expect it to be as difficult as it was. Port rat photographers are always told that you have to get the eyes in focus, or at least the near eye. I don't know if that was the closest eye, but it's certainly the only thing in focus.
July
Here's a fun picture that I just dropped off at the Morgan Elser Gallery in Delavan. The photo was taken at Zabriskie Point in Death Valley National Park on the morning of a full moon. The moon is just setting in the west as the sun is coming up behind me. You can see the sun just starting to light the mountain peaks on the west side of the valley.
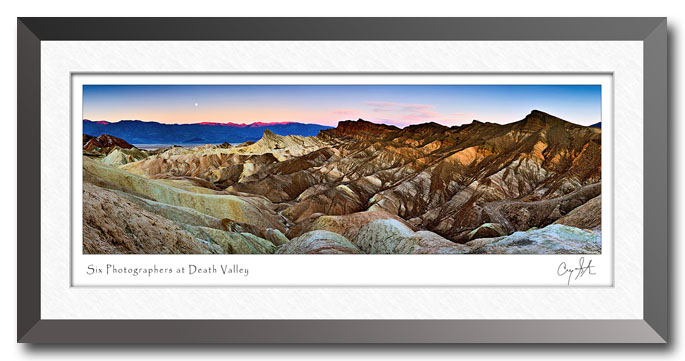
The fun part though is the nearly hidden detail. This is another of my HyperDetail photos, and the original is around 300 megapixels and nearly 10 feet wide without enlarging. That much resolution captures an extraordinary amount of detail, including some photographers on the trails and ridges. The challenge of this "Puzzle Piece" is to identify the six photographers.
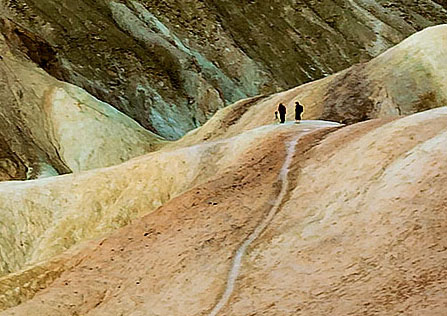
Here's a close-up view that shows two of them. Of course, you can't see them in the small photo above, and you can barely even tell that this section is from the left hand side of the photo. This area is about one inch wide in a three foot wide print, and the two photographers are very clearly visible - but you do have to look closely..
June
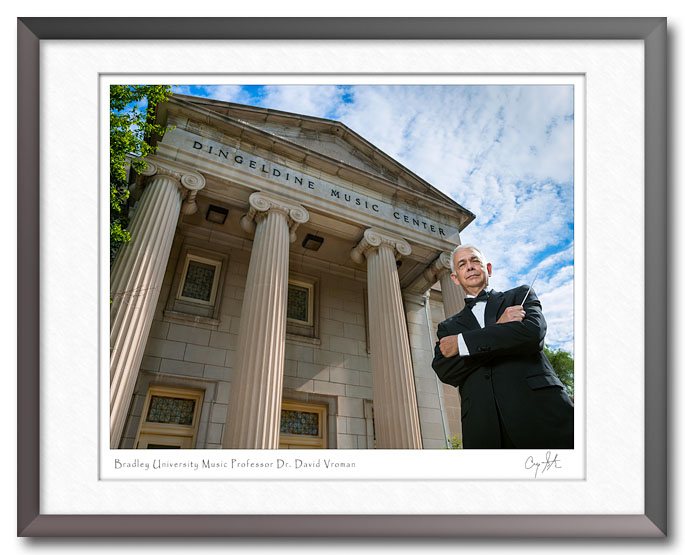
Be sure to read my latest post on Playing Peoria at www.playingpeoria.com. This week's feature is Dr. David Vroman, Chairperson of the Bradley University Music Department and Director of Bands. He also directs the Peoria Municipal Band during the summer.
June
The other day I posted an image of windmills at sunset. I really like the graphic simplicity of that image, but it needs the clouds to help make the sky interesting. Unfortunately, as the sun got lower on the horizon, the clouds were moving rapidly overhead leaving nothing but clear sky to the west. Does that mean it's time to pack up and go home?
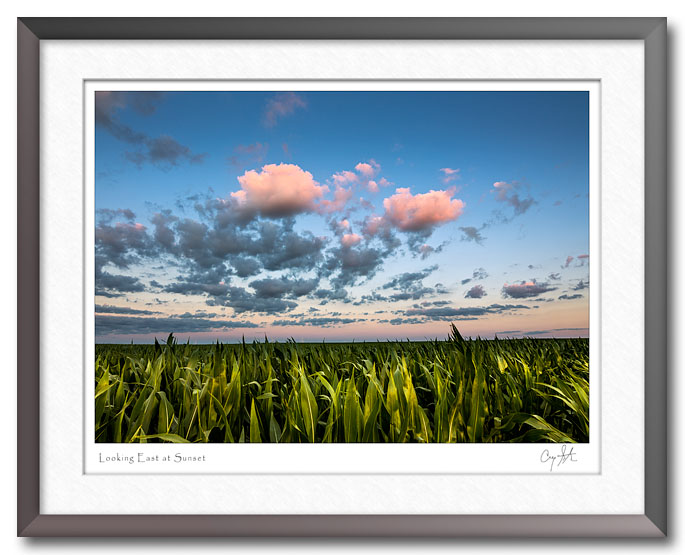
The answer in this case was simply to turn around and look east. The clouds that had been in the western sky were now in the east, and the setting sun was creating a wonderful, reddish glow on the nearest clouds. The result was a completely different look. The color palette tends more toward blues and reds instead of bright yellows, and the dominant feature of the clouds gives a much softer feel to the sky.
The two photos were taken about 20 minutes apart, but they're 180 degrees apart - both literally and figuratively.
June
It seems that I've been fascinated with windmills lately. They make great, graphic subjects, and I always know where to find them. I like the simplicity of this composition, and the clouds add a nice framing element.
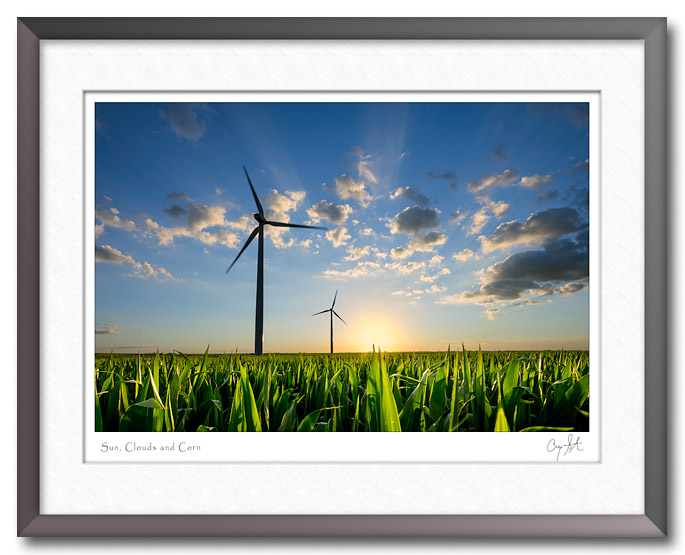
Photos like this one where the camera is facing right into the sun are hard to pull off technically. The two big challenges are controlling flare from the sun, and balancing the foreground with the much brighter background. A technique I use occasionally is to take multiple exposure, one for the foreground and one for the sky. I also take additional frames using my hand to block the sun. Of course, my hand is in those frames, but everything else is much more clear since there wont' be any lens flare. Then, I can use Photoshop to piece together the final image using the best from each frame.
June
I'll try to make a long story short. In May of last year, we visited the Trona Pinnacles near Ridgecrest, California with the goal of getting some good photos. The Trona Pinnacles is designated a National Natural Landmark, which is a program administered by the National Park Service.
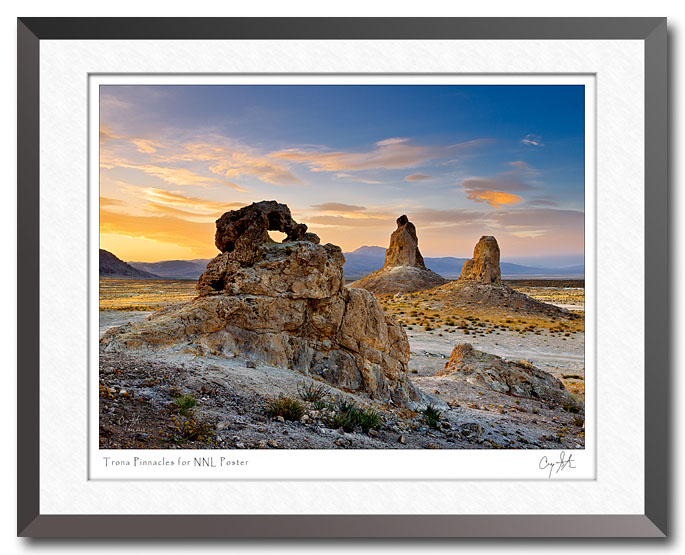
I had a number of images I was happy with, so I sent some samples to the National Park Service with a note they were free to use them. Well, about a month later I got a phone call from the NPS to ask if they could get a high resolution copy of one of the photos to use on a poster they were preparing to celebrate 50 years of the National Natural Landmark Program. I was honored to be considered and was happy to help out. Fast forward a year and the NNL 50th Anniversary poster has made its debut.
Do you want a copy of the poster? I'm having a show of my work this Friday, June 22 in Delavan at "An Evening of Art, Wine and Spirits" cosponsored by the Morgan Elser Gallery and Hometown Wine and Spirits. The National Park Service was kind enough to supply 200 posters to be given away at the event (while supplies last). Of course, I'll also have an original print of the Trona Pinnacles photo on display as well.
June
We've had a run of really nice weather in Central Illinois for the last couple of weeks. The downside of that is that the skies have been clear and sunsets have not been very dramatic. That's finally started to change the last couple of days. Last night we had some high clouds hanging around to the northwest, so I headed out to a spot I'd seen along Interstate I-155.
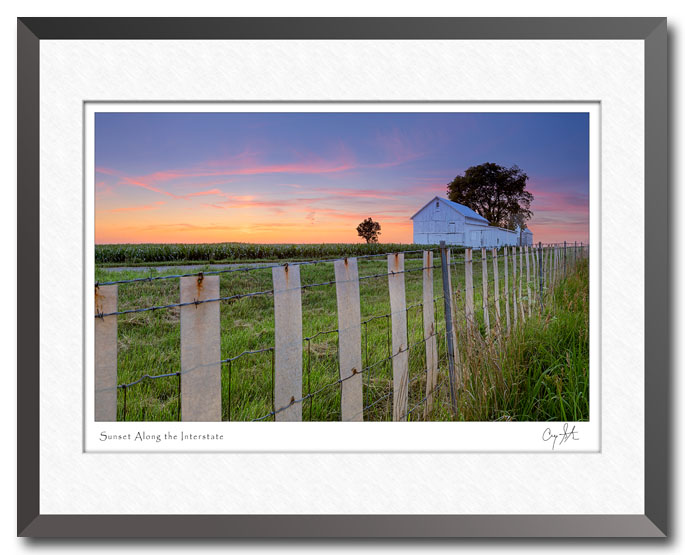
What caught my attention was the snow fence and the old barn. Fortunately, there was an exit ramp right there, so I was able to pull a ways off the highway. Then, all I needed was to find the right place to set up my tripod to include the fence, barn and sky.
Like most of my sunset pictures, this one was actually taken about 10 minutes after sunset. I really like the colors that sometimes emerge during that civil twilight period when the sun is below the horizon, but it's still lighting up the clouds. It's especially nice when there's a layer of high clouds that can catch the color of the sun and stay lit up for quite a while.
June
I've been very busy lately doing photo shoots of local Central Illinois artists, performers and entertainers for the Playing Peoria website that I'm producing in association with ArtsPartners of Central Illinois. I completely enjoy every shoot, but some are more interesting than others. And, the photo shoot of magician Mitch Williams was certainly interesting!
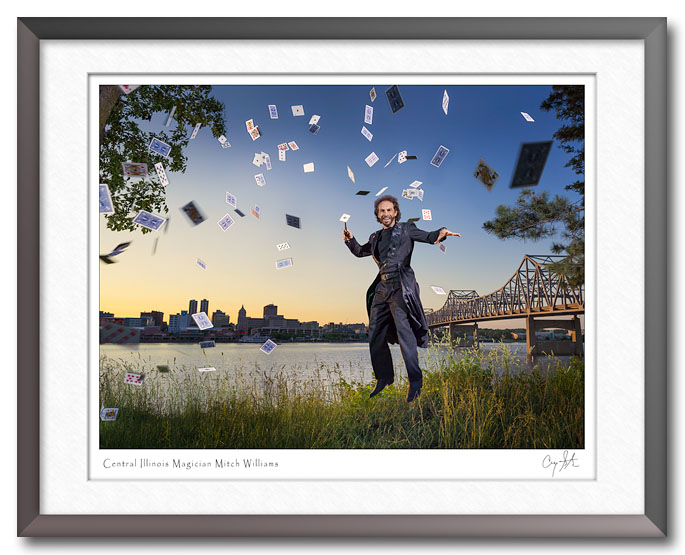
I like to approach the photos as a collaborative process, so Mitch and I had talked about a variety of ideas. The one that seemed to keep coming to the top of the list was of him spearing the ace of spades from a flurry of flying cards. And, we might as well make it more interesting by having him appear to float above the ground with the Peoria skyline in the background. Lastly, I didn't want a lot of Photoshop "magic" to make the photo, so we mostly relied on good old-fashioned production processes, and a couple of helpers.
The setup was pretty simple. My helpers (wife Deb and grandson Chase) and Mitch all toss their cards into the air. Then, Mitch jumps at just the right moment as the cards are flying past and I try to get the shot as it's happening. The short video clip below shows how it looked. Timing, of course, was critical, and we had to do numerous takes to get the right combination. Then, we'd all join in a game of 52 pickup and repeat the process. We ended up with just a few frames that had the right combination of Mitch in the air and no cards covering his face.
Photographically, the setup was pretty simple as well. The camera is on a tripod at the far right of the video frame. Mitch is mostly shaded by some trees along the river, so I'm free to light him with a couple of strobes. You can see the main strobe high in the air between Chase and the camera. The second, accent strobe is positioned right next to the video camera and has an orange gel to mimic the color of the sunlight on the bridge in the background. Post-production in Photoshop was pretty basic. Besides adjusting tones and colors, I removed the stool and added a few more cards from two other frames to create the final image.
Of course, I can't tell you the secret of how Mitch managed to end every take with the ace of spades magically impaled on his dagger.
May
I'm starting to work my way through nearly 1400 images from my son Christopher's wedding to Ketra this past Saturday. I swore I'd never again photograph my own child's wedding, but I couldn't resist. I did get some assistance from my brother-in-law Terry and friends at the reception.

The wedding was held outdoors in the Botanical Gardens, so we were keeping a close eye on the weather. With all of rain we've had, we were really worried, but it turned out to be an absolutely perfect day - good weather, great family and friends, and a swinging party.
May
Mary Simon of Conklin's Barn II Dinner Theatre in Goodfield is the latest entertainer to be featured on the Playing Peoria website. I had a great time doing her photo shoot, and it was really interesting to learn something about the person behind the characters we see on stage.
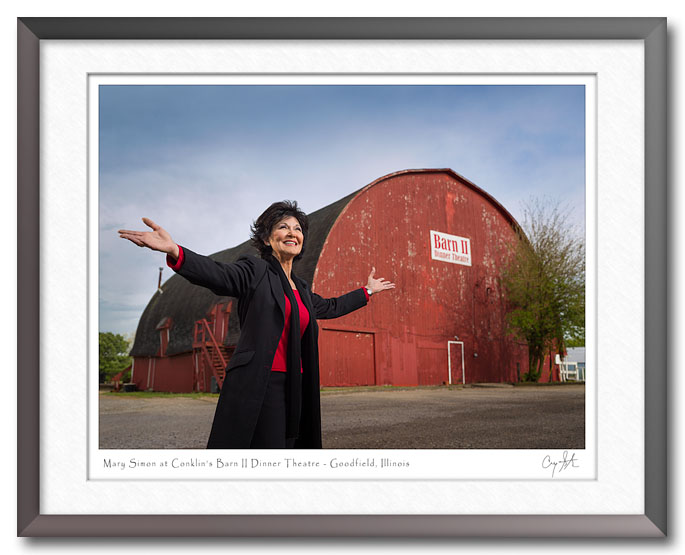
I've also begun to collaborate with Arts Partners of Central Illinois. They are putting together a set of photos featuring local artists for National Arts and Humanities Month in October, so my photos can now have a dual purpose. They are also helping to promote Playing Peoria on the Arts Partners Facebook page.
April
I love to revisit old photos. The photo below of Pickwick Landing Dam was one of my first digital photos taken just after I purchased my first serious digital camera in 2005. I was spending quite a bit of time in Corinth, Mississippi at the time, and it's only about a 20 minute drive to the lake. So, I went over one evening after work to try out the new camera.
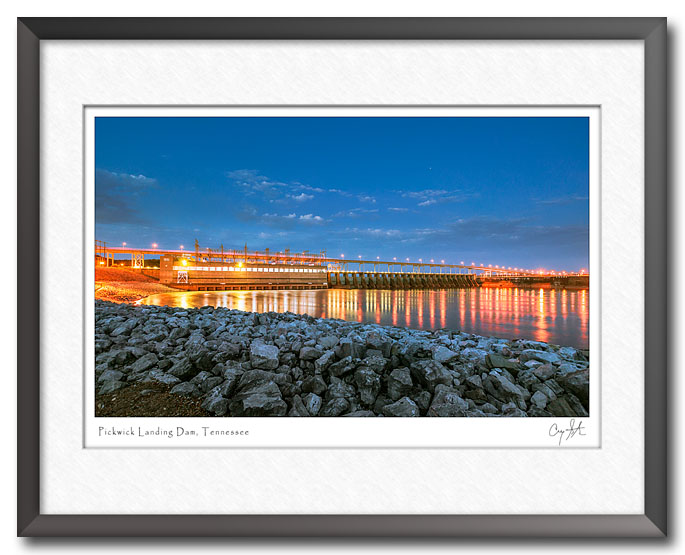
I recently ran across the original raw file, so I thought I'd try processing it again. Software has changed a lot in the last seven years. We now have Lightroom 4.1 RC which has significantly improved processing algorithms, especially for pulling detail out of dark areas. I can remember really struggling to get a good finished image with the software I had in 2005, and it was a whole lot easier with the new version of Lightroom. Of course, my skills have probably improved as well.
This is another good example of the advantages of shooting in raw format. You can also check out my tutorial video about the advantages of shooting raw for more information.
April
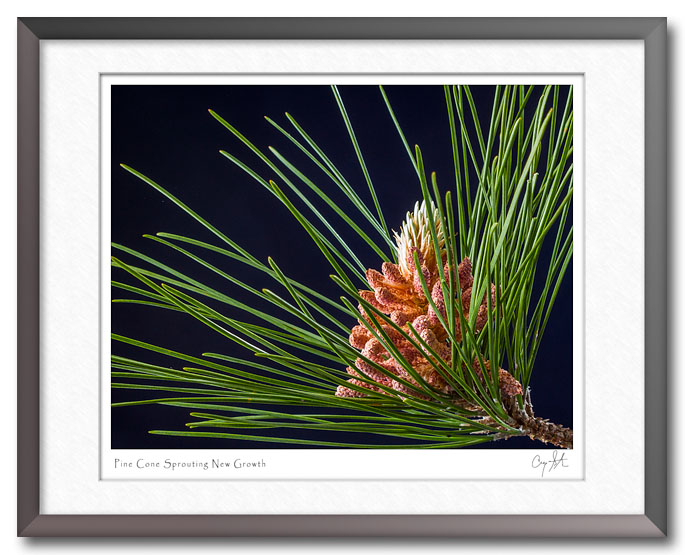
At least, that's what it looks like. My grandsons found this on the ground under a neighbors tree. I guess I've just never looked closely at the candles on a pine tree in the spring. It appears to be growing out of a small pine cone.
April
It's that time of the year when our plants in the yard are starting to bloom. My knowledge of flowers is just broad enough to be able to look at one and say "that's pretty." I have no idea what this flower is, but it is colorful. In fact, it was the bright color that I noticed first, because I suspected that it was "out of gamut," which means that colors are so intense that they can't be recorded properly in a photograph.
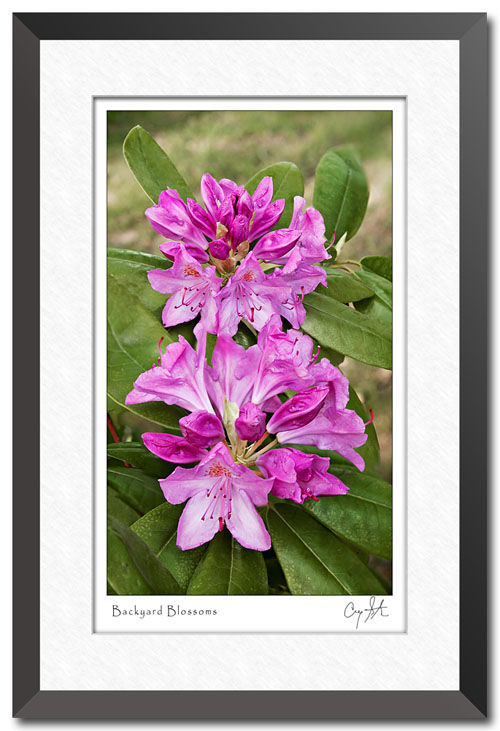
When photographers talk about color gamut, they're referring to the range of colors that can be displayed on a screen or printed on paper. Every device has limitations, including our own eyes. The color gamut we can see is referred to as the visible spectrum. There are lots of colors (wavelengths of light) that we can't see, such as infra-red and ultra-violet. Color film, display devices such as TVs and monitors and color printers area all even more limited than our eyes. You might be able to see the color of these flowers in person, but the purple color is so intense that printers and monitors can't duplicate the color. So, the best you can do is to get the color as close as you can, so that it looks as good as you can get it.
Sometimes we just can't duplicate what nature can create so easily.
By the way, be sure to check out my latest post about Central Illinois artists and entertainers at my new Playing in Peoria website. The most recent post is a profile of musician Mark Rogers of Morton.
April
Today I'd like to tell you about a new project I've started. It's called "Playing in Peoria" and it features local artists, entertainers and performers. Each post will feature a portrait of the artist along with a write up, and occasionally some video. I'm seeking local artists and entertainers of all sorts - singers, actors, magicians, DJs, jugglers. You can read more about the project here on the Playing in Peoria website. Please let me know if you'd like to participate.
I've just put up the first post featuring David Vernon, a local photographer and teacher. One of David's projects has been to photograph this particular oak tree - over and over since July 2005. To date he's posted 76 photos of "The Tree" on the Flickr photo sharing website.
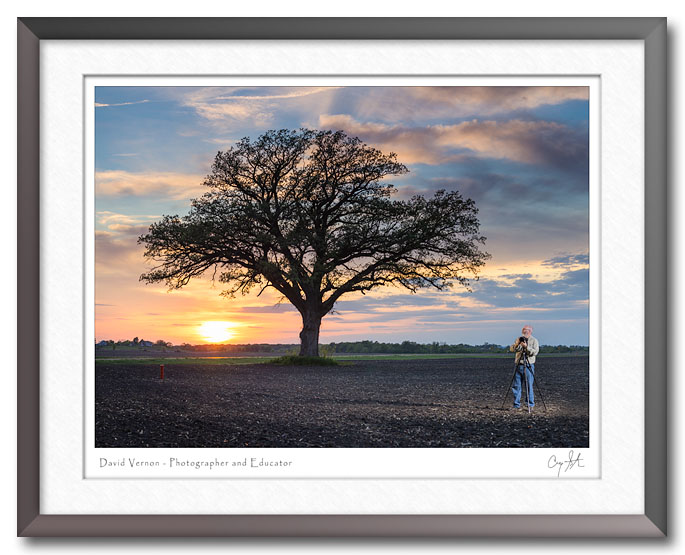
The photo above is one of the out-takes from our session the other night when David was kind enough to pose for a portrait with the tree. That meant he was the subject rather than the photographer, but he still took a few moments to enjoy his tree framed by a wonderful sunset. He even snapped a few photos with his phone, so he didn't leave completely empty handed.
April
I seems I've been doing a lot of panoramas lately. I like the panoramic format, and once you start looking at the world as a potential panorama subject, it seems you see them everywhere. I guess it's the nature of our world that it's mostly horizontal. Most panoramas are done by stitching multiple images together in Photoshop, so you end up with a higher resolution image than you would normally get with a photo straight from your camera.
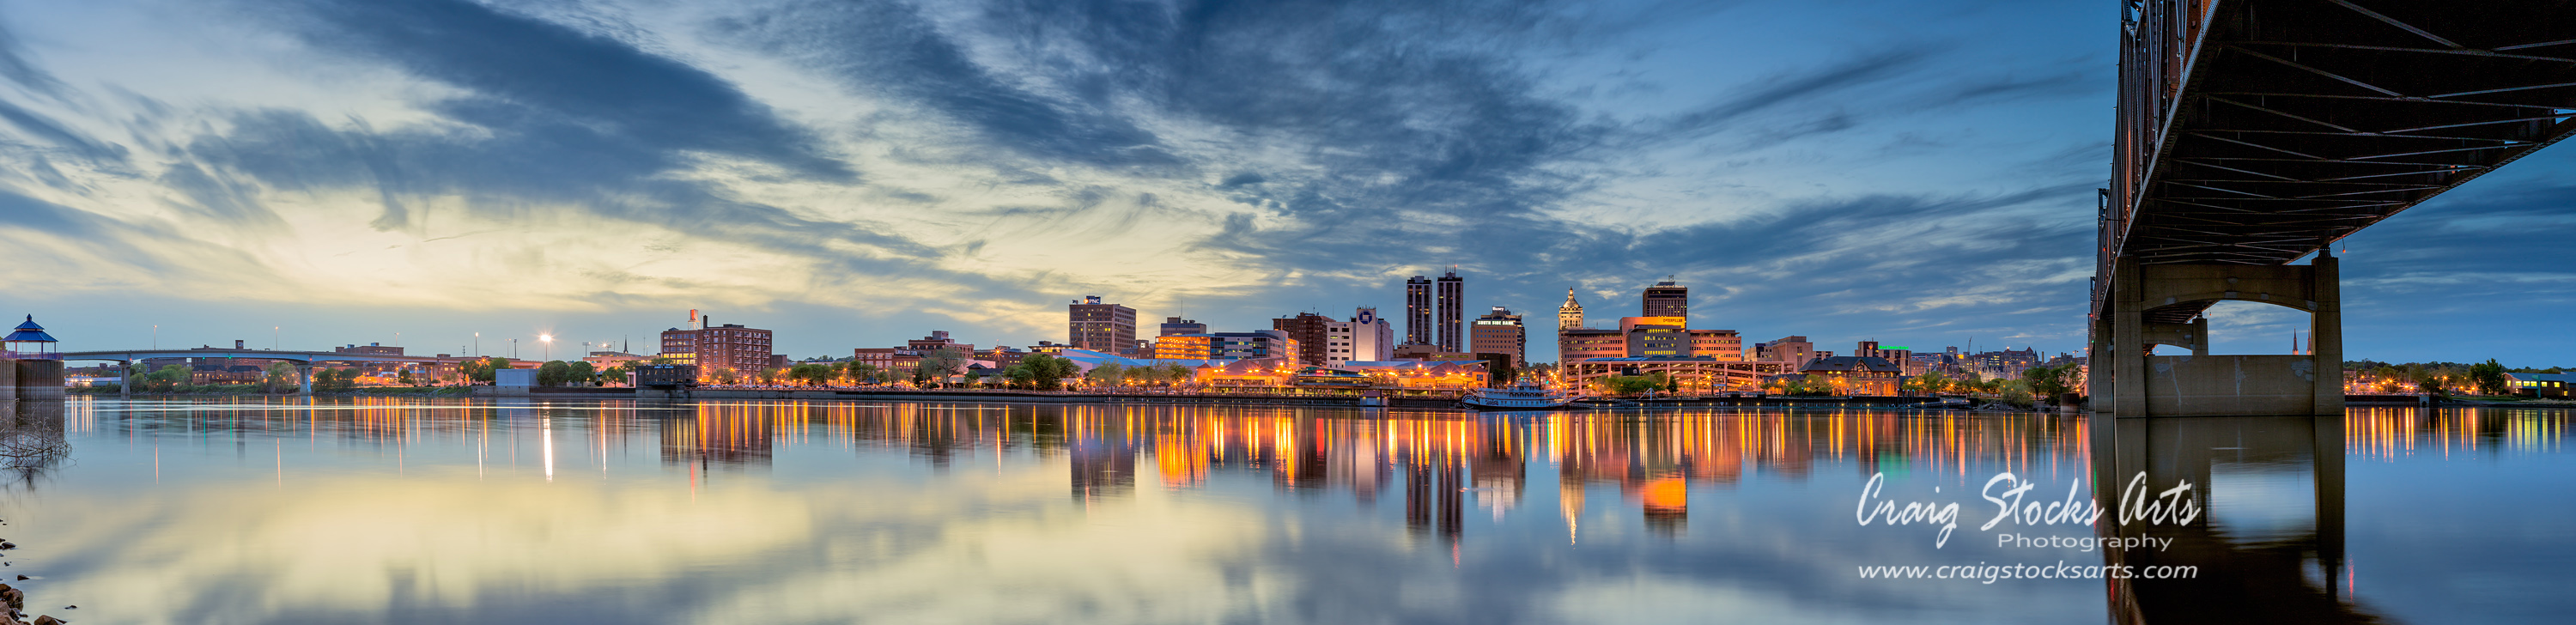
This image was stitched from five individual frames, each taken with the camera rotated for a vertical, or portrait, orientation. The result is a huge, 215 megapixel image that takes up nearly 6 gigabytes of space on my hard drive. The payoff for investing that many pixels and bytes is an enormous about of detail. It's hard to appreciate the detail in a web sized image, but you can click on the photo to see a larger version of the Peoria skyline.
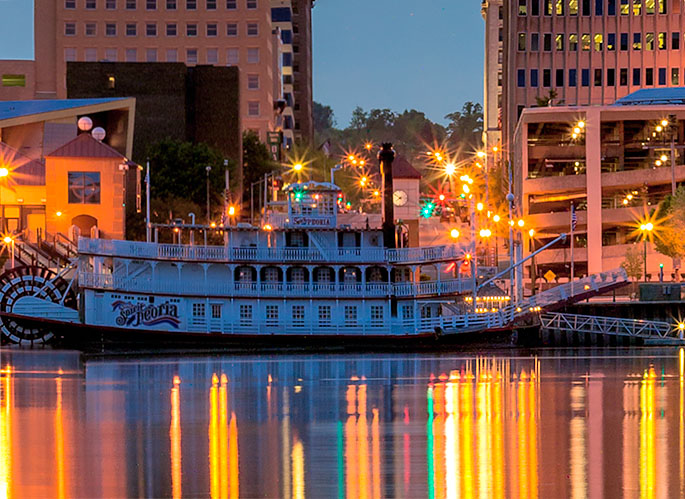
Also, look at the detail in this close-up crop from near the center of the image. You can easily read the time on the clock just beyond the the Spirit of Peoria. I'm not sure what I'd do with it, but I'd like to make a print 10 feet wide. I've noticed that people get entranced with very large, highly detailed photos and enjoy picking out the little details.
April
The Midwest has lots of streams and rivers, and so it also has lots of bridges. Last year I posted a photo of an old, abandoned bridge that's still across the Mackinaw River. Today's photo shows the Murray Baker Bridge which is where I-74 crosses the Illinois River between East Peoria and Peoria.
April
I posted a photo of the LA basin a few days ago, so this time I thought I should post a photo of Peoria, Illinois. Boy, what a difference a few million people make. I grew up in a small town just a few miles from Peoria, so it always seemed like the big city, and it's about 100 times larger than my current hometown of Delavan, Illinois.
It's funny how communities have their own personalities. As the home of the entertainment industry, Los Angeles is usually thought of as shallow and self-absorbed with a focus on glitter and glamour instead of substance. Peoria, on the other hand, has a strong agricultural and manufacturing history, and is known for its strong work ethic and family values. For years, people have asked the question, "Will it play in Peoria?"
April
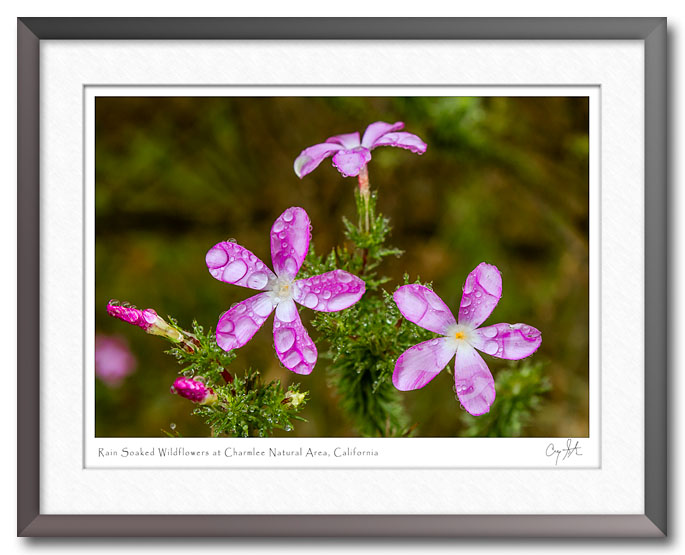
Here's one more photo from California. Rather than a grand scenic vista, this shows a small detail I found along the trail at the Charmlee Natural Area near Malibu. The day was foggy and misty. Even though it wasn't actually raining, everything was wet. You can tell by the size of the water drops how small these flowers are. I think these are a type of phlox known as Davey's Gilia, or gilia latiflora. Unfortunately, I'm not much of a flower person, so I don't really know for sure what they are.
March
I think this is my favorite image from Bryce Canyon National Park in Utah. If you want beautiful scenic landscape images, you have to go to beautiful places. And, you have to be there at the right time of day. And you need to have the right weather for the kind of photo you want. Given all of those requirements, it's never a sure thing. In this case, I got lucky on the first day, but that's unusual.
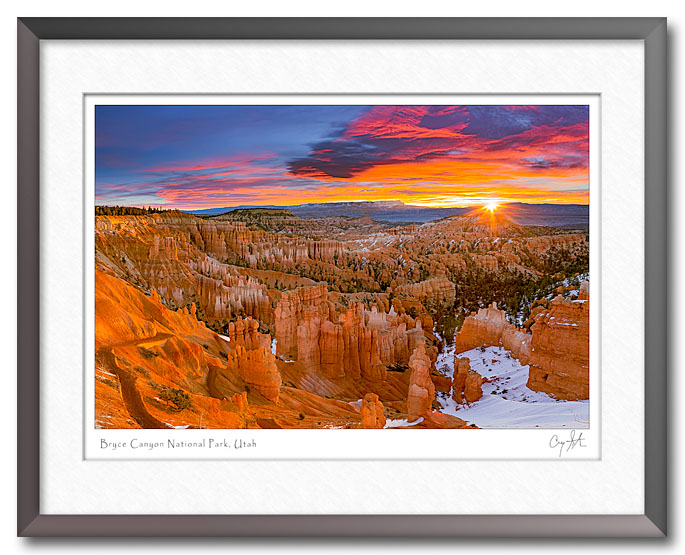
I was at Bryce Canyon National Park for four sunrises, but this was the only one that provided any clouds. Of course, I went out for the other three mornings as well, and I got some photos that were OK, but nothing this spectacular. I guess landscape photography can be a little like fishing. You won't catch a trophy fish on every cast, or even on every fishing trip. Unless you're very lucky, you'll need to go back to the same spots over and over until you get what you want. And even then, you'll keep going back to those same places see if you can pull out something even better.
Do you ever wonder how photographers like Peter Lik and Art Wolfe get those amazing photos? Certainly, they have mastered the technical aspects, and they understand composition. But the most important thing is they have to be at the right place at the right time. Knowing how your subject appears in the various seasons helps narrow down the time of year. And, weather forecasts can help further. But in the end, you have to keep going back over and over to find the trophy shot.
So, I'll keep exploring new places, but I'll also happily return to places I've photographed before. You never know what you'll find unless you go look.
March
One of the best views of the Los Angeles basin is from the Griffith Observatory in Griffith Park. Unfortunately, there isn't nearly as much available parking as there interest in the observatory, so many visitors end up parking along the along the street and walking up the hill. But it's well worth the effort. Light pol uti on has pretty much ended the serious use of the observatory, but there's still a variety of excellent exhibits and a world class planetarium. But still, most people come for the view.

The photo above is actually just a small part of a panoramic view of the LA Basin. The complete image would measure more than 10 feet wide when printed, and the detail is extraordinary. Be sure to click on the link or the photo above to see the full image.
March
This is the classic view of Zion National Park. By classic, I mean it's the photo that nearly every visitor takes. The view is actually from a bridge over the stream. There are so many competing for space that the park service has painted spaces along the south side of the bridge to designate spaces.
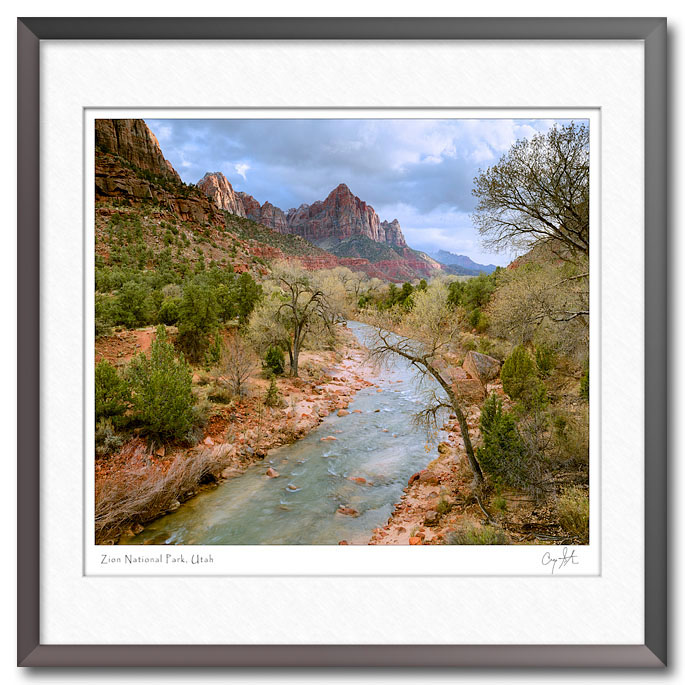
Fortunately, the day I was there there wasn't much of a crowd. I think it was a combination of cool, winter weather and heavy snow. The snow was just letting up, and very little of it actually stuck to the ground at the southern end of the park. As a photographer, we dream of being at a scenic viewpoint just as a storm is clearing at sunset, and I got my wish on this particular day.
March
Landscape photographers generally do most of their work at sunrise or sunset. Of course, one reason is the colorful skies that you may get, but that's not the only reason. Consider the three photos below. All three were taken looking north from the Bryce Point overlook at Bryce Canyon National Park. All are cropped to show roughly the same view. Notice how different they are. All three have been adjusted and optimized in Photoshop.
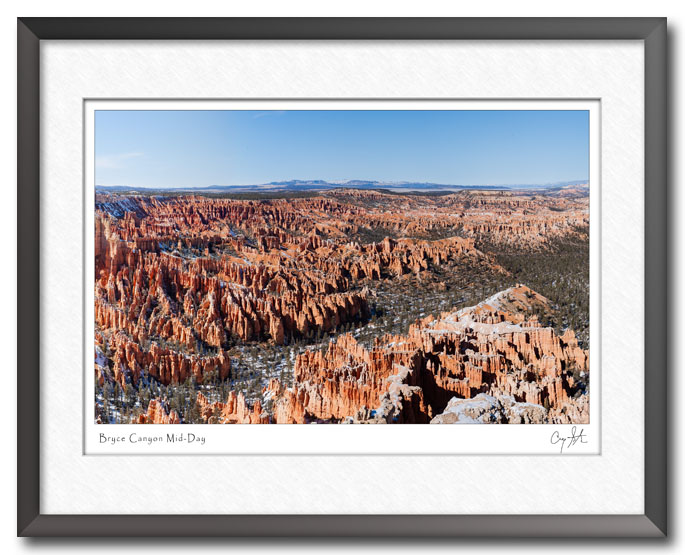
The first photo above is mid-afternoon. The sun is still high in the sky and behind me over my left shoulder. Since the photo was taken with a fairly wide angle lens, you can see the difference in lighting on the left side of the photo versus the right side. On the right side, the sun is directly behind me, so there are very few, if any, shadows to show the texture in the hoodoos. On the left side, the light is more from the side, so the shadows help to define the hoodoos and spires. The colors are OK, but the harsh lighting doesn't help the colors at all.
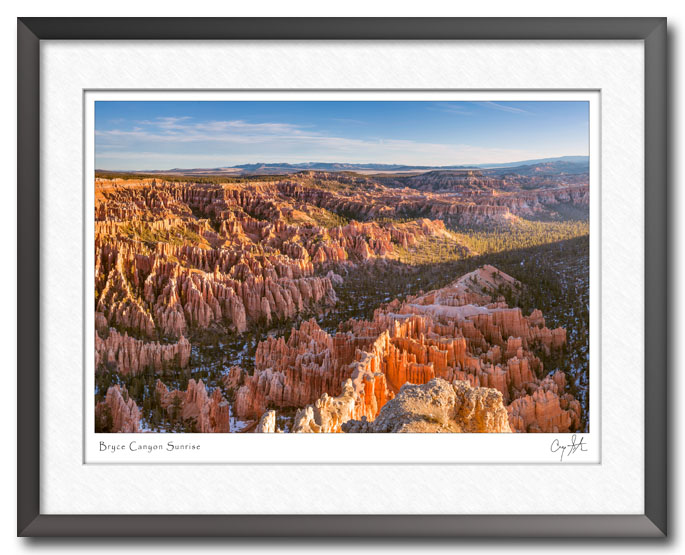
Now consider the second photo taken a couple days later at sunrise. In this photo, the sun is coming from the right at a very low angle. The combination of the side and low lighting really brings out the texture and you can see every hoodoo. Notice also how the colors are much richer. The early morning sun is much warmer in color, more of a yellow-red color, and that really makes the red colored limestone pop. Also, notice how the valley that runs diagonally from lower-left to upper-right is much more clearly defined. Compared to the mid-day photo, I think it's quite an improvement.
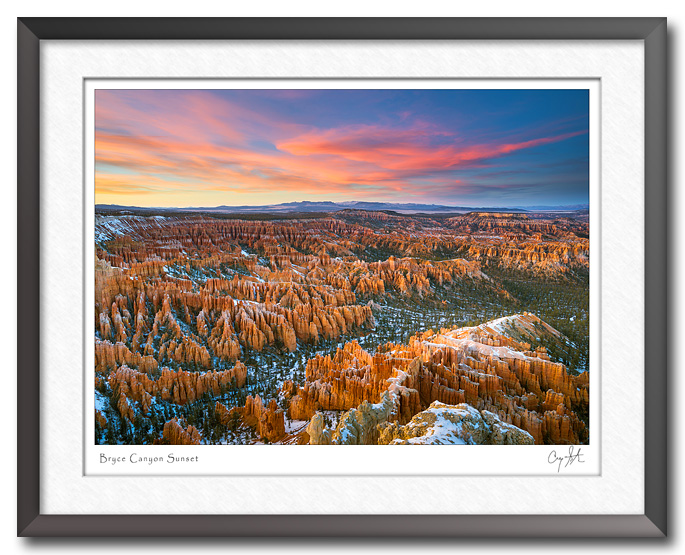
Lastly, consider the photo above taken at sunset. In fact, it was taken the same day as the mid-day photo, but about five hours later. The canyon is completely in shadow, so there isn't any harsh lighting. But, the light still has some direction so the hoodoos have shape and dimension. As an added bonus, the clouds that were just on the horizon at mid-day have now moved across the northern sky, and the setting sun is really doing a great job lighting them up. As a result, the canyon is actually being lit by the glowing red clouds in the distance, and that helps to accentuate the red colors in the limestone formations.
All three photos are an accurate representation of what I saw when I was standing at the overlook. But, I'd much rather have the sunset photo hanging on my wall. It's the same canyon, but it sure looks better.
March
Bryce Canyon National Park in Utah is a little hard to get to, but it's well worth the effort. Bryce is famous for its hoodoos, sandstone spires that create a labyrinth of trails and slot canyons. The geology here was formed millions of years ago at the bottom of an ancient sea. Over time, the plateau has raised up to over 8,000 feet above sea level. Wind and water erosion assisted by freeze-thaw cycles have created the amazing landscape we see today. I arrived just a day after a winter storm dropped about four inches of snow. The shapes and colors of the hoodoos is fantastic by itself, but when you add snow, it adds another dimension.
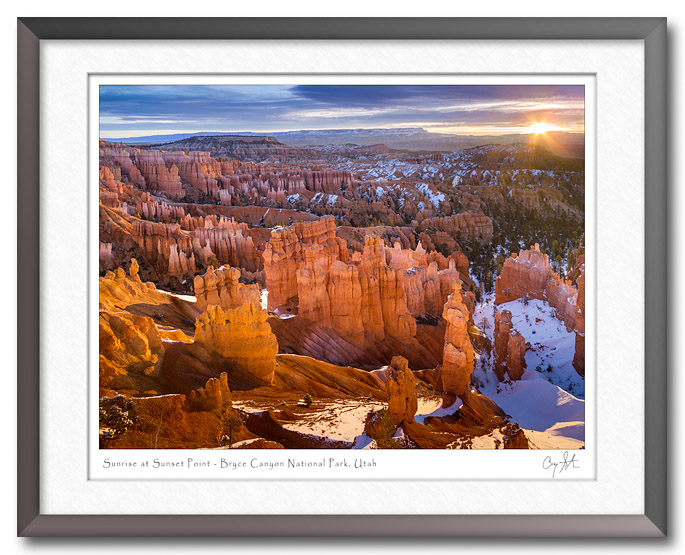
The photo above was taken at sunrise from Sunset Point. Notice how the hoodoos in the foreground seem to glow as they are being lit by sunlight reflected off the canyon wall. By using graduated neutral density filters to help darken the sky and the foreground I was able to capture the scene in one shot - no Photoshop needed.
March
Here's a twist on the photo I posted the other day. The two changes are pretty obvious. First, this version is black and white which puts more emphasis on the tones and textures. The other is that I added some light clouds to the sky. Now, I know many of you will say "that's cheating" and that's OK for you to feel that way. In my case, I'm presenting an image, and I'm not claiming that I captured a specific moment in time. If I were a photojournalist, I obviously wouldn't change the sky. If I were a painter, nobody would every ask me if that's exactly the way I saw the waves and clouds. As a digital artist, I feel I'm more like the painter than the photojournalist.
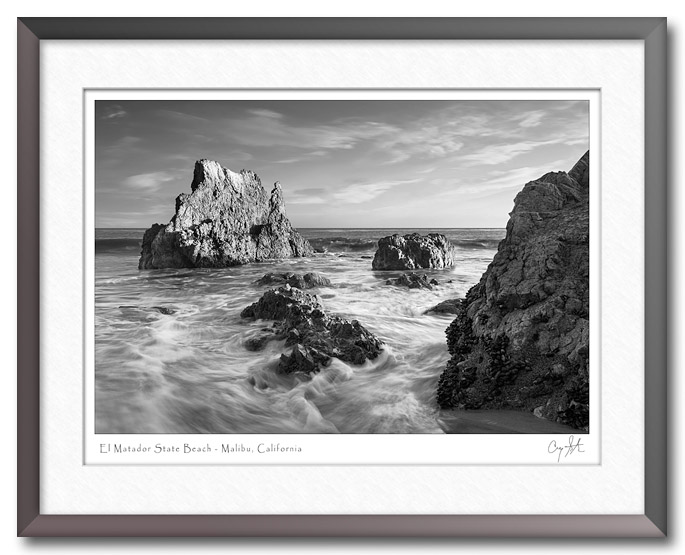
I do find it particularly interesting that this version of the image has such a different feel. While I normally lean toward strong colors, in this case I believe I may prefer the black and white version.
March
Here's another photo from El Matador State Beach near Malibu. This photo was taken a littler earlier, about a half hour before sunset. I love the way the warm yellow sunlight glows on the rocks and creates a pleasing color contrast with the blue sky and water. Even though it's a very simple composition, I like the subject, the balance, the sense of motion of the waves and the color contrast.
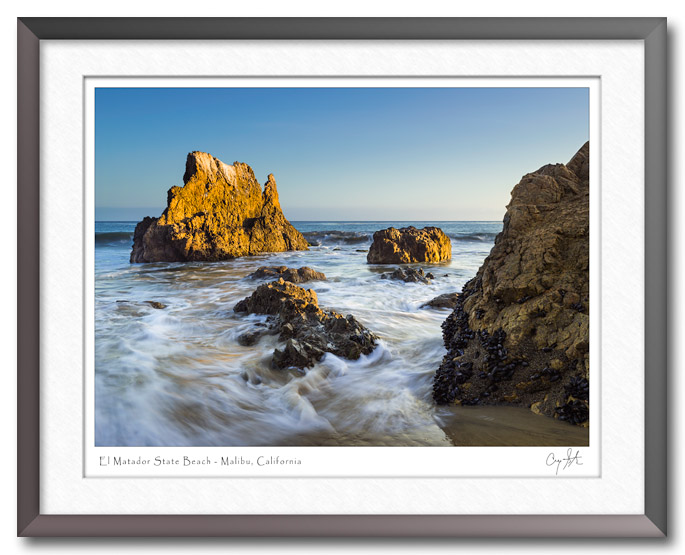
There are two technical issues worth discussing on this photo. The first is obvious - the movement of the water is blurred which give it a soft, foamy appearance. Generally, when you're photographing moving water you want to use as slow a shutter speed as possible to create the soft lines. In this case, I used a shutter speed of 1/5th of a second which was just barely long enough. Obviously, you need to use a tripod to hold the camera steady. Then it's just a matter of waiting for the waves to wash in and take lots of frames. I find it hard to predict exactly what I'll get with each exposure.
The other technique is using a graduated neutral density filter to balance the foreground and background. A graduated ND filter is usually square or rectangular, and half of it is a somewhat dark shade of gray so that you can position the dark portion of the bright part of the image. It's especially useful when the sky is bright but the foreground is dark, or in a shadow. I find I use one on at least 80% of my landscape photos.
March
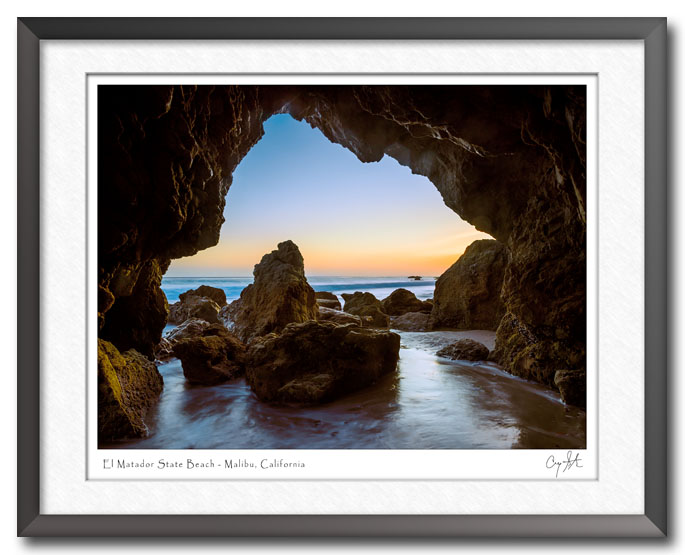
El Matador State Beach is located about 10 miles up the coast from Malibu and is a wonderful spot to enjoy a sunset. This stretch of beach is rather small, but the rock formations and coves make it well worth the effort. There are several large formations with holes or tunnels at the base. For the photo below, the I'm shooting through an opening that's about 4 or five feet high, so the camera is actually set pretty low.
March
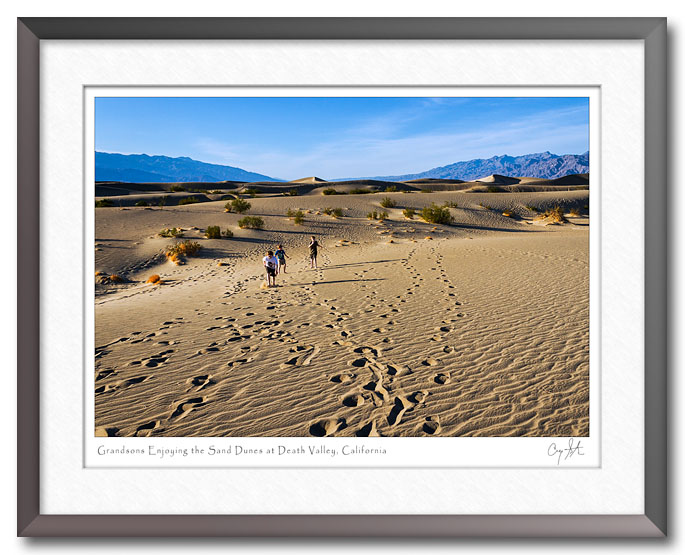
My daughter and her family finally made it to California for a visit and a vacation. I think everyone had a great time, although the first couple of days were affected by some apparent food poisoning they'd picked up somewhere in the San Francisco area. By the end of the week, everyone was feeling fine, and the boys were ready to romp in the sand dunes at Death Valley.
March
The Valley of Fire State Park is located about 40 miles north of Las Vegas and is Nevada's oldest and largest state park. If you're in the Las Vegas area and have some time for nature, I highly recommend the trip. The main attraction is the intense red color in the sandstone rock formations, but the park also has a number of large concentrations of petroglyphs.
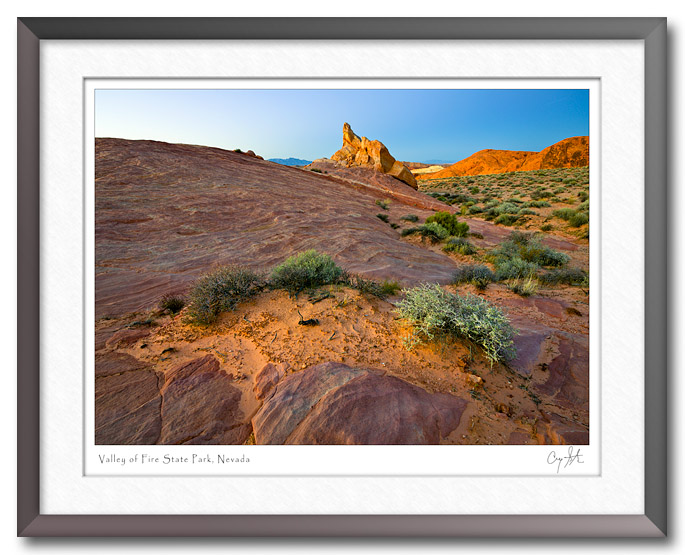
As usual, I went out for a sunset photo shoot. Unfortunately, there were two factors working against the photographers. First of all, there wasn't a cloud to be found anywhere, so there weren't any spectacular colors in the sky. The second problem was that most of the park closes at sunset, and the rangers were there to chase us out shortly after the sun went down.
I can certainly understand why parks feel the need to close at sunset - rangers want to go home to their families, and sunset is a very easy time to define. But for photographers, some of the best light actually comes after sunset (or before sunrise). In fact, my favorite time is during civil twilight, which is around a half hour before sunrise or after sunset.
The photo above was actually taken shortly after sunset, and just before I had to pack up and leave. There's nothing going on in the sky, but the colors, shapes and patterns in the rocks provide plenty of interest. With or without clouds, sunset is still my favorite time of day for landscape photography. The quality of light and the colors can be spectacular.
February
Big Sur is one of our favorite areas. It's regularly voted one of the most beautiful drives in the world, and I certainly agree. Last weekend we made the drive from Monterey to Cambria, which covers the area "officially" considered Big Sur. The photo below is a stitched panorama taken from the overlook at McWay Falls. And yes, the water really was that color.

February
Remember the TV show MASH? The show followed the antics of a group of surgeons from the 4077th Mobile Army Surgical Hospital in Korea in the 1950's. Of course, it wasn't filmed in Korea, it was filmed in sunny Southern California at 20th Century Fox's Century Ranch. Today, the movie ranch is the Malibu Creek State Park, but the MASH filming site is one of the highlights. It a fairly easy 2.5 mile hike through some beautiful scenery to get to the site, and it's well worth the effort.
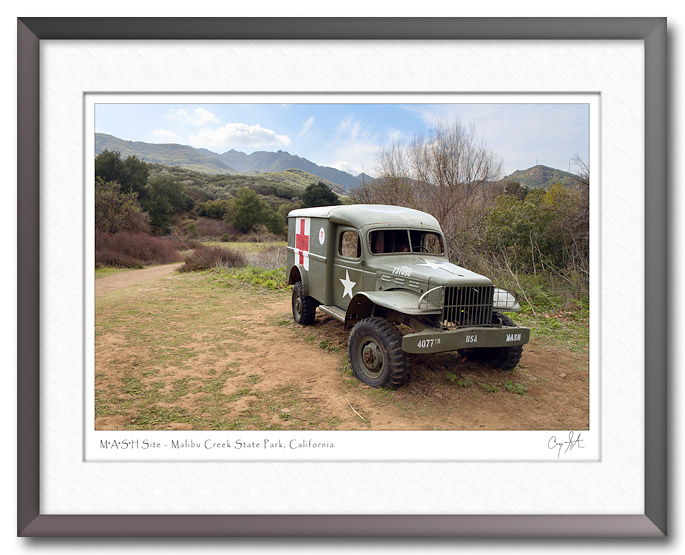
The scene pictured above presents the sort of challenge you frequently encounter. The sky is very bright compared to the foreground, and a camera can't properly expose both the bright sky and the darker foreground all at once. One solution is to use a graduated neutral density filter, but in this case, I didn't have one with me. When we're hiking, I normally just carry a small camera and no accessories.
Another common approach is to take two exposures and blend them using Photoshop. Ideally you should lock the camera onto a tripod, set the lens to manual focus and the exposure mode to Aperture Priority and then carefully control the exposure compensation or turn on automatic exposure bracketing. But, for a simple scene like this, I've found I can take some shortcuts and still get good results.
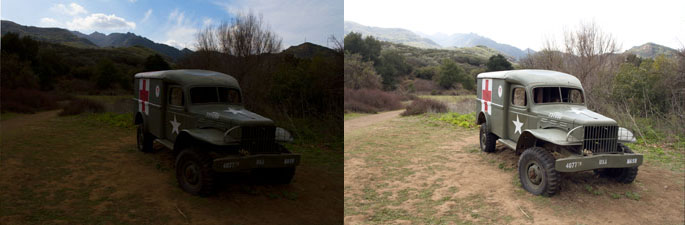
Most modern cameras use a half-press of the shutter button to lock the exposure, and the exposure calculation is based on what's in the frame at the time. That allows you to frame a scene, half-press the shutter to set the exposure and then recompose the frame. In this case, I frame the scene to include mostly sky and half-press the shutter so that the camera calculates the exposure for the sky. Then, I recompose to get the scene I want in the frame and take the first frame (the dark one). Then I fully release the shutter button and take a second frame without moving the camera. The exposure for the second image is then calculated mostly for the foreground and that results in the lighter frame.
Then, it's pretty straightforward to open the two images as layers in Photoshop, use the auto-align function to make sure they're aligned and then use a layer mask to blend the two together. You do need to be careful that the sky doesn't end up too dark. In this case, I ended up lightening the sky exposure frame a little bit to give a natural appearance. You still want bright regions to appear bright and dark areas to be dark for the photo to look right..
For more details about the process in Photoshop, check out my new Photoshop video tutorial.
February
I love our National Parks. On Saturday, the Santa Monica Mountains National Recreation Area offered a free program by Park Ranger Anthony Bevilacqua discussing the importance of art and photography in the parks. You probably know that Yellowstone was our first national park when it was established in 1872. But you may not realize that the paintings of Thomas Moran and the photographs of William Henry Jackson were instrumental in the park's creation. Few, if any, of the congressmen would ever see the Yellowstone area, but they were able to see and appreciate the images.
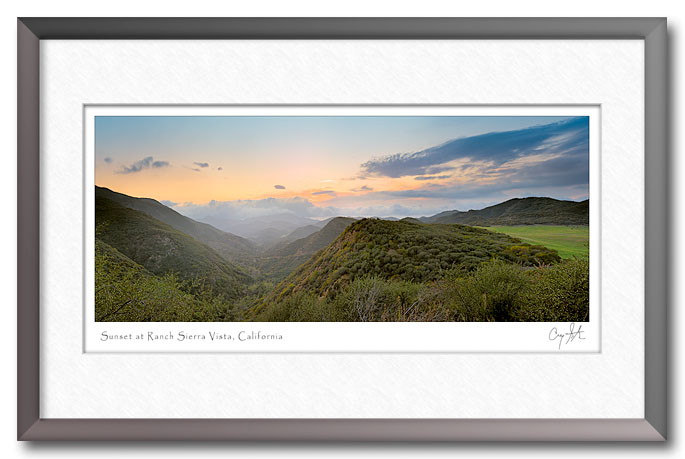
Later that day, the Anthony hosted a sunset photowalk at Rancho Sierra Vista. We found the view shown above and decided to stop there and wait for sunset. The clouds were coming and going, and even though they weren't perfectly positioned at sunset, they still created a beautiful view to create the scene above.
There are two interesting aspects to this photo. First, scenes like this are very difficult to capture with a camera because of the drastic difference between the bright sky and the much darker foreground. We can easily see both with our eyes, but cameras are much more limited. In this case, I used a graduated neutral density filter to reduce the exposure in the sky, sort of like putting sunglasses over the top portion of the frame. That allows me to capture the details and colors in the sky and still be able to see the detail in the hills in the foreground. Check out my graduated neutral density tutorial on YouTube for more details about how they work.
The second point of interest is that the image is actually composed of several separate frames taken in quick succession. By stitching the images together in Photoshop I can create a much higher resolution image. In this case, the total image is roughly 11 feet wide by 4 feet high - that's a total of 335 megapixels! Of course, you can't see all of that detail in a small web image, but you can see a larger version of the photo here.
February
Deb is my wife, my partner, my best friend, the mother of our children, and my Valentine. Nearly 36 years ago we took the plunge and got married and went to Minnesota for our honeymoon. We both like the outdoors and we had a wonderful time fishing in one of the most beautiful lakes I've ever seen. At the time, Deb was still in nursing school and I was struggling to make a living as a photographer. We didn't have money, but we had love - and that was enough.
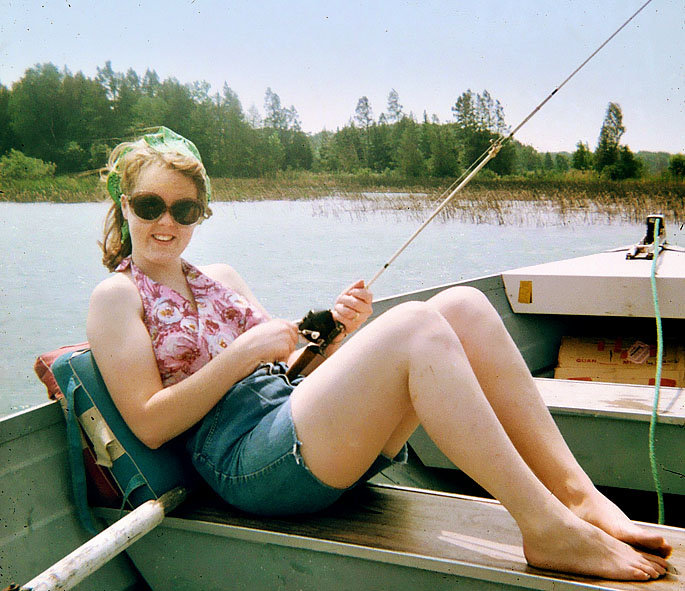
I knew I loved her, but I didn't yet appreciate what a great life partner she would be. She supported me when I took the plunge to go back to college and begin a completely new career. She gave birth to our two wonderful children and proved that she's as good a mother as she is a wife. She follow along when my job took us to Mississippi, and then to South Texas and Mexico. Later, she supported me in our decision to begin retirement so that we could explore the country, starting in Arizona and followed by Boston, San Francisco and Los Angeles.
So, today I want to say how thankful I am to have found the perfect partner. I feel extremely fortunate to have Deb in my life. She's my Valentine today and every day..
February
Here's another photo from my recent road trip. This was taken at sunrise on the Mesquite Flats Sand Dunes near Stovepipe Wells in Death Valley. It's actually a very wide panorama made by stitching together several individual images to give a nearly 180 degree view. The sun was just barely above the horizon and the very low angle of light really brings out the texture in the sand. We were also fortunate to have some clouds that echo the the texture in the sand.

February
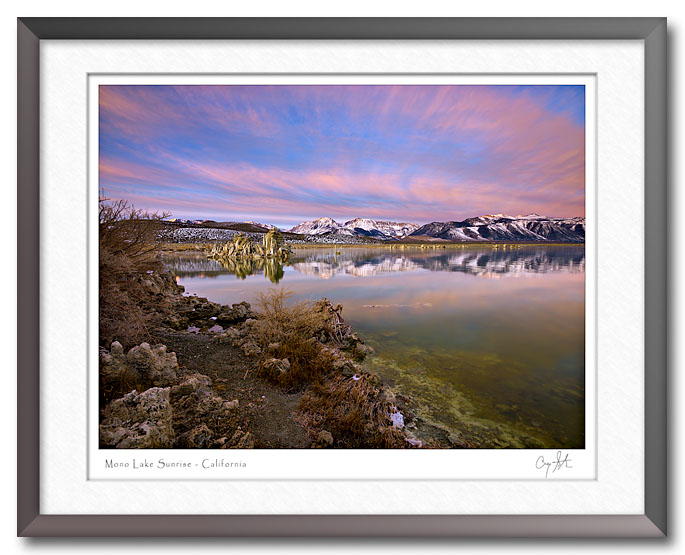
I love a road trip. This one stretches from Mono Lake in West Central California to Death Valley. Mono Lake is well known for its tuffa formations which were formed on the lake bed thousands of years ago. Now that the lake level is much lower, the formations are visible above the water level. We were fortunate that we had a very nice sunrise on Monday morning. It was another case where there weren't any clouds to speak of when we left the motel, but some wonderful clouds moved in just as the sun was rising above the mountains.
February
Here's another photo from Christmas morning at the Alabama Hills near Lone Pine, California. When I arrived, the sun hadn't yet come up over the horizon, but there was a strong orange glow in the east, which is camera left in this photo. The shadow areas were lit by the blue sky overhead, so the result was a strong color contrast between the yellow light on the highlight side and blue light on the shadow side. This photo is looking to the west toward the eastern slope of the Sierra Nevada mountains. I believe the highest peak is Lone Pine Peak, and Mount Whitney is out of the frame to the north (right).

January
This is one of the photos from my recent visit to Yosemite National Park. The view is sunrise from the Tunnel View Overlook, and it's said to be the most photographed vista in the park / nation / world, all depending on who's making the claim.
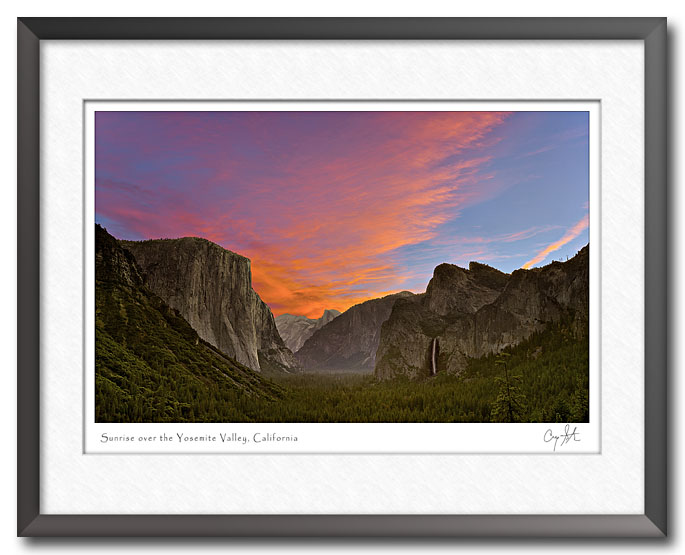
One of the interesting aspects of the image is the bright colors of the sunrise. If you're not a photographer, you probably don't think much about color, but if you're trying to produce high quality photos and prints, then the details are important. The problem is that colors in the digital world are not all the same. The picture probably looks different on your monitor than it does on mine. And it's not just the colors, if your monitor can't display the colors correctly, then you probably just see a blob of orange color and don't see the fine details in the wispy clouds. For a quick glance at a photo on a blog, it's not all that important. But, when I make a 16 X 20 or 24 by 36 inch print, I want all of the detail in the clouds.
After working with this and similar photos, I decided to post a new video tutorial explaining more about the problem - what causes it and how to deal with it. If you're interested, please take a look.
January
I recently had the opportunity to spend a few days in the Tampa / St. Petersburg area in Florida. That gave me a chance to visit the pier in Fort De Soto Park at sunset. I've been here a few times before and always find it fascinating. You may recall another photo of the Fort De Soto Pier that I posted some time ago.
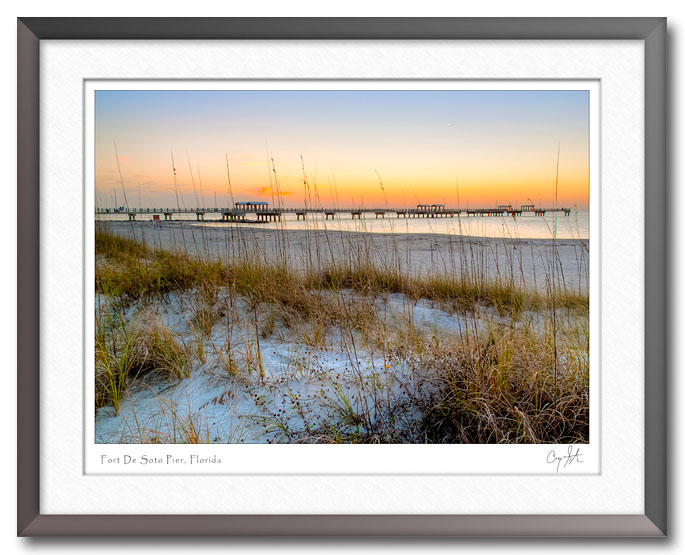
The beach and pier are a great location for sunset photography. For the photo above, I was standing on a boardwalk that extends from the parking lot to the beach, so I didn't need to go tromping through the sea oats to get a good vantage point. As you can see, the boardwalk is well positioned to include the sea oats and small dunes as foreground elements while the sun is setting behind the pier. The result is several layers of interesting elements - dunes, sea oats, beach, water, pier and clouds.
January
Here's another photo from the Alabama Hills area on Christmas morning. This rock formation is known as the Mobius Arch and it shows up in lots of places. You can see a short video about the arch here.
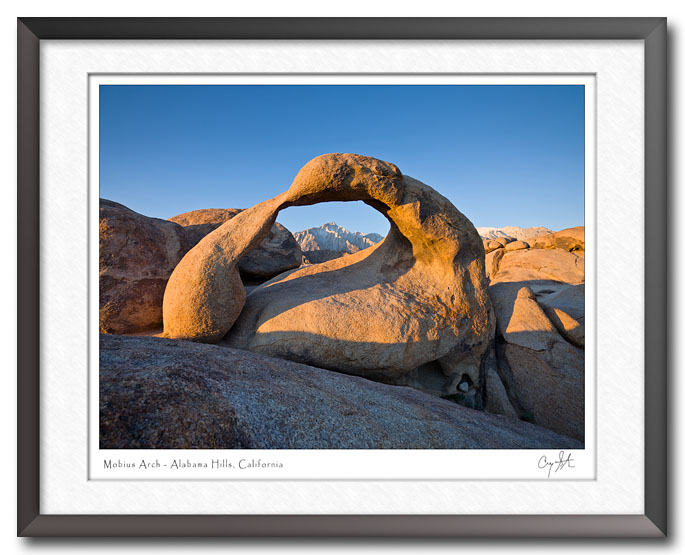
You may have never heard of the Alabama Hills, but I'm sure you've seen it in movies and TV commercials. I've seen a number of locations where the old westerns were filmed, such as the Iverson Ranch where the Lone Ranger rock is located, and Vasquez Rocks, but the Alabama Hills area is unique because it is a much larger area. The rock formations at the Iverson Ranch covered several acres, where the Alabama Hills area covers several square miles. It's easy to see why it was such a popular location.
Since I grew up in the Midwest, my perception of the old, Wild West was formed by the movies and TV shows I watched as a boy. It seems like every western was filmed in and around these rock formations, so I thought the entire West looked like that. The reality is that there are just a few isolated areas with rock formations, and most of the West is flat, high desert. The rock formations make a dramatic setting, but they're not really typical of the area.
January
It's a new year, and I'm posting a completely different kind of photo. I had the pleasure of doing a photo shoot with actor, model and artist Tania SalasPlatt the other day. She's a little unique in that she rides a motorcycle instead of driving a car. I've ridden motorcycles in the past, but I can't imagine riding it the traffic here. But Tanya says she's more comfortable on a bike than in a car since that's what she's used to.
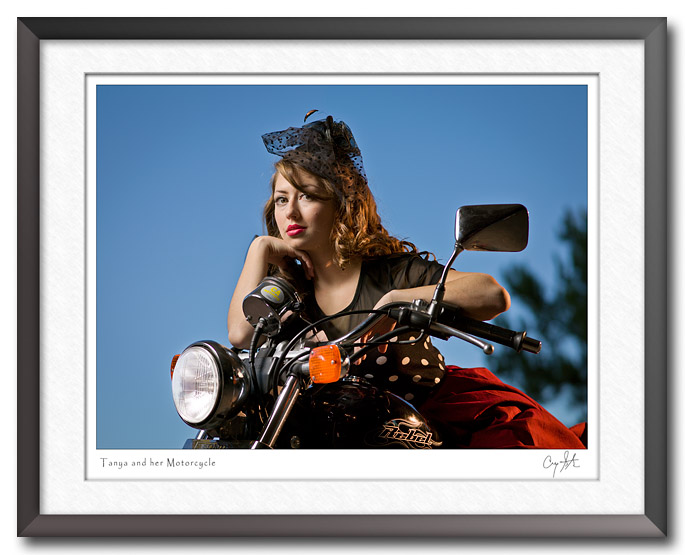
We had a great time doing the photo shoot, and I think she got some photos that she'll be able to put to good use.. Of course, we used the motorcycle as a prop for a number of the shots. She was an absolute pleasure to work with, and she was extremely prompt and professional. If you're in the market for an actor or model, I'd certainly recommend her.
December
This photo was taken Christmas morning at the Alabama Hills near Lone Pine, California. Numerous movies and TV shows were filmed there. Most recently it's featured in Subaru commercials where the car is lost in the rocks. Of course, most of the movies were westerns, and the rock formations bring back my childhood memories of pretending to be a cowboy in the old west. When I look at this scene I can sure imagine "bad guys" hiding behind the rocks. Or, maybe I'm the bad guy using the rocks as my hideout. Either way, it's easy to imagine yourself inside the image.
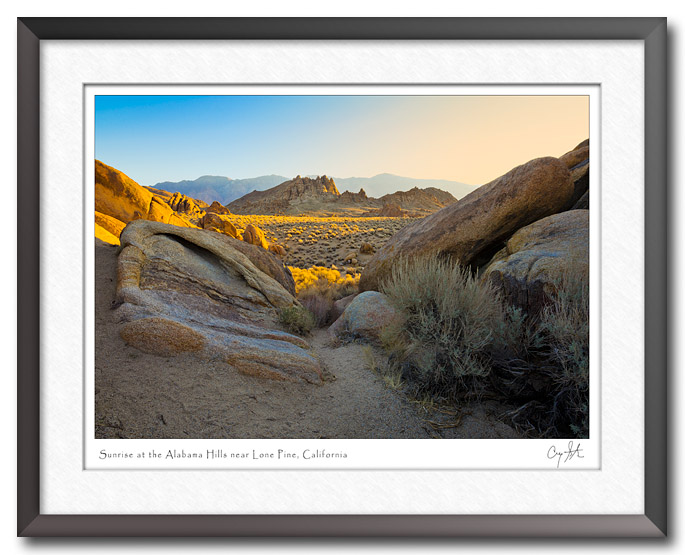
This image is a good example of why landscape photographers like sunrise and sunset. Since there weren't any clouds that morning, the sunrise wasn't very spectacular. But once the sun is up, its low angle create lots of texture in the landscape, and there's a great deal of warm/cool color contrast between the shadows and highlights. Everyplace the sun is shining is turned a bright red-gold color while the shadows take their color from the bright blue sky.
December
We spent Christmas weekend on a whirlwind tour, first to Las Vegas and then through Death Valley on our way back home. I've been to Death Valley a couple of times before and I always enjoy it. It's not necessarily my favorite place, but it's a favorite place for photography. I think it's because there are so many easily accessible locations that can easily produce a good photo.
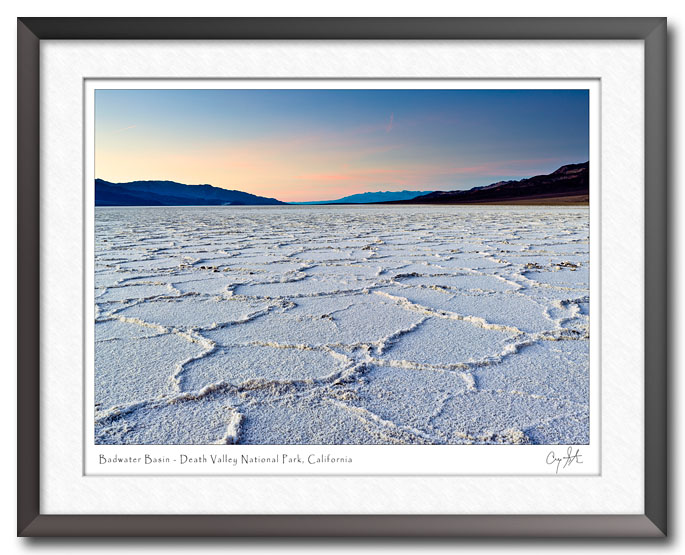
Of course, you're still depending on the weather to produce a great shot. The weather in Death Valley on Christmas Eve was a clear blue sky and moderate temperatures. While it was great for hiking, it wasn't ideal for a sunset photo shoot. Undaunted, I made the trek out onto the salt flat at Badwater Basin to enjoy the sunset. As it turned out, there were were a few wispy clouds to the north that provided some nice pastel colors in the civil twilight period after sunset.
December
I've had mixed emotions about posting this additional photo from Vasquez Rocks. While some photos seem to simply fall out of the camera ready to print, this one has had hours of work in Lightroom and Photoshop. All of the work was to shape the colors and tones - nothing was added or removed. The photo was taken shortly after sunset so the light was very flat. But the sky had some nice pastel colors which created an interesting backdrop for the rock formations. The end result is a nice play of shape and color.
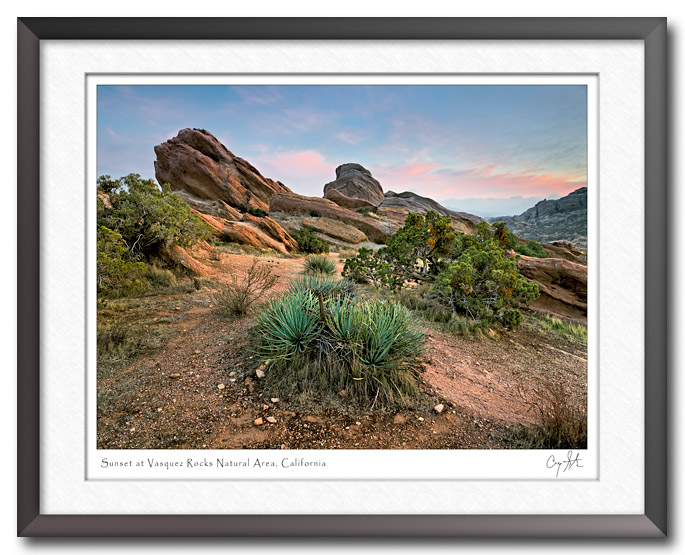
I almost didn't have the chance to take the photo. This time of year the Vasquez Rocks park closes as 5:00 PM (or at sunset depending on which sign you read). Sunset was at 4:42 so there wasn't much time before they locked the gates. I was on my way back to the car when I stopped to chat with a fellow photographer, who was also wrapping up. As we talked we noticed the twilight colors developing and rushed back for a couple final shots. I made it back to the car just as the ranger was coming by to herd the stragglers to the gate.
December
One of the most fascinating places near us is the Vasquez Rocks Natural Area, about 20 minutes from our apartment. You may not know the name of the location, but I'm sure you've seen it in numerous movies and TV shows such as Star Trek and The Flintstones. The area of uplifted rocks was shaped by movement along the San Andreas Fault.
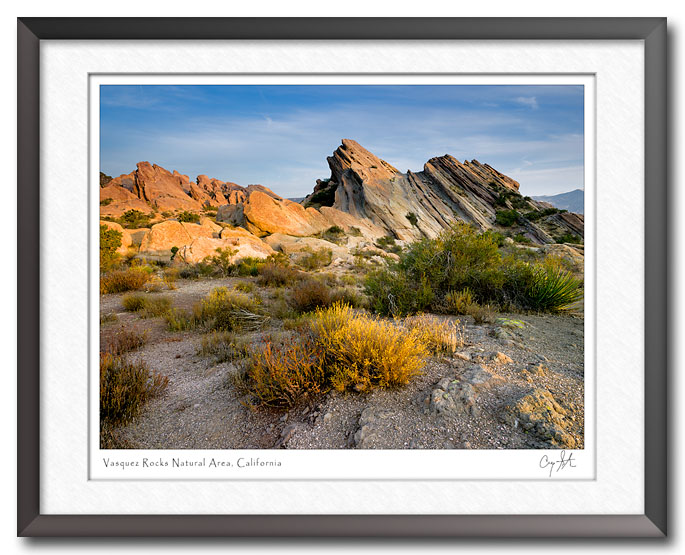
We had been there before and decided to go check it out at sunset the other day. There was a storm system moving in and I hoped that we'd get some dramatic skys. The dramatic skys never materialized, but the warm yellow late afternoon did a great job of making the reddish rocks really pop with color. That's one of the reasons landscape photographers love sunrise and sunset times of day. The warm red-yellow light streaking low across the landscape is nicely contrasted by the blue light from the sky illuminating the shadows. The low angle of light brings out the texture and creates the very dramatic color combinations.
December
This picture violates one of my rules for sunset photography, but I like it anyway. My rule? Even though most of my landscape photos are taken at sunset, I try to avoid photos that are just about the sunset. I try to approach sunset (or sunrise) as a time for photography rather than the subject. But this glowing cloud was so extraordinary that I couldn't resist. Believe it or not, this is really what it looked like. In fact, I had to cut back a little on the intensity of the orange cloud so that it would retain the details in its texture.
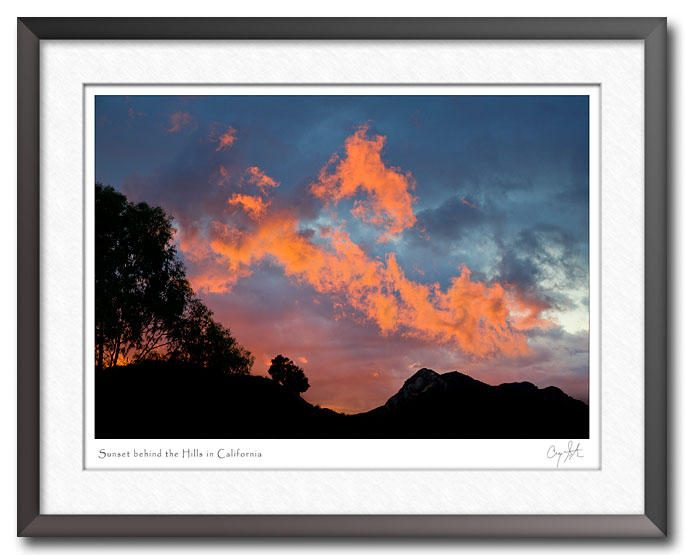
The photo was taken right outside of our apartment. I couldn't help but notice the sunset as I was walking back from the mailbox, so I quickly grabbed my camera. The hills at the bottom of the frame and the trees on the left create nice framing elements and give the photo an abstract feel.
December
Grandpa (that's me) is baby sitting (that's him below) today while my son and the rest of his family are at Disneyland. The consensus opinion was that six month old Cohen wouldn't really enjoy the land of Mickey, and I'm the lucky one who gets to spend a day or two with him.
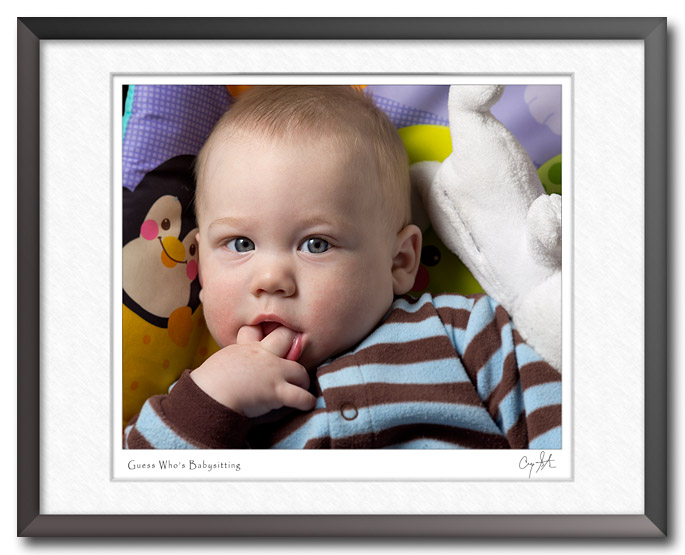
So, he and I talked about how to spend the day. We watched a little TV, talked about life, and frankly, he was hitting the bottle pretty hard. Eventually, the camera came out of the closet and we ended up doing a quick photo shoot. Maybe I'm not completely objective, but I think he makes a great model. The photo itself is pretty basic - one strobe through an umbrella from camera left and a white Teddy Bear camera right serving as a reflector to provide some fill.
December
I've said it before, but I sometimes like to revisit an image and process it again. The photo below is from Jasper National Park in Canada. I recently went back to the original capture and played with different approaches. I've always liked the image, but I've never been completely satisfied with the result. This time, I tried a black and white version, and I think I like it better.
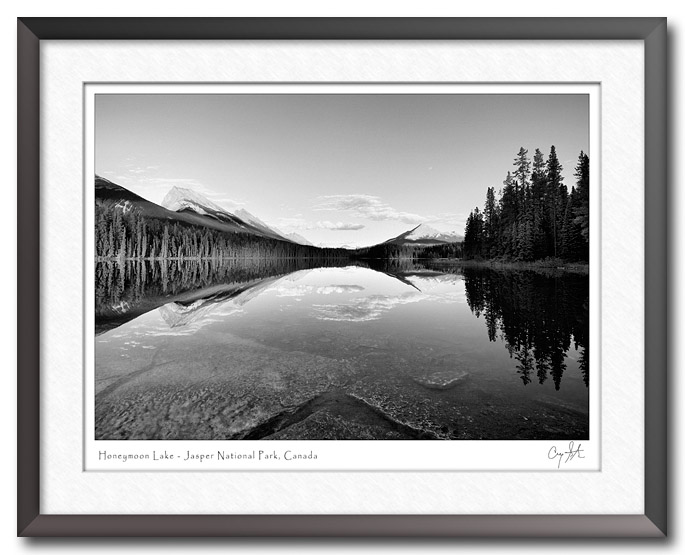
One of the interesting features in the photo is the flat rocks in the foreground. The water was very shallow there, so the rocks are only a few inches below the surface. I like the texture and the way their shapes mimic the mountains, but their color tended to clash with the blue sky. In the color version I just let the overall blue reflection overpower the color and texture of the rocks. But in the black and white version, I was able to fully reveal the texture and shape of the rocks, and I like the way it compliments the rest of the composition.
By the way, if you haven't been there, I strongly suggest a trip to the Canadian Rockies. They are much more rugged dramatic than their US counterparts, perhaps because they are younger in geological terms.
November
I was home visiting family over Thanksgiving, and we decided to spend our Black Friday on the golf course. It was a really special event for me since we had a foursome made up of four generations. Pictured below (left to right) are my grandson, Chase, my son Chris, myself and my father, Clarence. You might also have picked up on the fact that all of our names begin with 'C.' Chase is actually my daughter's oldest boy, so it's not a linear four generations, but it's still four generations.
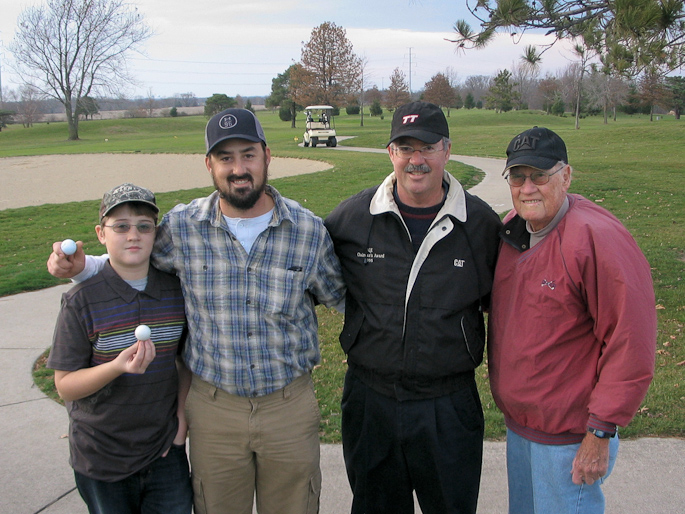
This was Chase's first time on a golf course, and we were all amazed at how well he did. He hit a number of really good shots, and rarely had a bad shot. With some training and practice I think he will be a pretty good golfer.
November
When I first started adopting digital photography processes in the mid-1990's, I was immediately drawn to its power. Since 2005 I've been exclusively using digital cameras and processes, and I definitely like both the process and the results. But, I also see lots of folks who prefer the process and look of film, which left me wondering why I preferred digital.
Before I continue, let me say up front that this post isn't about film versus digital. That's one of those arguments where no one wins. Rather, it's about me, and why I've finally concluded that I prefer digital. As it turns out, my exercise in introspection helped me understand other aspects of my taste as well.
Consider woodworkers for a moment. There are two rather sharply divided camps - those who prefer working with hand tools and those who prefer working with machine tools. I'm the type who works with machine tools. When I build something, I'm looking for the mechanical precision that power tools provide. Others prefer the more organic results that result from hand tools, but that's just not my taste. I do find it ironic that the goal of most hand tool woodworkers is to be able to produce perfectly flat surfaces and perfectly mating joints. Of course, that's an area where machine tools excel, but the hand tool woodworkers view those as cheating.
It turns out that taste in photography is very similar. Film and wet-chemistry processes provide a more organic result. There are built-in characteristics that end up in the finished print. And, the "best" photographers (think Ansell Adams) have perfected their processes so that they can mold and control many of those characteristics. Digital processes give us the tools to fine-tune just about any characteristic of the image that we want. It takes a lot of skill, practice, training and time to do it well, but the end result can be an image with all of the organic artifacts cleaned up.
So, digital photo processes are a lot like using woodworking machine tools. It allows you to produce results with mechanical precision that is difficult or impossible to achieve with manual processes. Of course, buying a table saw doesn't immediately create good designs, much less guarantee straight cuts or properly fitting pieces. Likewise, buying a digital camera and Photoshop doesn't immediately generate good photos, it still takes a lot of skill.
November
I haven't done much new photography lately, so I'm posting another photo from Yosemite. This is a view of the Yosemite Valley viewed from the Glacier Point Overlook 3,000 feet above the valley floor. It's a completely different perspective on the valley. When you're in Yosemite Valley it's certainly awe-inspiring to look up at the granite walls, but you never get to see the whole valley. When you get up above the valley floor you really get to see the size and shape of the valley.
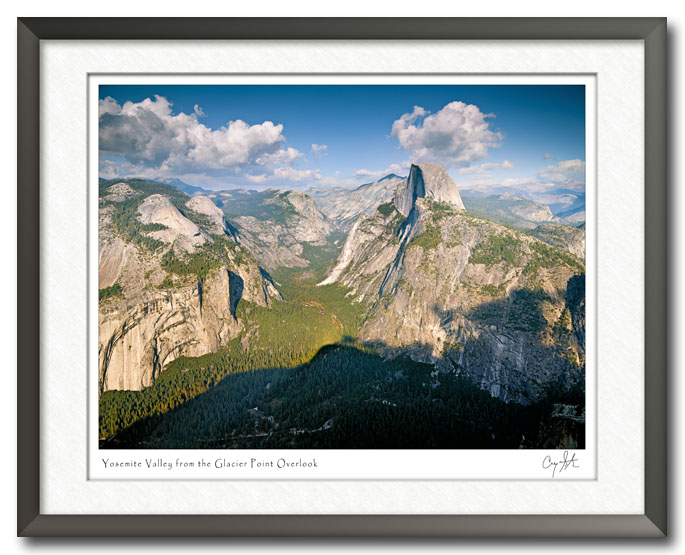
One of the great aspects of this viewpoint is the clear view of the iconic Half Dome formation on the right side of the valley. It's a very distinct landmark, and you can immediately recognize it in photos and know you're looking at a photo from Yosemite. While it looks like a round sphere that has been cut in half, geologists believe that it never was a whole dome.
November
I've finally recovered from a dead computer, so I'm celebrating by posting another photo from Yosemite. My computer died during my trip to Yosemite, which left me unable to review my photos. Fortunately, my daily routine includes running a backup of all the photos I've just downloaded before I clear out the memory cards, so I didn't loose any photos. But, it's still quite a hassle to install everything on a new computer. If you don't have a regular backup routine, I strongly urge you to get started right away.
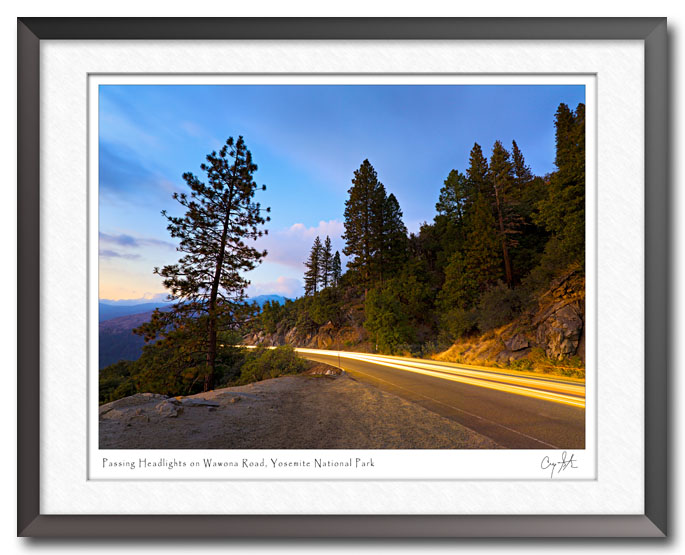
This was a fun photo. I was returning from Glacier Point at sunset and was hoping to find a good spot along the road. However, the Park Service was doing a number of controlled burns in the valley which created a lot of haze. The result was stronger colors, but lack of definition and I didn't really get anything I was happy with. So, after the sun went down, I set up to do long exposures as cars passed by to create the streaks of light from the cars' lights.
October
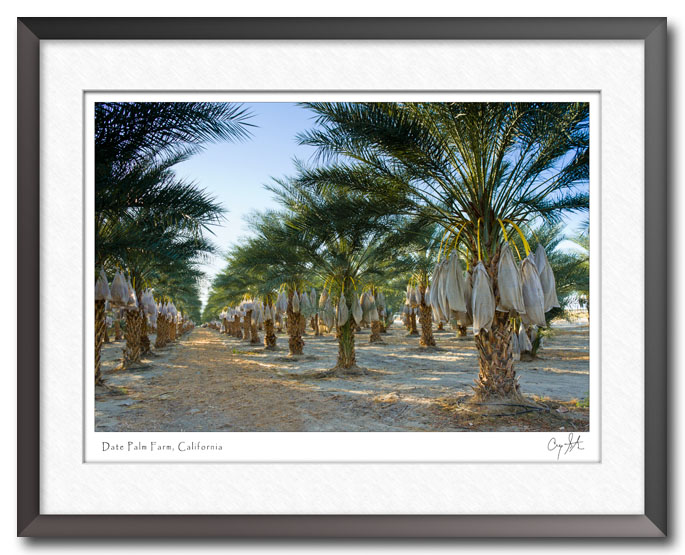
Here's a quick look at a date palm tree we discovered near the Palm Springs area. I've always heard of Palm Springs, but I never realized that it got its name because of California palm trees that were growing along spring fed creeks. It's an amazing feeling to walk along a trail filled with plants and trees to the left and have barren rocks on the right.
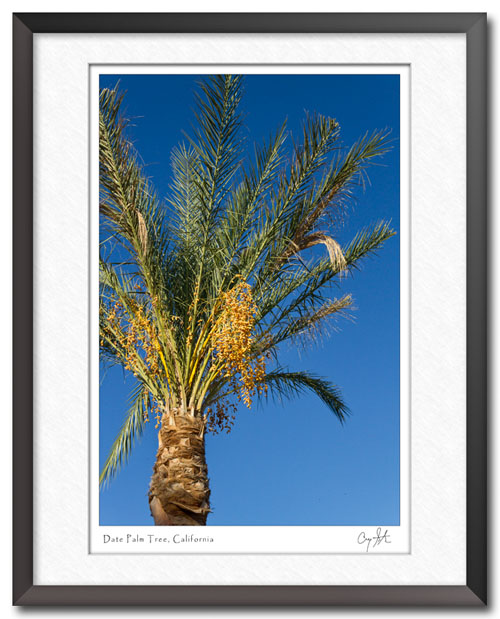
We also explored the Salton Sea area just south-east of Palm Springs. The sea itself was disappointing, but the date palm farms were fascinating. It looked like most were about ready to harvest - the trees were just dripping with dates. Fortunately we had seen an episode of "Dirty Jobs" featuring date palms, so we were some versed in the process.
October
I thought I'd post another photo from our trip through the Canadian Rockies this past summer. The photo itself is pretty mundane since it lacks dramatic lighting or a clear foreground subject, but the scenery is spectacular. We were driving up one of the very curvy roads to a glacier and stopped at one of the "scenic overlooks" along the way. It was easy to be blown away by the view.

That particular day was quite memorable. We had just hiked to a spectacular waterfall, and then drove by a black bear eating berries in the woods right next to the road. Later in the day, we added moose and elk to our list of critters we'd encountered. And of course, the scenery was just fantastic everywhere we went. In other words, it was a day filled with memories.
As a photographer, it's important to be able to separate the image from your own memories. This image evokes memories for me, but other viewers won't have my memories - they only see the image. The challenge for a photographic artist is to communicate emotions that you want the viewer to feel even though they won't have your memories. Hopefully, when you look at this photo, you'll be struck with the rugged beauty of the Canadian Rockies.
October
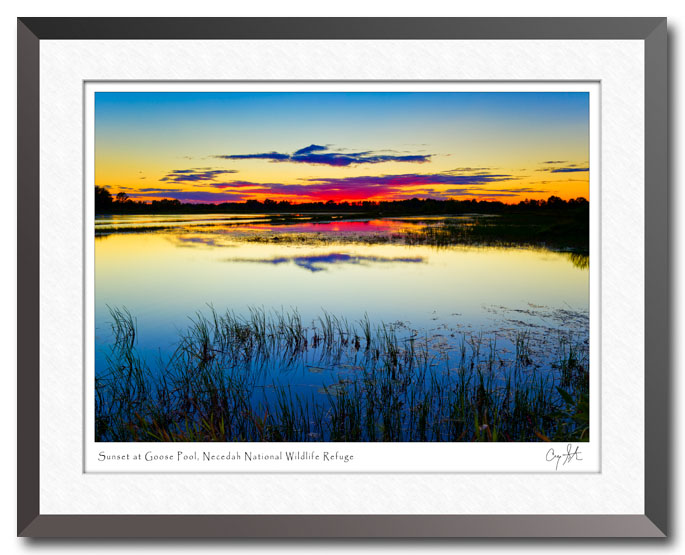
After two black and white photos in a row, I feel a need to post a colorful image. In fact, color is the dominant feature in this image. I love the deep red in the clouds on the horizon contrasting against the deep blues in the sky above and water in the foreground. The photo was actually taken after sunset, during the period known as "civil twilight," which is the period just after the sun has set (or just before the sun rises). In fact, many of my favorite photos were taken during civil twilight.
October
After two black and white photos in a row, I feel a need to post a color photo. In fact, color is a dominant feature in this image. I love the interplay of warm reds and yellow in the sunset against the cool blues in the sky and water. The green lily pads provide a set of visual stepping stones to lead you through the grasses and into the image.
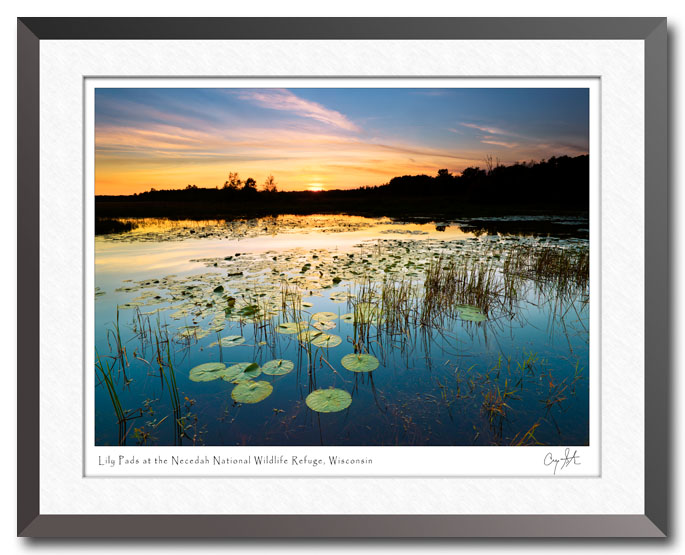
Recently I've had a few opportunities to display my work in a setting where I could discuss the photos with viewers. One comment I've heard several times is "Gosh, you must really like sunsets." While it's true that I do like sunsets, I hope you see more than a sunset (or sunrise) in the photos. I try to view sunset as a time for photography, not the subject of the photo. It's the time of day when I find the interplay of warm and cool colors that I like to highlight in my photos.
So, is the photo about color, or is it about lily pads? My answer is that it's both. It's about color shown in the context of a lake with lily pads, and it's about lily pads at a colorful time of day.
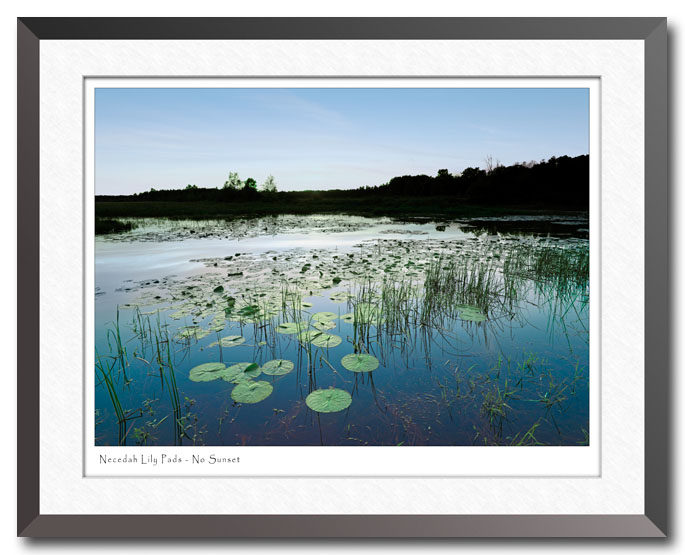
To illustrate the point, compare the image above to the image below where I've used Photoshop to remove the sunset. It's still a photo of lily pads. It still has interesting composition where the lily pads lead you into the photo. But to me, the photo just isn't as interesting without the added dimension of color contrast.
So, why do we do landscape photography at sunrise and sunset? Because that's when we find beautiful light and vibrant colors. Any subject looks better with a sunset behind it. And, any sunset looks better with a subject in front of it.
October
What's the world coming to - I'm actually posting another black and white photo. That makes two posts in a row with a B&W photo!
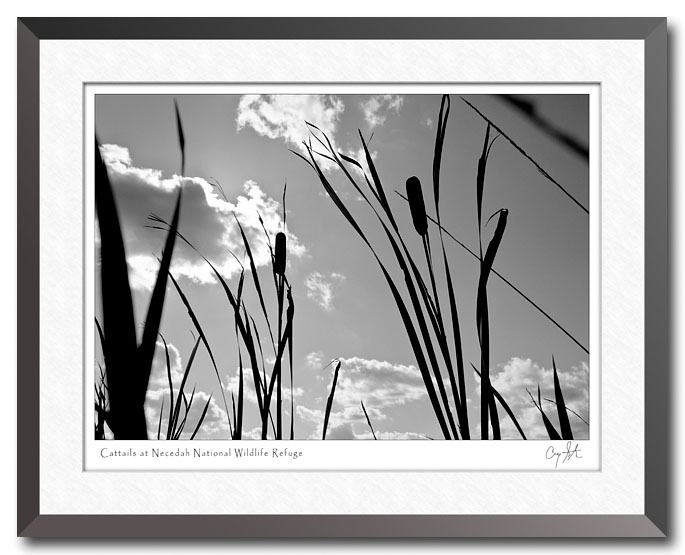
Yes, in spite of my self-proclaimed love of strong colors, this is another photo that I feel really works best in black and white. Unlike the previous post where the photo had very muted colors, this one did have a bright blue sky. But, that was the only color , so it was really something of a monochrome photo to start with in that it just had one color. In the end, I felt that the color was actually distracting from the strong lines of the cattails and grasses silhouetted against the puffy white clouds.
This photo is also a good illustration of the value of unusual perspectives. I knew when I saw the cattails along the trail that I wanted to show them against the backlight clouds. That meant a very low camera angle. Since cattails grow in marshy areas, I wasn't keen on the idea of laying on the ground to get the picture. Instead, I simply held the camera down to the ground and aimed it through "dead reckoning" at the sky. With a little practice you can get pretty good at pointing a camera without looking through the viewfinder. Through a combination of practice and luck, I got the shot I wanted.
September
This is another image from Necedah. Most mornings had at least some ground fog, but this morning had fog in abundance. There's something magical about a wooded area in the fog. I love the way the receding trees become more and more obscured by the fog, giving a real sense of depth and a little mystery.
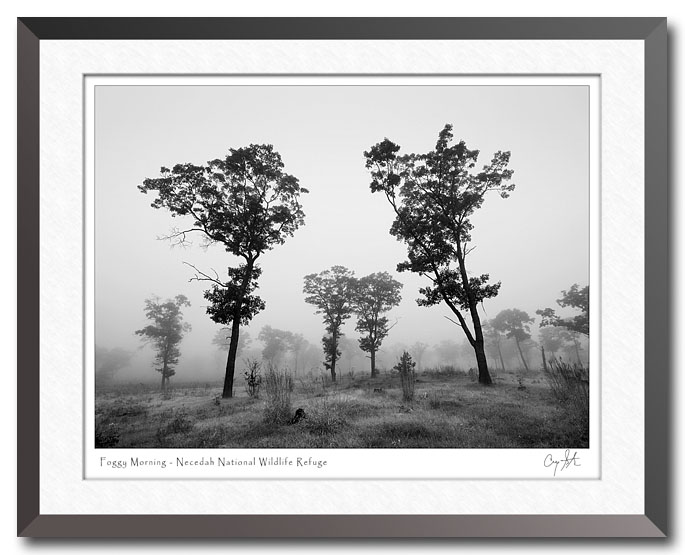
I mentioned the other day that my images tend to be about color as much as subject matter, and I feel like that's true here as well. Sometimes, the dominant feature of of color in an image is actually the absence of color. In this case, I really want the image to convey the muted colors and tones of a foggy morning. So, instead of exaggerating the color, I choose to exaggerate the lack of color. The result is a simple black and white image.
September
Have you ever seen a sunset that was too spectacular? One with too much color? Well, I didn't think it was possible, but I saw one during my term as the Artist-in-Residence at the Necedah National Wildlife Refuge in Wisconsin. My time was nearly up, and it had been raining pretty steadily for the last several days. But, when I stepped outside to check the clouds on the second-to-last day I saw a great big patch of blue sky overhead, and tall clouds surrounding to the north, east and south.
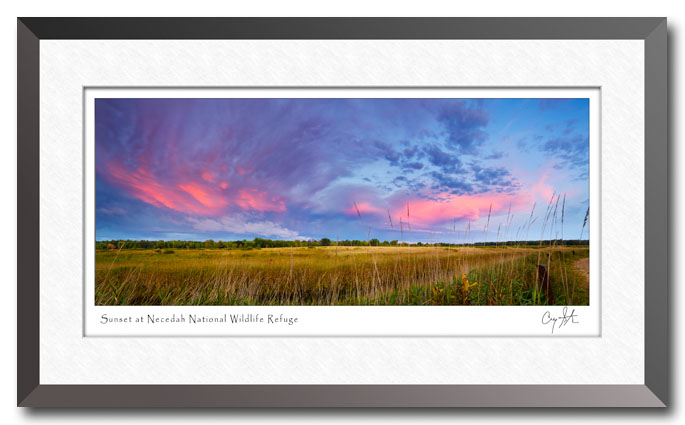
I grabbed the camera and headed to the overlook area along the entrance road. The colors were just getting started when I arrived, and I shot a number of frames. All of the photos were looking east, away from the setting sun. While it's normal to get some color in the east, I've never seen a show like this one. The red and magenta colors were as intense as they could be, contrasting brilliantly against the blue sky around and yellow grass in the foreground.
Even though I loved the sunset, I ended up rejecting most of the images. The sky was just too bright and bold for the subject. In order to get the photo above, I stitched two frames, each taken with an extreme wide-angle lens. The total field of view is about 160 degrees, so it encompasses the view north, east and south all at once. It seems to be the only way to tame the colors so that they don't complete drown out the rest of the scene.
I've never before tried to photograph a sunset (or sunrise) that was too spectacular, but I sure I hope I get to see another one someday.
September
Here's another photo from the Necedah National Wildlife Refuge where I served as the Artist-in-Residence this Fall. This photo was taken in the early morning before the ground fog had burned off, and that's what is creating the large burst of color. If you look closely you can see the fringes of the fog at the top where the yellow and red gives way to the blue sky.

Like many of my photos, this one is as much about the color as it is the subject. I like black and white photos, but I find that I really enjoy working with colors. In fact, most of my landscape photos are as much about the color as they are the subject. My goal is for the viewer to first be captured by the colors, and then be enticed to look more closely to investigate the subject.
September
Here's a photo from the Necedah National Wildlife Refuge in central Wisconsin. It looks like one of the ink blot Rorschach tests, but it's really just a sunset reflecting in a completely still lake.
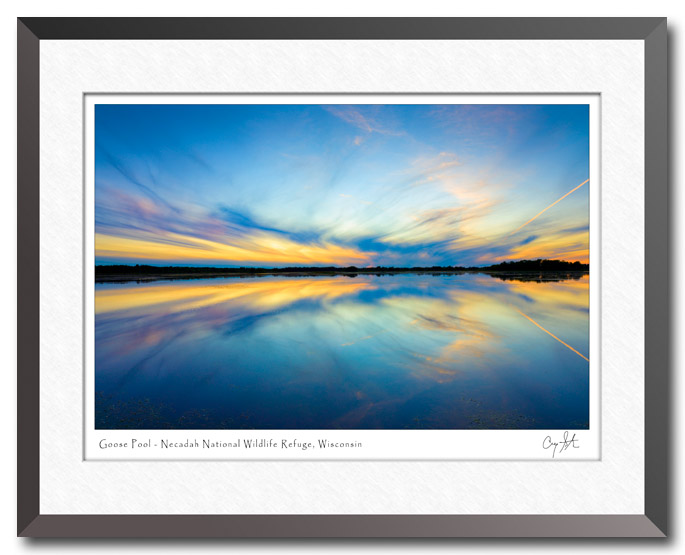
One of the added treats of sunset at Goose Pool is the nightly fly-in of the geese and cranes. During the day, the birds graze in the surrounding fields. Then, as the sun sets and during the following twilight period, the birds fly in to roost for the night on the water. You hear them coming (usually from the east) before you see them, and when they fly over, you can hear their wings beating in the wind. Really cool!
I should also mention that this and other photos are available for sale as large format prints. Click here for more details.
September
One of the events I look forward to each September is the Morton Photography Show (formerly the Morton Pumpkin Festival Photo Contest). I'm happy to report that the photo below won First Place in the Professional Division. This image is from Riding Mountain National Park in Canada. Last month I posted a different version of the scene. That photo was taken somewhat earlier during dusk, so the colors were not yet as intense. The big difference though is that for this version, I used a flashlight to "paint" the side of the canoe with light which gave the canoe its colorful glow.
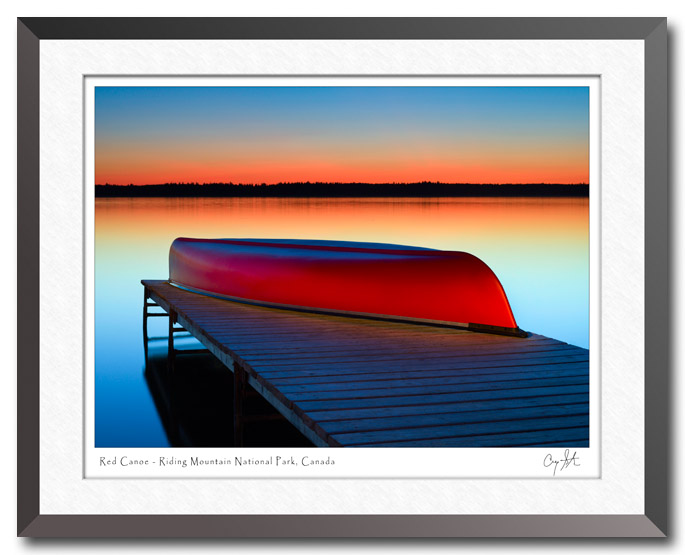
I've participated in the show every year since it began. I'm impressed each year with the quantity and quality of the entries and I'm sure the judge had a very difficult time choosing the winners in each category. One of the wonderful aspects of digital photography is how it has made high quality tools so much more accessible. Film photography required a much higher investment in both equipment and time to produce a high quality print. Judging by this year's entries, there are obviously lots of people with creative talents who are applying their creative skills.
September
Here's another old image, this one from January 2010. I'll be serving as the Artist-in-Residence at the Necedah National Wildlife Refuge, and I was reminded of our visit to the Bosque del Apache National Wildlife Refuge in New Mexico. Both reserves provide extensive wetland habitat and are home to numerous species of birds, including geese and sandhill cranes.

September
Here's an old image from December 2008 that I just rediscovered. Some people like to immediately delete photos that they don't use right away. I'm at the other end, I rarely ever delete an image. In this case, I had skipped over this photo and concentrated on a few others from the same shoot. As I was looking back, I noticed this one and immediately liked its potential. After some tweaking in Lightroom and Photoshop I'm pretty happy with the result. Once again this illustrates why I like digital processes. Sure, you can save your film negatives (and I do) but it's not very easy to review them in the future. With digital processes, those old photos are readily available.
This is also a good example showing that you can sometimes find a good photo that you initially overlooked. Right after a shoot, it's easy to get focused on one particular type of image that you're after and overlook others. It's always a good idea to let the images age a little bit and then go back to review them with a fresh eye. It's not unusual to find a gem that missed on the first pass.
September
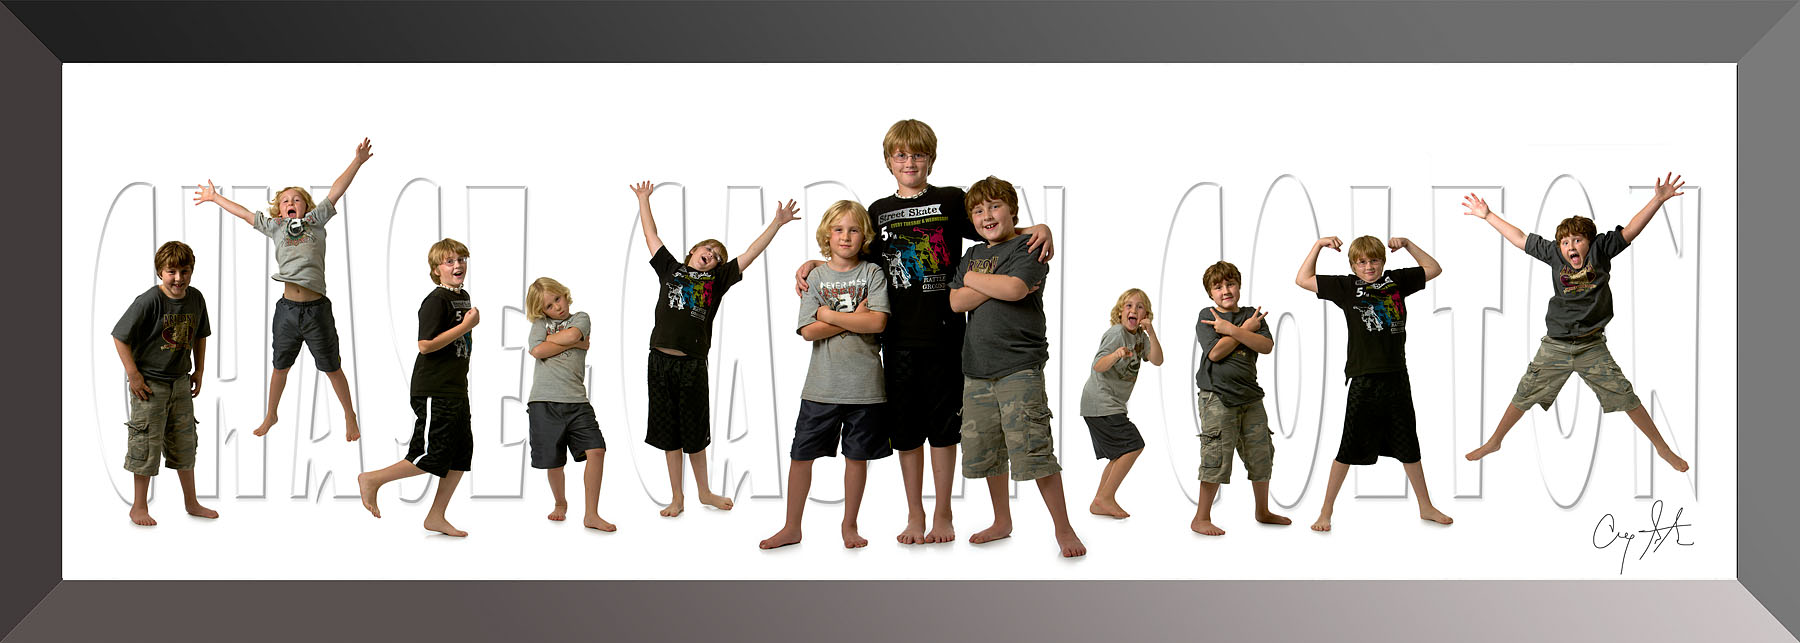
I thought I'd depart from my more typical landscape photos this time and post a recent montage of my daughter's three boys. They spent the night with us a couple weeks ago, and this was one of the results. Click on the image below to see a larger version.
August
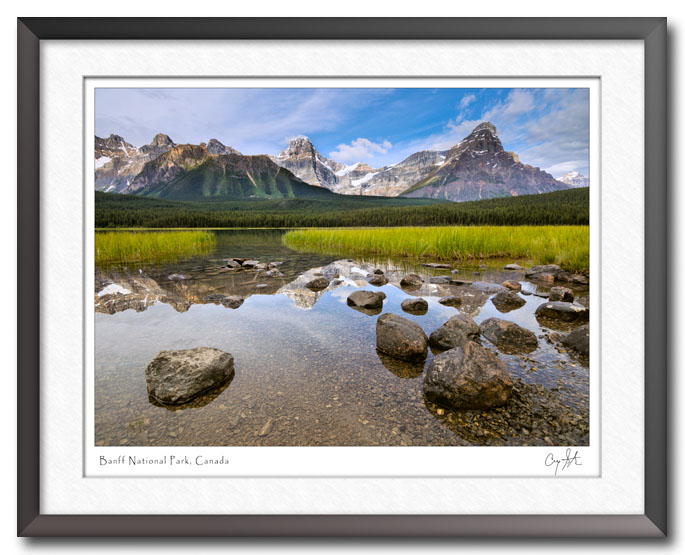
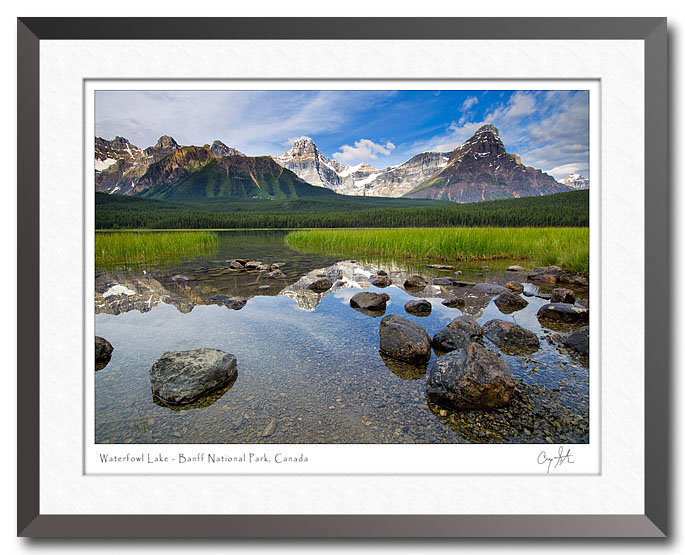
Since I haven't been very productive here at home, I thought I'd post another photo from Canada, this one of sunrise at Lower Waterfowl Lake in Banff National Park.
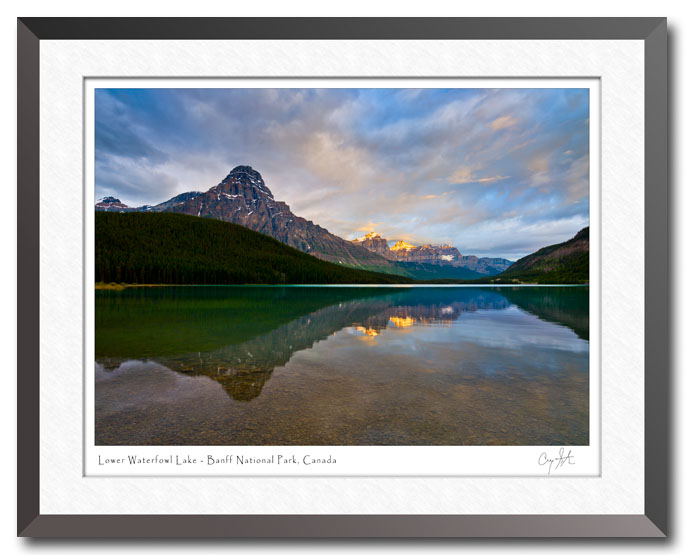
Some photos become favorites just based on the image, perhaps a favorite subject or colors. Others are favorites because of the memories they contain, and that's the case for this image. We were camped about 50 yards from the spot where this photo was taken. The night before had been cloudy and rainy, and it was still raining at sunrise. But, by 8 AM, the clouds were just starting to break up so I grabbed the camera and headed for the lake. Just as I arrived, the clouds parted and a shaft of golden morning light high the far peaks like a spotlight.
To top things off, my wife knew I'd taken off in a hurry without any coffee. As soon as it was ready, she poured a cup for me and came out to meet me along the shore. In fact, my best memory of that morning is standing on the shore with Deb and a cup of fresh coffee watching the spot of sunlight on the mountains.
August
A bit closer to home, here's a flower from my own back yard. Last year I posted a photo of a surprise lily that I noticed while mowing the yard, and this year I repeated the process. Maybe I'm just more attuned, but it sure seems like we have a much better crop of lilies this year.
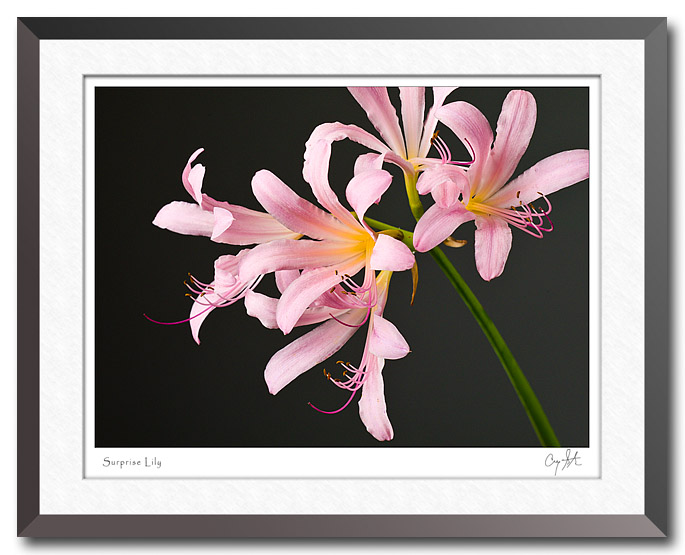
I did a few photos in the yard, but I ended up bringing a cutting into the studio for more control. The lighting couldn't be much more simple, just a large softbox to camera left and a large reflector on the other side. The background is actually white seamless paper, but it's so far back and away from the light that it's rendered as nearly black.
August
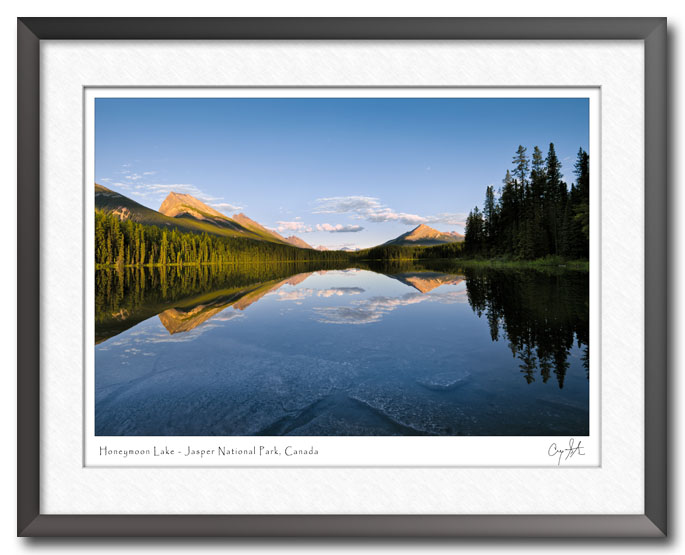
Here's one last photo from Canada. This one shows Honeymoon Lake in Jasper National Park in the Canadian Rockies. We were camped about 100 feet from the lake shore, so all I needed to do was walk over after supper. I love the way the reflections turn a sunset photo into something more abstract.
August
Here's another photo from Canada. This one is Upper Waterfowl Lake in Jasper National Park. We had a beautiful campsite right along the water, but the weather gods were against us that day. Sunset was cloudy and rainy, and sunrise the next morning was not much better. However, by the time we got on the road, the sky was clearing. This photo was from a short trail that led down to a beautiful lake.
August
This is one of my favorite images from Central Canada. We were camping at Audy Lake in Riding Mountain National Park, and as we were registering for the campsite, I ran into another photographer. He was much more prepared though, and had brought along a canoe and an extra tent to serve as props. We decided to pool our resources and got set up for a sunset photo shoot.
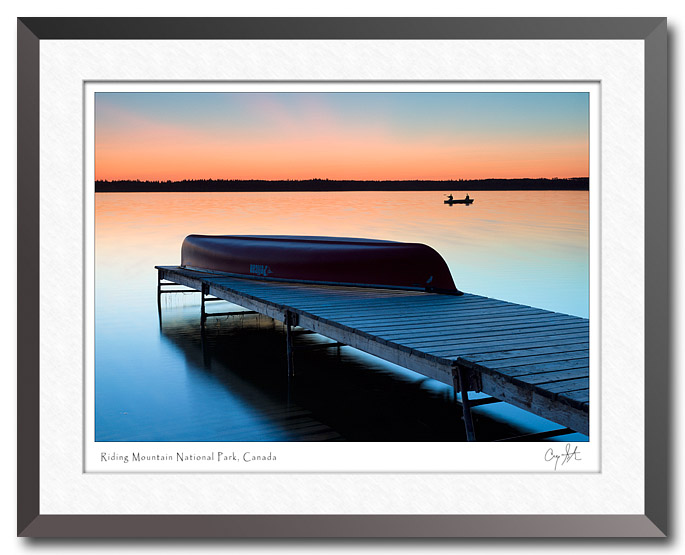
As luck would have it, there were also a couple of fisherman on the lake. Amazingly, they trolled past the dock area at just the right time to be silhouetted against the twilight glow in the west.
July
It seems that I've been chasing windmills lately. I went out last night for a sunset photo shoot and ended up around the wind farm east of Delavan. There wasn't any wind at the time, so all of the windmills were parked, so I was able to get a sharp image of the blades even using a long exposure. These two windmills were positioned perfectly with the near one parked head-on and the more distant on sitting in profile.

Twilight is one of my favorite times for photography. This photo was taken about 20 minutes after sunset during the civil twilight period. The orange glow on the horizon and the sky fading from light to dark blue is completely natural. In fact, this is one of those rare photos that seemed to just fall out of the camera ready to print.
July
I woke up early this morning so I headed out to see if there was any sunrise magic happening. I ended up on a narrow country road along this bean field. I was especially attracted to the way the seed pods on the grass seemed to glow.
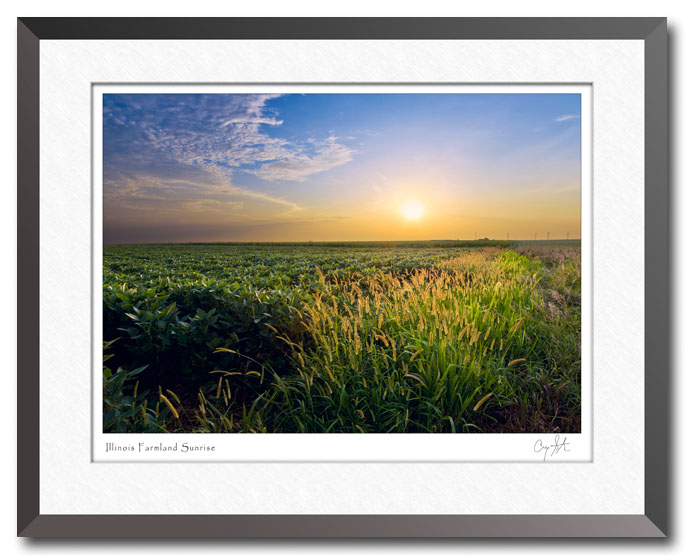
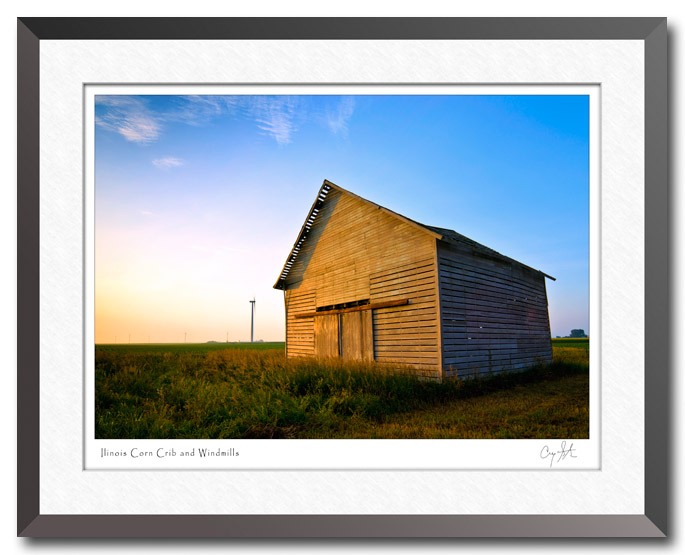
After the field, I turned my attention to this old barn. I like the juxtaposition of the old barn and the modern windmills in the background. Of course, both images benefit from the color contrast between the blue sky and the warm yellow light.
July
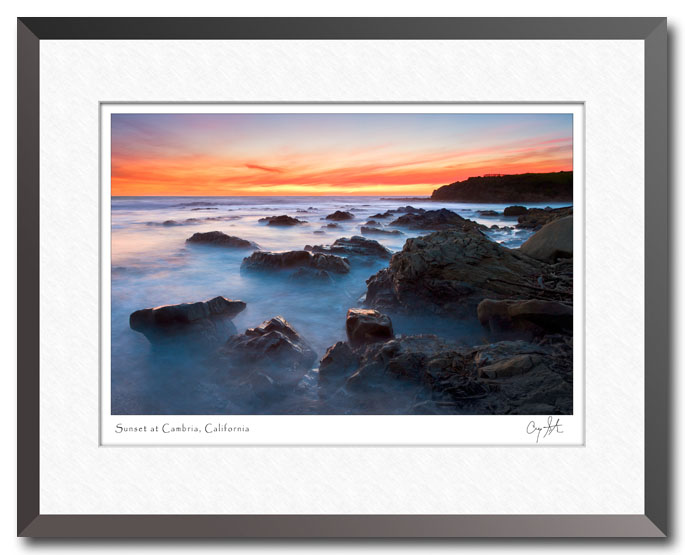
I'm excited that a selection of my work is now available at The Trafik Jam in Mackinaw, Illinois. The Trafik Jam is a new shop that carries a wide variety of local artists work ranging from jewelry to furniture. Besides photography as a creative outlet, I also enjoy creating metal folk art and furniture pieces, and a couple of pieces are available in Mackinaw, including a cattail sculpture, a wine rack and a glass top sofa table. There are also a few of my photos for sale, including a couple of cornfield sunsets and a large print of the photo below from California.
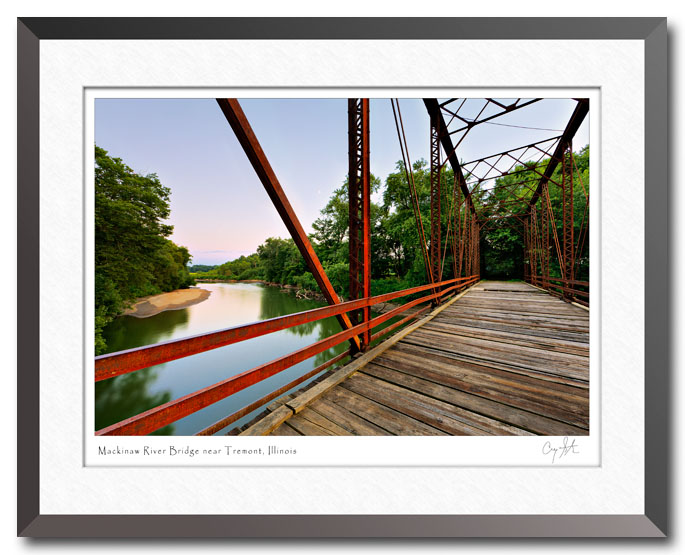
I went out exploring the other night at sunset and ended up at this old, abandoned bridge over the Mackinaw River near Tremont. I love the way the rusty steel beams seam to glow in the evening light. As old as the bridge looks, it's actually only been closed for a few years. It has a steel structure, but the deck is wooden planks about four inches thick. I can remember driving over it not too long before it was closed, but now I'm cautious even walking across.
June
What better way to celebrate the 4th of July than with a backyard barbecue and fireworks? We were fortunate this year in that we celebrated with friends on the 3rd and with our children and their families on the 4th.
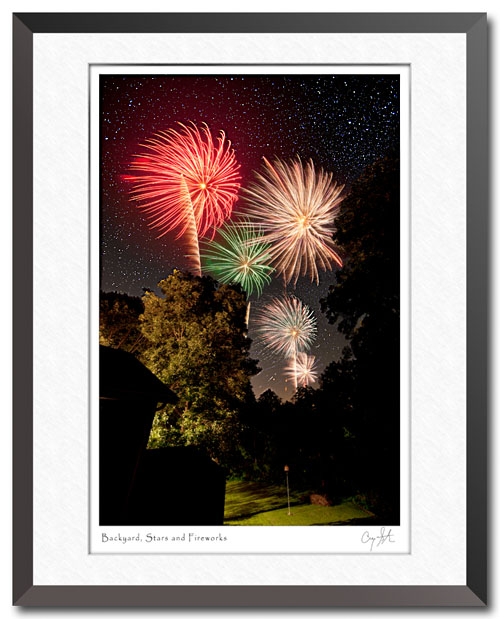
The image above captures the spirit of the holiday, but it's actually a composite of several photos. The yard and sky is made of two frames. The first was with the yard lights on to show the details of the grass and trees. The second was a 5 minute exposure to record the stars. Since it was such a long exposure, I needed to use a special tracking mount for the camera that tracks the stars and avoids steaks (star trails). Since the camera is moving with the stars, the foreground was blurred in that frame. No problem, just combine the two frames to retain the best of both.
Lastly, I decided to add some fireworks. We certainly had lots of them around the neighborhood, but most weren't visible. Instead, I used some fireworks photos from a couple of years ago at the Delavan Fall Festival and simply dropped them in behind the trees and in front of the stars.
I'm not sure I'd call the finished product a photograph, but it's an interesting image.
June
Two of my recent posts have featured the same cornfield and the same sunset, and it's interesting to look at the two photos side by side. Keep in mind that they were taken from the same general location along the edge of the field. The photo on the right was taken 20 minutes later and is much more literal. You'd easily identify the subject as a corn field, at least you would if you're from the Midwest. The photo on the left is more abstract. If you were to see it from across the room, you'd probably identify the sunset component, but perhaps not the corn. In fact, your first impression is probably related to strong colors and the geometry of the photo rather than the subject.

The two photos have a lot in common. Both are vertical orientations. Both feature a cornfield in the foreground and a sunset in the background, with the sun's hotspot in about the same position. Both are framed with the horizon about 1/3 of the way from top, so they're 1/3 sky and 2/3 foreground. (As a general rule, you don't want the horizon line to be in the center of the frame, but rules are made to be broken.)
In terms of timing, the photo on the left was taken 20 minutes before the one on the right. The important point of the time is that the first photo was taken about one minute before sunset, and the second was taken about 19 minutes after sunset. As a result, the colors are quite different. The earlier photo is heavily influenced by the strong yellow light from the sunset streaming across the cornfield, so there is a yellow glow throughout. In the second photo, the field is lit mostly by the blue sky above, so everything has a much cooler feel. One effect of that is that there is a strong contrast between the cool colors of sky and field and the red and orange glow of the clouds. So, the first photo has harmonizing colors while the second has contrasting colors.
The other big difference is the choice of lens. The earlier photo was taken with short telephoto lens at 105mm, so the scene is compressed and the sun's hot spot is shown prominently. The later photo was taken with a 14mm extreme wide angle lens. Even with the vertical orientation, the frame encompasses a large area of the horizon. I particularly like the effect of the wide angle lens. Since the camera was so close to the leaves, it gives you a sense of being in the cornfield.
June
Here's another picture from my photo shoot by the corn field on C Street last week. This version is much more abstract. In fact, it's really about the colors and less about the corn, or even the sunset. The strong colors might lead you to think that there's a lot of Photoshop involved, but there isn't. In fact, most of the Photoshop work was technical in nature, cleaning up aberrations and artifacts that were caused by shooting directly into the sun.

I'm finding that my photography is more and more about color. I don't have anything against black and white, and I've posted a few B&W images in the past, but it seems that most of my images don't translate well into black and white since color is such a strong component. Maybe that's a reaction to my early years where nearly all of my photography was black and white. At that time, color photography always seemed special. I liked it, but it wasn't what I was doing, so it wasn't particularly relevant.
The other problem I had with color was loss of control. I've done some color film and print processing, but it's much more complex than black and white. In the film days, very few photographers did their own color processing, even though most black and white processing was done by the photographer. With black and white, I had complete control over processing and printing. With color, I had to turn over control to a lab, and it just wasn't as satisfying.
Today, digital processes have changed that. Photographers now have complete control of their images, whether color or black and white. In fact, digital processes give us much more control than we ever had with wet processes in the darkroom. A lot of photographers have gravitated to black and white, but I seem to be moving more strongly toward making colors and important creative element in my photography.
June
Last month, I wrote a post announcing the birth of our newest grandson. Well, like any grandparent who also happens to be a photographer, I've taken a "few" photos of the new fellow and the proud parents. That also led us to the photo below showing a maternity "before" image and the "after" image as a reflection in the mirror.
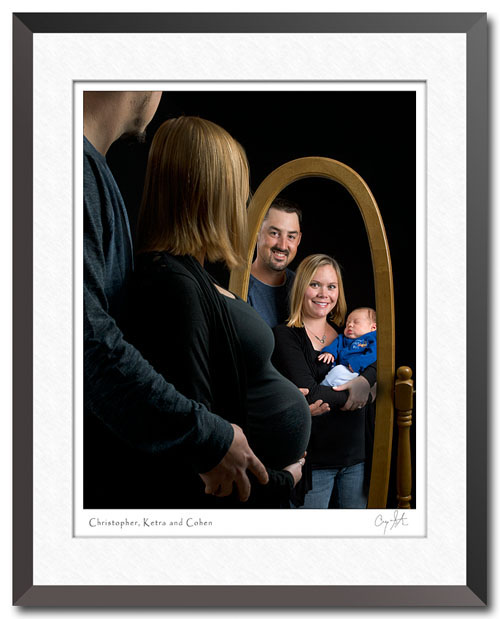
I don't remember where I saw the technique, but it's not an original idea. The process is pretty simple, We did the before image last winter, and made notes of how the people and studio lights were arranged. We then simply recreated the setup for the after photo. Throw in a little Photoshop work and you have the finished image.
June
It seems like this is my corn phase, but the this post is really not related to the last one. A couple months ago, I received an e-mail from a local woman who wanted to share her favorite location with me. She told me about a spot here in Delavan, on the northwest edge of town, where you have beautiful views of the rolling farmland to the west.
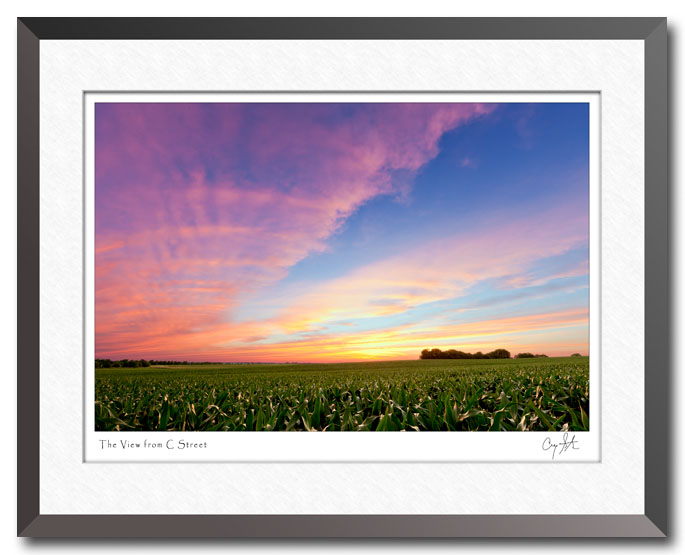
Since we were in California at the time, it took me a while to be able to go explore the area. Last night, it looked like we might have an interesting sunset, so we packed the gear and headed out at the last minute. Well, as you can see from the photo above, we had a beautiful sunset. And, while it's a pretty good photo of a sunset, I feel like the main subject should be the corn, not the sky. That led me to the second photo below.
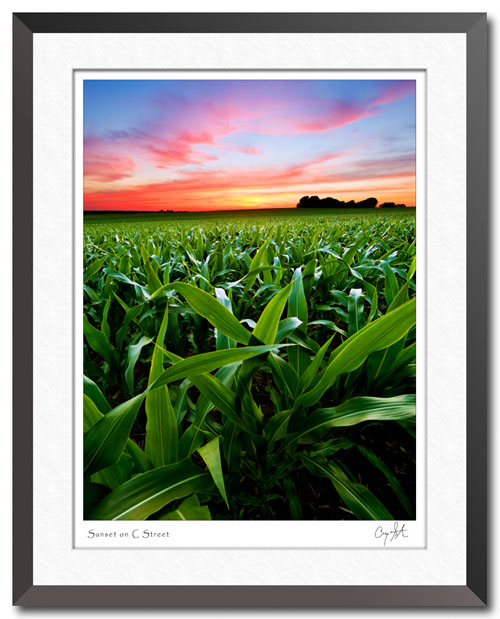
The second photo was taken with the same camera and lens, and it was just a little bit later. The big difference is the camera position and perspective. The first image seems to be all about the sky, and the cornfield is lost. But turning the camera to a vertical view, and moving in close to the corn, the second image is all about the corn. It just happens to have a beautiful sunset in the background. I just made a 16 X 20 inch print of it, and looking at it makes you feel like you walking through the cornfield, but without the bugs.
June
I've written before about how I enjoy revisiting older images. The photo below is a good example. I took the photo three years ago, and even though I like the photo, I was never completely happy with the result. I can't really say why I didn't like it, but even after many hours of working on it Photoshop, I still wasn't satisfied. Since I'm now in the middle of preparing for a couple of local shows in Central Illinois, I thought I'd revisit some of my local images.
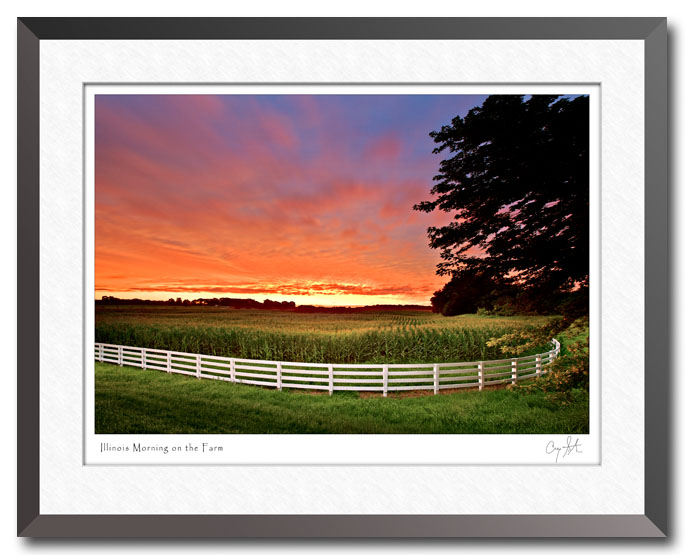
A big advantage of digital is the ability to revisit older images and process them with newer technology, and technology has advanced quite a bit in the last three years. The new versions of Photoshop and Lightroom have all new processing versions, and I now have custom profiles for my cameras that yield richer and more accurate colors. Of course, I'm sure my own skills have advanced as well. The end result is that I was able to create a result that I'm happy with.
I also discovered a bonus during the process. As I was going through all of the images from the shoot I found the frame below where I'd zoomed in much tighter on the farm buildings in the distance. (The image above was shot with an extreme wide-angle 16mm lens, the one below was shot at 75mm, which is a short telephoto.) About all I need to do in Photoshop was crop the image into a panoramic format and adjust the brightness.
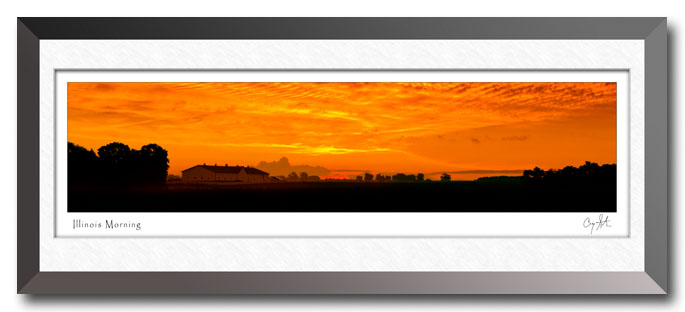
June
Well, maybe it's me who feels the need, but I do feel the need to make prints. Maybe I have some old-fashioned values, but for me, the goal of my photography is to make a print. Ideally, it will be a large, matted and framed print that can be viewed and enjoyed for years.
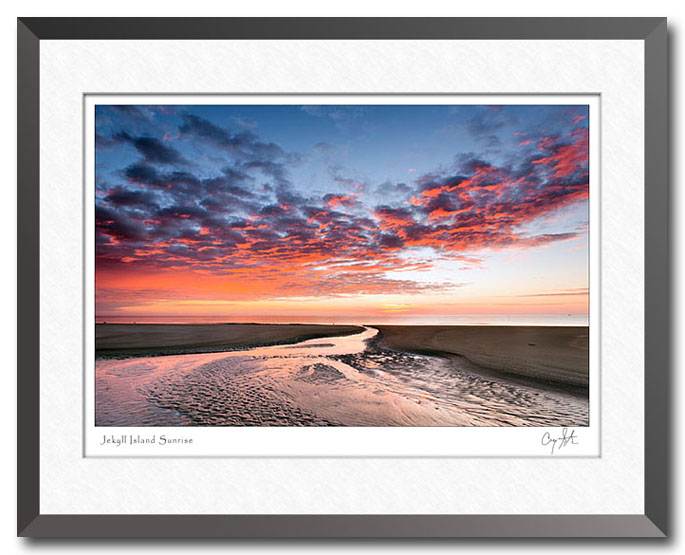
The ability to make a print is one of the things that makes photography unique. Particularly with modern digital cameras, many still photographers are migrating to video, but I've just never felt an attraction to video. To me, a video is like a box of slides, or a collection or music CDs - it's not really a thing you can enjoy all by itself. A printed photograph is an actual thing that you can pick up, set down, display, and even dust occasionally. A video needs all sort of supporting technology to be viewed, and the technology needs some sort of power supply. And, you need to worry about the quality of the display device, the size of the screen, the viewing conditions in the room - all sorts of variables that the artist can't control.
When I make a photographic print, it is what it is. It's the culmination of my technical capabilities and artistic vision. You may like it, or you may hate it, but I don't have to worry about whether you saw or heard it presented correctly. And if you like it, you can buy it and take it home with you. It (hopefully) becomes a valued object that you'll treat with some amount of care since it will be hard to replace.
Last week, I took "a few" pictures of our newest grandson. I posed one photo on my blog, and also set up a web gallery of photos for friends and family to view. Lot's of folks looked at the pictures on line, but everyone really wanted a printed wallet-size photo. Those little prints get stuck to the refrigerators, saved in wallets and propped up on kitchen tables and window sills. They are viewed and enjoyed repeatedly during the day. They're something you can carry around and show to others without needing to plug in, log on or boot up.

The ability to make prints is one of the things that makes photography unique. You can't sing a song and then give it to me as an object. You could paint a picture, but you'd only have one. Of course, you could use photographic processes to duplicate it, and then you could have many. I suppose book printing and binding is similar in that you can capture ideas and words and put them into a beautifully bound object that will endure. Modern manufacturing processes also allow a design for a part (or even a statue) to be created by expensive CNC machining centers, so it's somewhat similar.
May
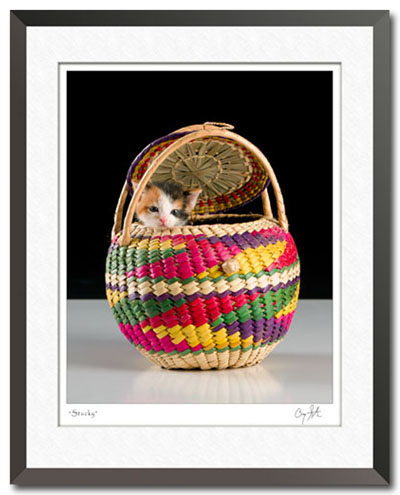 This our son's other new addition to his family. While he was helping a relative with some remodeling he heard a kitten meowing inside a garage wall. After a little investigation with a hammer, he had a new kitten. Apparently the mother gave birth to her litter up in the rafters above the garage and this kitten somehow ended up inside the wall itself.
May
There's not many things in this world as exciting as a new baby! Last night, our son Christopher and Ketra delivered our fourth grandson, Cohen. He was born around 7:00 PM and weighed 7 lbs 10 oz. and is perfect in every way.
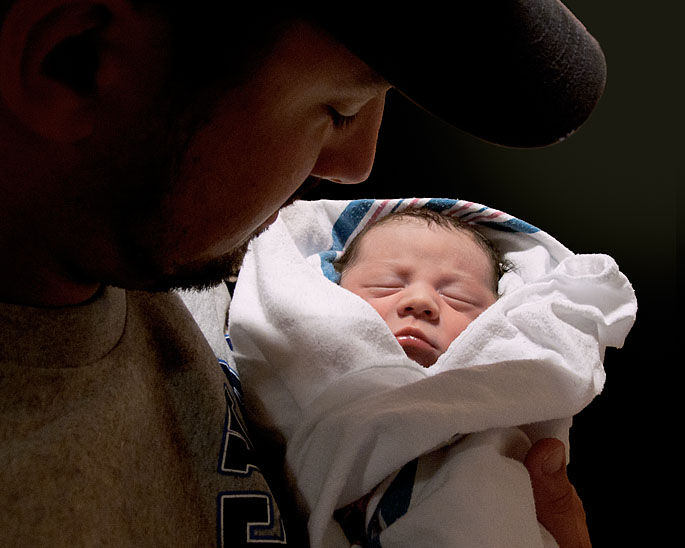
Cohen is also carrying on a Stocks family tradition, he just doesn't know it yet. He is the fifth Stocks to have the initials "CES" and the fourth in the Stocks lineup with the same middle name.
Big congratulations to Chris and Ketra!
May
I thought I'd post a couple more photos from our visit to the Trona Pinnacles last weekend. The photo below shows one of the ridges of tuffas about a half mile or so east of where we were waiting for sunset. I love how the orange light from the setting sun is just skimming across the tops of the tuffas. I find I'm especially drawn to scenes with strong contrasting colors, such as the orange and blue here.
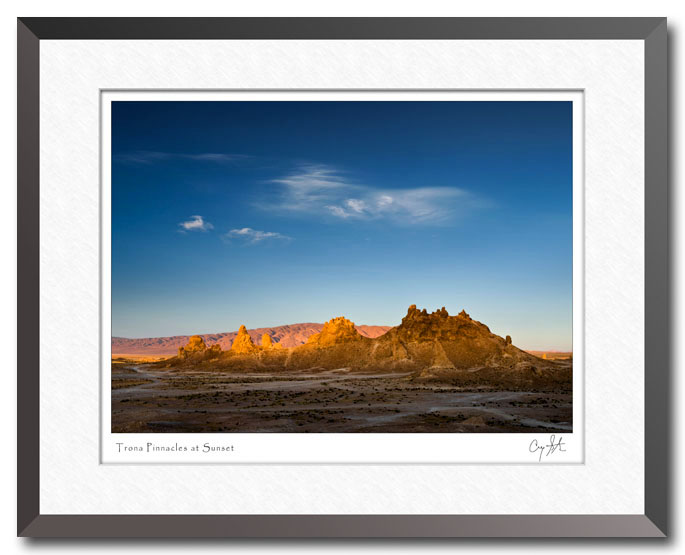
The second image below was taken at sunrise the following morning. To be honest, we arrived too late. We woke up about 5 AM and decided to make the dash out to the tuffas. But sunrise was less than an hour away, and we had close to an hour drive just to get to the parking area. I took the photo below as soon as we pulled in - I grabbed the camera and tripod and set up right next to the car. It's the very first frame I shot, and it shows the best color of the morning. By the time I walked around to the east side of the tuffas, most of the show was over.
Even worse, the sky was mostly overcast, so all I had was flat light once the sun came up. And to top it all off, the wind was blowing at least 30 MPH with gusts even higher. I had to hold on to the tripod to keep it stead for each shot, but also to keep it from blowing over! Oh well, it was still an amazing place to visit.
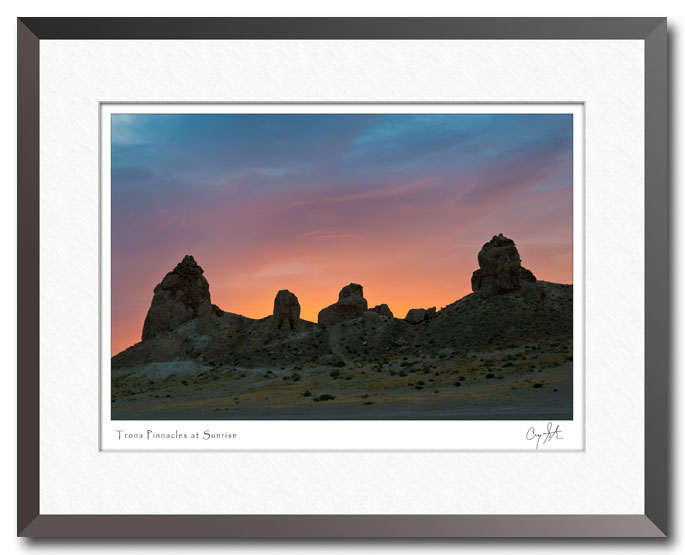
That's the way it is with landscape photography. The best light of the day happens at sunrise and sunset, but there's no guarantee. Some days are glorious, and some are dull. There are some things you can predict with certainty, such as the time of sunrise and sunset. You can also check the forecast, and "partly cloudy" is usually a good sign, but it really all depends on where the clouds are as the sun does its tricks.
I don't remember where I read it, but I once saw the advice that if you want to build a portfolio of great landscape images, you need to go to every scenic location in every national park at least 20 times. If you do that, you'll find at least a few winners.
May
Have you ever heard of the Trona Pinnacles? Well, I hadn't either until I started researching interesting locations for a quick trip. They're located just south of Death Valley National Park and about 20 miles east of Ridgecrest, California. The area is part of the Searles Dry Lake basin and were formed underwater between 10,000 and 100,000 years ago. At that time, the Searles Lake formed a link in an interconnected chain of lakes stretching from Mono Lake to Death Valley. The tuffas at Trona reach as high as 140 feet!
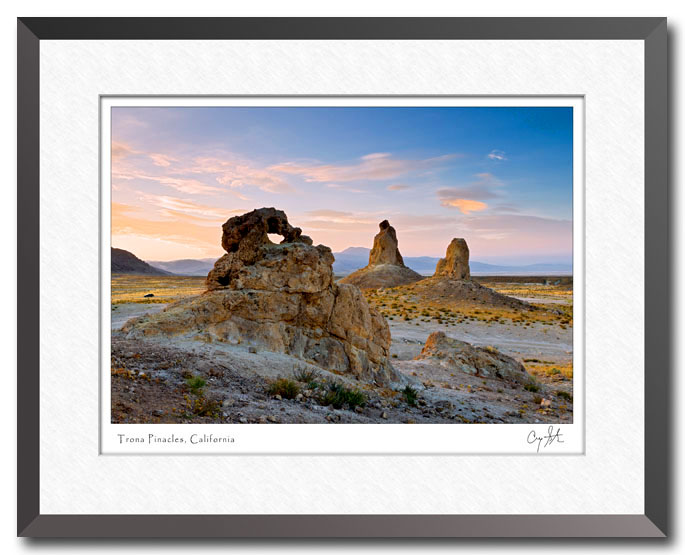
I'm always amazed at the circles of life. Last year, I posted images from Mono Lake. But, the tuffas at Trona seem huge compared to those at Mono Lake. Of course, many of the tuffas at Mono Lake are partially submerged, and I don't know how much of the tuffa is under water. But where you can walk around them, they tend to be 10 to 20 feet high, so much smaller than those at Trona.
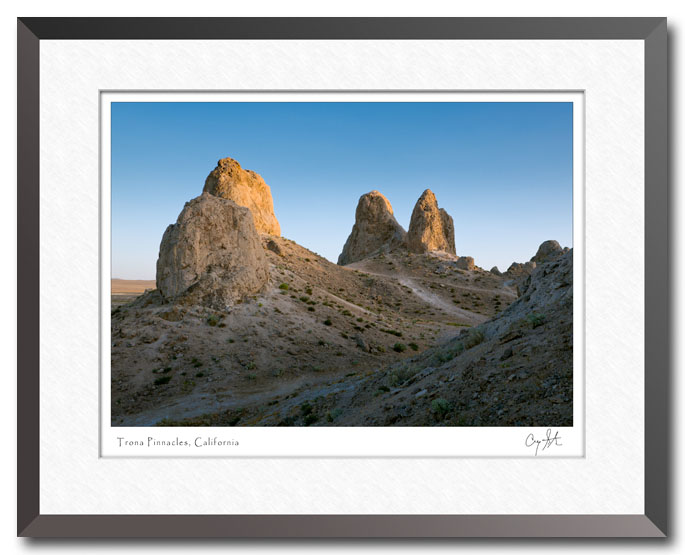
We did a fair amount of research before heading out. I noticed that the crescent moon would be fairly low on the western horizon at sunset, so I decided to try to get some night photos including the stars. I also packed a couple of strobes and radio controlled remote triggers so that I could add some light to the tuffas.
Note - to see the stars in the photo more clearly, click on the photo to see a larger version.
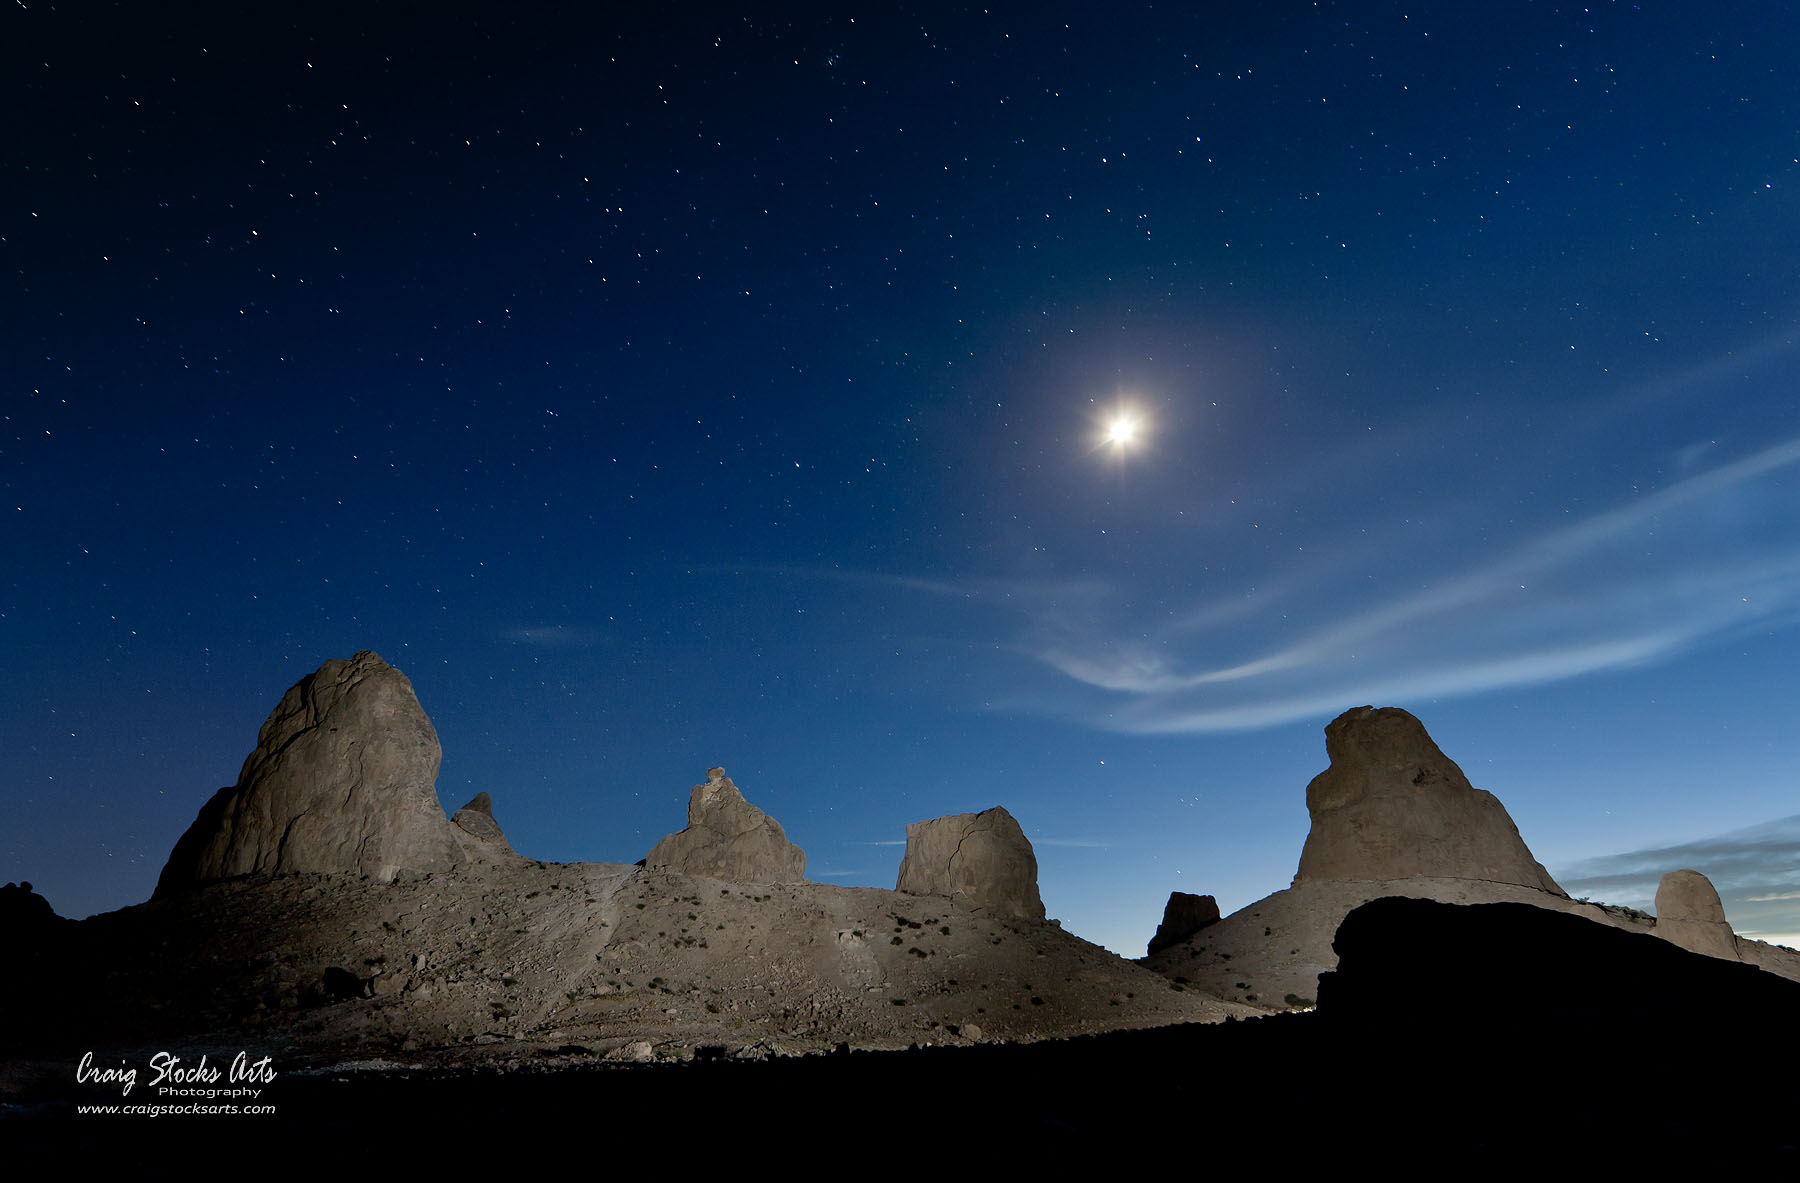
The photo is pretty straightforward technically. Obviously, you need a tripod and a long exposure The main parameter of concern is the length of time for the exposure. I was using an extreme wide angle lens, so 30 seconds is about the longest exposure you can use before the earth's rotation turns the stars into streaks instead of points of light. This image ended up at ISO 640 at f/5.6 for 30 seconds. To light up the tuffas, I had two strobes positioned behind a large outcropping and aimed at the the tuffas in the distance. In order to build enough exposure from the strobes, I had to fire them 10 to 12 times during the 30 second exposure.
May
We visited the Huntington Library, Art Collections and Botanical Gardens last weekend, and what a place! Beautiful gardens and an amazing collection of art and historical items. I doubt if we saw everything, but we were able to visit most of the art gardens and galleries. I also especially enjoyed some of the historical artifacts, such as an original Gutenberg Bible and hand-written drafts of Thoreau's "Walden Pond." The draft of "Walden Pond" was especially meaningful since we hiked there several times while we were in Boston a few years ago.
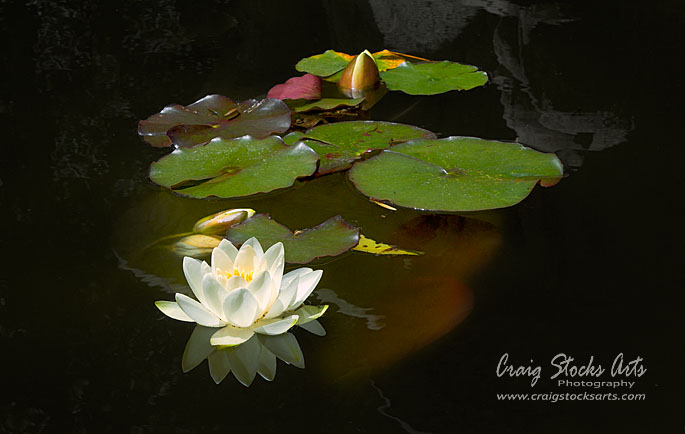
We were at The Huntington during the middle of a bright, sunny day, so it wasn't especially good conditions for scenic photography. I did a few close-ups of some of the flowers, but I ended up taking the most photos at a fountain filled with lily pads. I like the simplicity of the composition above and the way the lily pads and flower seem to be completely isolated.
April
I was recently notified that I had been accepted as one of two Artists in Residence for 2011 at the Necedah National Wildlife Refuge in Wisconsin. The Artist in Residence program allows artists an opportunity to draw inspiration from the refuge while working in the park's facilities. I plan to spend two weeks sometime this summer or fall exploring and photographing the refuge and its inhabitants, such as the sandhill cranes.
One of my goals is to display and demonstrate my processes. Even though I work digitally, my end result is a printed photograph. I like printing my photos because I'm creating something physical, an actual thing. I particularly enjoy them once they are mounted, matted and framed. To me, that's one of the things that turns a photograph into a work of art that can be displayed and enjoyed. During my time at Necedah, I hope to share my entire process starting with the original digital capture and ending with a framed print.
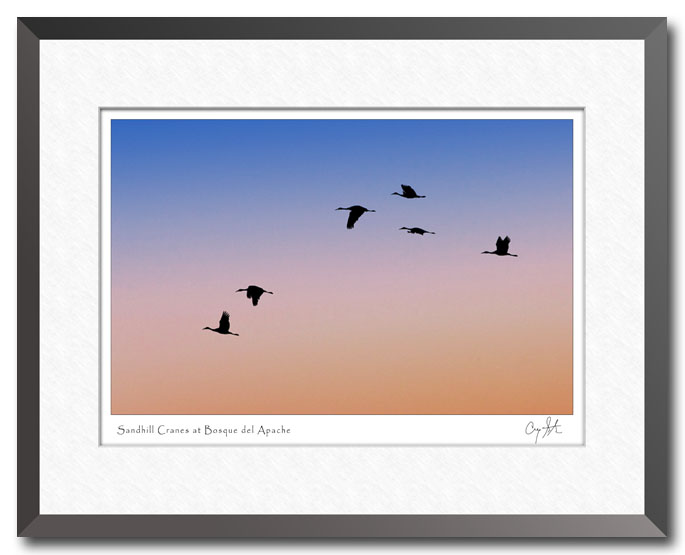
I think we naturally understand the value of an object, especially a rather fragile object like a printed photo. Unlike a digital file, a printed photo is something of substance, something you can touch. You don't need additional technology to look at it or enjoy it. It is what is is, and all you have to do to enjoy it is look at it. But also, it's most likely the only one you have, so if you damage it or lose it, it's gone. Hopefully, you appreciate the time and skill that was required to produce it, and you understand that it can't be easily replaced. I think that's
There's also a bit of a story behind the image I chose to accompany this post. Last year while en route to California, we stopped for a couple of days at the Bosque del Apache National Wildlife Refuge near Socorro, New Mexico. Bosque del Apache is one of the wintering grounds for - you guessed it - sandhill cranes. The cranes spent the day grazing in the fields around the refuge and at sunset, they would begin arriving back at the numerous ponds for the evening. Then, the next morning, they would all fly out again to search for food. We spent many hours watching in fascination as they would arrive in flocks for the evening.
The photo above is one of my favorites. It was taken just after sunset as this group of six sandhill cranes was flying in for the evening. I love the way they're positioned right at the boundary between the orange glow of the sun near the horizon and the blue sky above.
And, who knows, these may be some of the same sandhill cranes that spend the summer in Necedah.
April
We spent the weekend exploring the southern stretch of Big Sur. As I mentioned in my blog post last year, Big Sur was named as the #1 best scenic drive in the US. This year, we spent more time in the stretch between Morro Bay and San Simeon. It's an almost four hour drive from LA, but the trip is worth it.
The area just north of Morro Bay has a stretch of tidal pools that are pretty accessible. Just by walking around on the rocks, we were able to find starfish, crabs and sea anemones.
Cambria has a very nice stretch of beach where we spent a fair amount of time. One of the attractions there is the colony of harbor seals. They didn't seem to mind the onlookers at all, they just swam back and forth and hauled out onto the rocks. We saw quite a few mothers with their pups resting on the rocks.
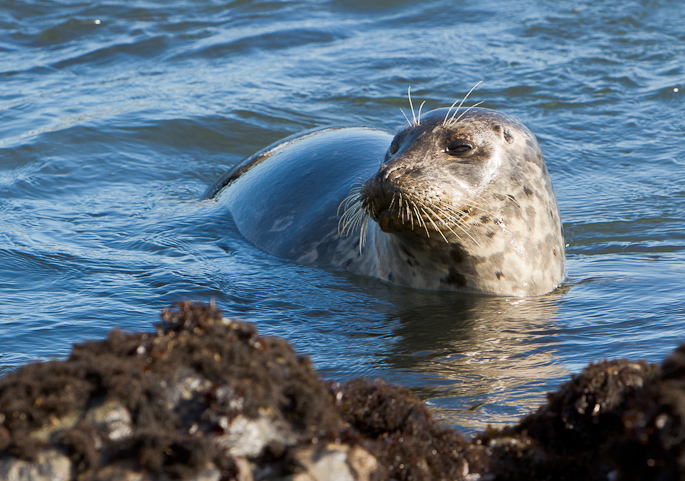
After spending some time watching the seals, we decided so just hang around there until sunset. It turned out to be one of the most spectacular sunsets I've seen for a while. Initially it looked like a heavy cloud bank to the west was going to obscure the sunset, but at the last minute, the clouds opened up along the horizon and that let the setting sun shine through.
April
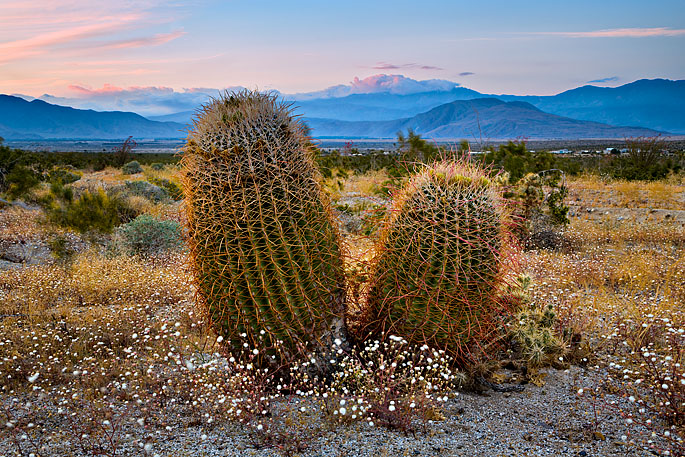
The barrel cactus photo above was taken at the Anza-Borrego Desert State Park near Borrego Springs, California. Borrego is the Spanish word for bighorn sheep, but unfortunately we didn't see any of the park's resident borregos while we were there. On the plus side though, there were still lots of spring blossoms. Because of the windy conditions though, I focused on cactus and other substantial plants that we less affected by the gusts. In this photo, you may notice quite a bit of motion blur in the smaller plants.
I love the grand sense of scale we feel in many of the desert parks. Distant mountain peaks provide a context to the size of the desert, so you constantly feel the contrast of near and far. Just as a good landscape photo should have a foreground, a middle ground and a background, a desert vista provides that same progression from the objects around you to the mountains in the distance and the sky beyond.
April
If you like advanced Photoshop tips, then this tutorial is for you. When you're taking pictures at sunrise or sunset, you may find a lot of the fine details get lost in a red fringe, as you can see around the Joshua tree leaves in the image on the left. I've just posted a Photoshop video tutorial to show an easy way to fix the problem.
Even though these are small details, it's all of the small details that add up to making a better image.
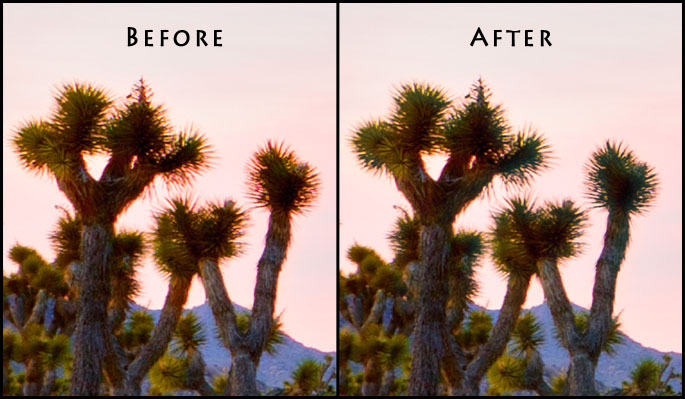
March
Here's another image from Joshua Tree National Park. This photo was taken about a half hour later than the photo in the previous post., so the sun a dropped fully behind the mountains, but it was still lighting up the high clouds to the north. The result was the beautiful glow in the sky, and soft, warm light on the Joshua trees.
Many times we we're photographing at sunset, we tend to get focused on the bright spot where the sun is setting in the west. Always remember to stop and look all around to the north, south and even to the east. Many times you'll find some of the nicest skies. The other big advantage is that there's a lot less contrast between the foreground and the sky, so it's a lot easier to keep detail in both areas.
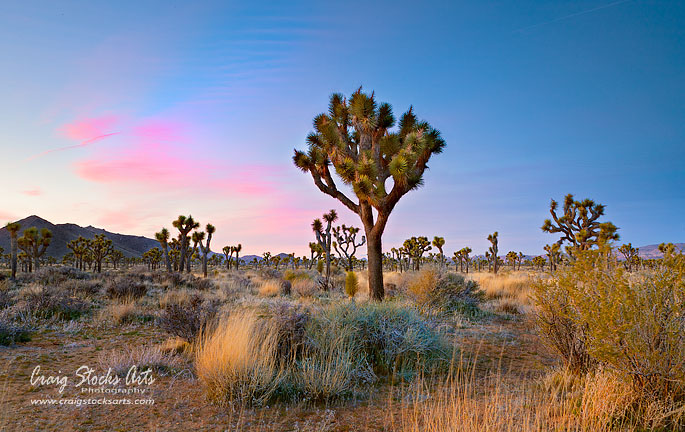
March
We love visiting National Parks, so we took the opportunity to go to Joshua Tree National Park this past weekend. We were able to hike a number of the trails, and we really enjoyed the variety of landscapes. Joshua Tree is along the juncture of the Mojave Desert to the North and the Sonora Desert to the South. (This region of the Sonora Desert is also referred to as the Colorado Desert.) As a result, the northern and southern portions have different plants.
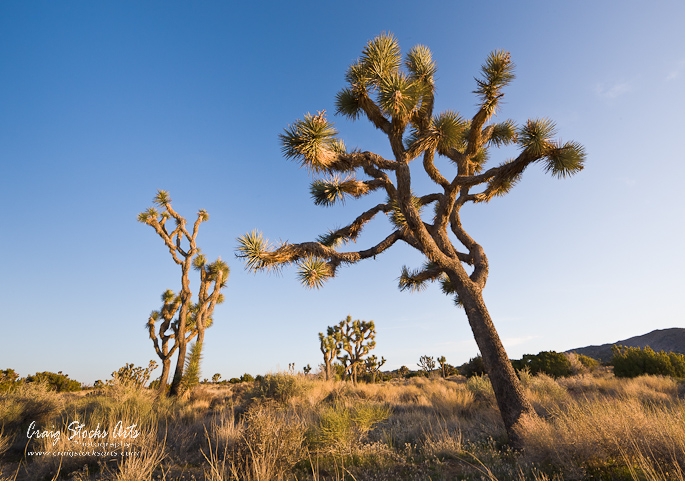
I really had to scramble to get the photo above. The sun was rapidly setting behind the mountains to the West, and I wanted to get a photo of the Joshua trees in warm evening light. This image was captured about two minutes before the sun slipped below the mountain ridge. I love the effect of the warm, yellow sunlight contrasting against the clear blue sky.
March
This past weekend was a good opportunity to visit San Juan Capistrano and San Diego. I'm not sure if it was good or bad planning, but we ended up touring the old mission at San Juan Capistrano the weekend before the return of the swallows. We missed the crowds, but also the birds. (I think I saw one swallow, but I'm not 100% sure.) You can see more photos from our California adventures in my California photos web gallery.
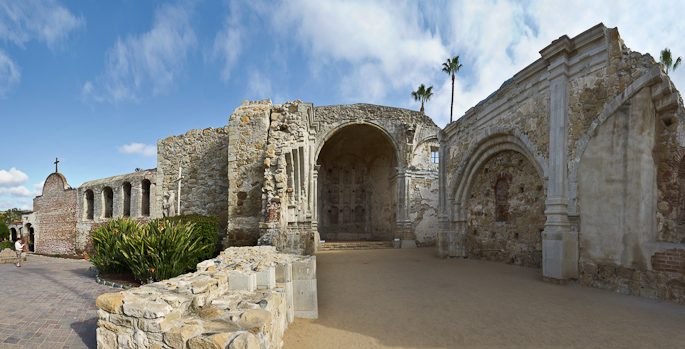
The photo above is a stitched panorama showing an extreme wide angle view of the original church. Construction was started in 1797, but it was mostly destroyed from a 6.5 magnitude earthquake in 1800.
March
After two cold and rainy weekends, we had some beautiful weather this weekend. We took advantage of the day to hike the Overlook Mesa trail in Topanga Canyon State Park. The panorama below shows a 180 degree view looking south along the trail to the overlook. Click on the photo to view a larger version.
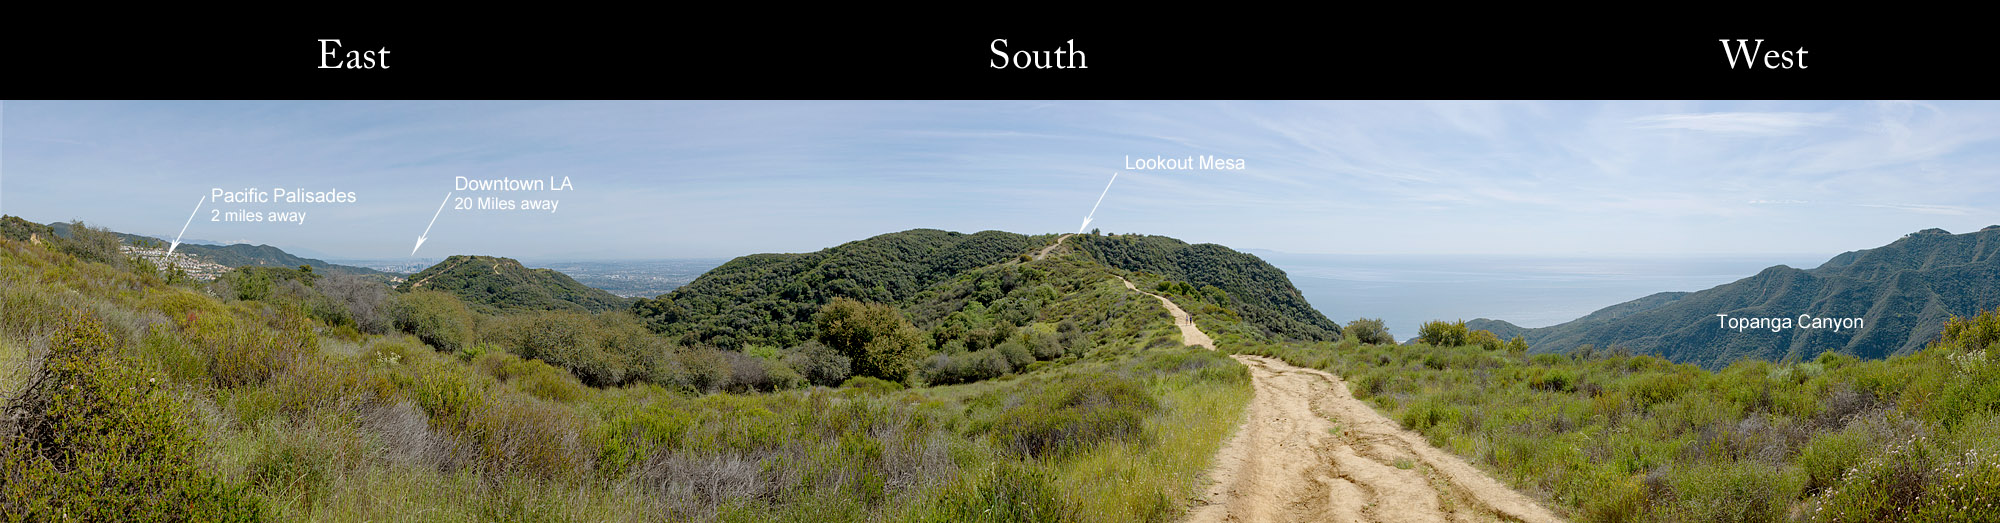
The trail starts at the parking area at the Topanga Canyon State Park. After a short climb, the trail follows a peak that runs between the Topanga Canyon to the West and the Santa Ynez Canyon to the East. In all, it's a little over three miles from the parking area to the overlook. There isn't much of an elevation gain in total, but the trail has quite a bit of up and down, so it ends up feeling like you've climbed a good sized hill. The views along the way and at the overlook are well worth the effort.
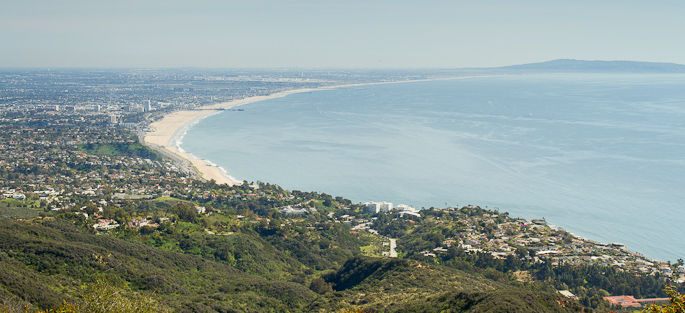
The overlook sits a the end of the ridge about 1500 feet above the ocean. From there, you get quite a panoramic view. Looking south-east you're treated to a view of the sweep of the Santa Monica beaches. In the distance, you can see Venice Beach and Catalina Island. Unfortunately, you also get a pretty good view of the LA smog.
February
I love before and after versions of photos. I'm a firm believer that all photos need to be developed to their potential. Some images area easy, then they just fall into place with the default processing settings in your camera, or in your processing software. Other images seem to fight you every step of the way. You know what you want, you just have to coax the image into going there with you.
The photo below is a good illustration of how much you can improve a photo through post-processing. The original image right out of the camera (bottom photo, obviously) is dull and lifeless. Even with a 2-stop graduated neutral density filter to brighten the foreground, the contrast range in the image nearly exceeds the camera's dynamic range. The camera recorded what it was able to see, but that sure wasn't how the scene appeared to me.
The top photo is the result of about 45 minutes of work in Photoshop. I used a layer mask to be able to adjust the brightness and saturation of the foreground independent of the sky. You'll notice little change in the pink clouds in the middle-right side of the image. I also spent a fair amount of time adding local contrast and color by hand to give the photo more texture.
You may or may not like my end result, and that's OK. I'm not trying to convince you that my version is the best, or that it should be your favorite. The point is to illustrate the power of post processing to move an image so that it matches your vision.
You can see a before-and-after rollover version of the image here.
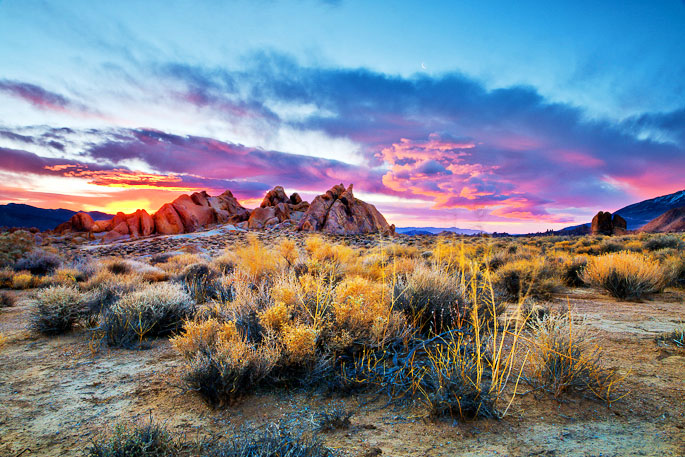
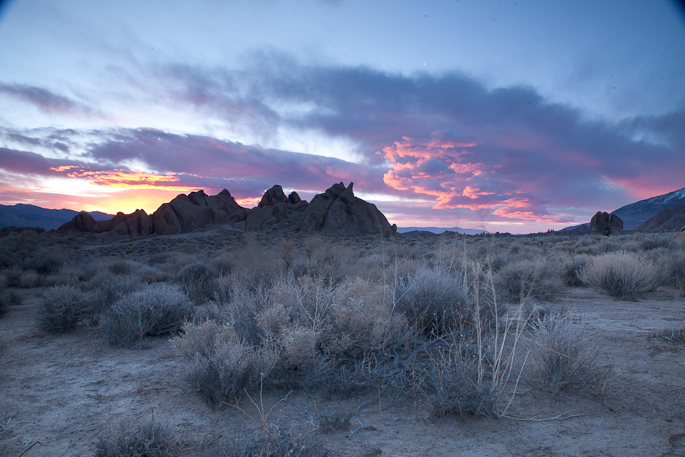
February
Here's a photo from several years ago, March 2005 to be exact. I've always liked this image. We were visiting my parents while they were wintering in St. Pete Beach in Florida. One of the attractions there is Fort. Desota, and I wanted to try to get a sunset photo at the pier. The rest of the group was getting ready to go out to dinner, so my mother went with me to enjoy the sunset on the beach.
It's certainly not the greatest sunset picture I've ever seen, but it's meaningful because of the circumstances. My mother, though, has always thought it was one of worlds greatest works of art. I guess since she's my mother, she may be less than 100 percent objective. Anyway, a couple of years later, she took her framed print off the wall and entered it into a local photography contest, in my name. And guess what - it won second place.
None of that makes the photo any better as a work of art, but it sure adds to the memories it carries for me.
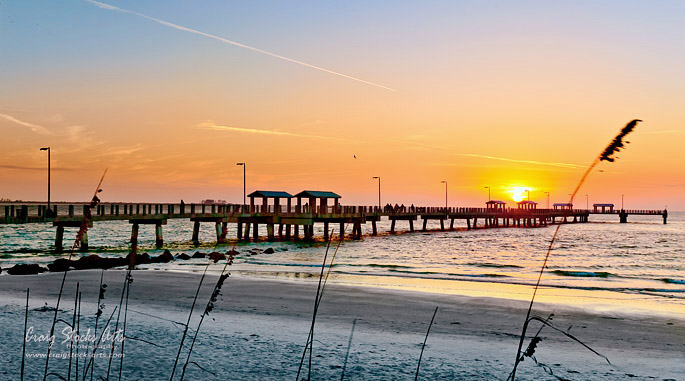
February
I just posted a new tutorial to explore variations in color saturation using the set of images shown below. How much is too much? Check it out here.
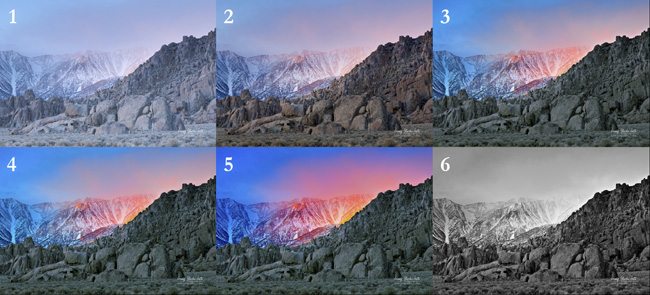
January
We had a wonderful visit to the Alabama Hills, which are just west of Lone Pine. Lone Pine is also one of the access points to Mt. Whitney, the highest peak in the continental US. The most striking feature is the rock formations that cover the area against a backdrop of the Sierra Nevada Mountains. The panorama photos below gives you a good feeling for the area.
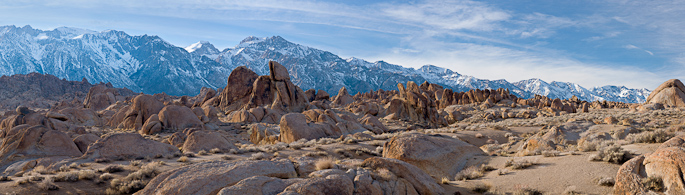
If you're a Western movie buff, you are probably aware of the area. The Alabama Hills played a supporting role in hundreds of movies and TV shows over the years, including classics like The Lone Ranger, Rawhide, Yellow Sky, Maverick and Gunga Din.
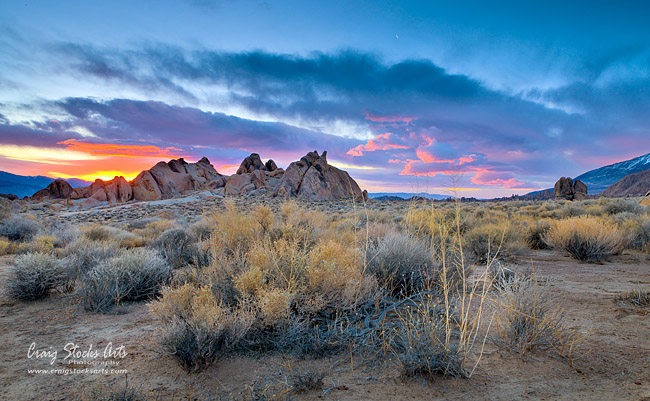
We were fortunate to have wonder weather. Highs were in the low 60's which were perfect for day hiking. And with partly cloudy skys, we had excellent sunrise and sunset conditions. Both photos shown here (above and below) were taken at sunrise, just a few moments apart. The top photo shows one of the rock formations just as the sun was cresting above the mountains to the southwest. The bottom photo shows the eastern slope of the Sierra Nevadas as the sunrise was just starting to kiss the peaks. I Iove how the clouds are moving in from the west and are just making it over the peaks to pick up all of the morning color.
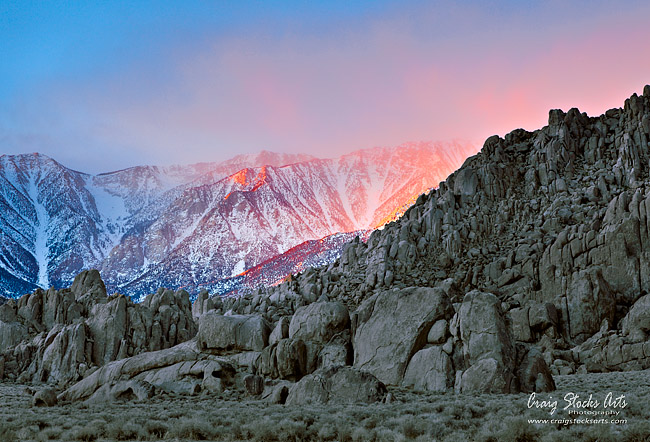
January
I posted another tutorial the other day. We occasionally want to preview our photos hanging in a room. It's especially useful for clients who can't easily visualize how the photo will look in their room, or to choose the best size.
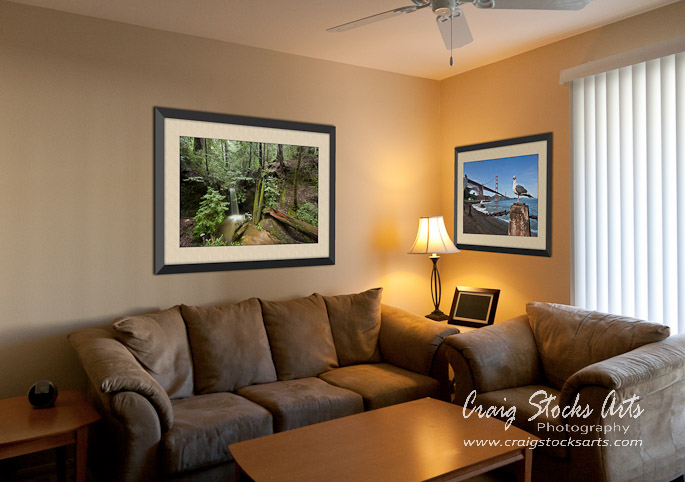
The tutorial consists of three separate videos. The first shows a couple of ways to create the preview in Lightroom. The second video uses Photoshop to create a more photo-realistic rendering. The third video shows how to create the digital frame and mat that I used in the example.
January
Here's another grandson and his project. His idea was to build a catapult that could launch walnuts, which we have in abundance in the fall. I'm pleased with the design we came up with. It avoids one of the issues with most catapult designs, that is that the throwing arm normally slams into a hard stop to get the best launch angle. In this design, we used two opposing springs (bunji cords), a strong one to provide the launch power and a lighter one to stop the arm. Even from a full power launch, the stopping cord provides a soft stop, but still has a consistent launch angle. We haven't tried a walnut yet, but it can easily send a golf ball 50 or more feet.
The catapult is built almost entirely out of thin wall conduit, which is strong, light and cheap. The joints are simply welded together. The cup that holds the projectile is a piece of sheet metal formed into a shallow bowl.
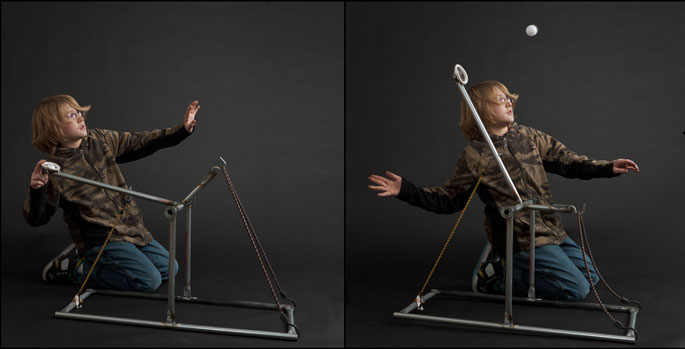
January
Here's another in the ongoing series of grandson's and their projects. The middle grandson was over the other day for a special "project day" where he gets to choose the project. He's something of a fan of weapons and martial arts fantasies, so steel claws (such as in Wolverine) made sense to him. Over the last year, we've built a sword, a battle axe, a shield and a spear, so some steel claws seemed to fit right in. It was also his creative mind that wanted to make flowers for his mom for Mothers Day, so he's not entirely all about weapons.
Since I'm an obliging grandpa, we laid out the plans and went to work. As we usually do, after completing the project, he likes to do a photo session with the new armaments. This time, his theme was "Secret Ninja." All we needed wa a little Photoshop work to add the text and the lens flare and it was done.
According to my daughter, as soon as he got home with his claws, they went up on a shelf along with the sword, axe, spear and shield. The flowers, though, managed to hold their place on the dinning room table.

January
I just posted a new tutorial about using Lightroom's Print Identity Plate feature to create a matted print. You can see it here on the Craig Stocks Arts website.
December
 If you recall from from my post a few weeks ago, we recently remodeled our kitchen. Overall, we're complete thrilled with the result, but along the way, there have been a few lessons in customer service. For the most part, customer service is all about how you treat a customer who isn't completely satisfied. Of course, there are any number of sayings about good and bad customer service, but what it really comes down to is your commitment to having satisfied customers.
During this process, we've enjoyed great customer service, and what I consider to be horrible customer service. The good came from our cabinet supplier, Kevin Zimmerman of Delavan, Illinois. Kevin runs a small contracting business and also builds custom cabinets under the name Country Cabinets by Kevin Zimmerman. What a pleasure it is to design the kitchen with the guy who's actually going to build the cabinets. Need them 25 inches deep instead of the standard 24 inches? No problem. Want to shuffle some drawers around? No problem. Need extra wide crown molding? No problem.
But, what really stood out was how Kevin handled the times things didn't go just right. When his supplier shipped him the wrong stain, he had the correct stain shipped overnight. When another supplier on sent only eight foot lengths of crown molding, he ordered more and specified some longer lengths. When some of the doors didn't take the stain quite right, he built new doors to replace them. What's more, he didn't wait for us to complain, he just took care of it.
Unfortunately, we've also experienced the other end of the customer service spectrum when the owner of the company, Paul Sherman of Sherman's in Peoria, called to tell us that he wasn't going to do anything about our concerns. I think I would have been happier thinking the owner didn't know about the problems, or just believing they didn't really care. Instead, he called to make sure we realized that he really didn't care, and wasn't going to do anything about our problem.
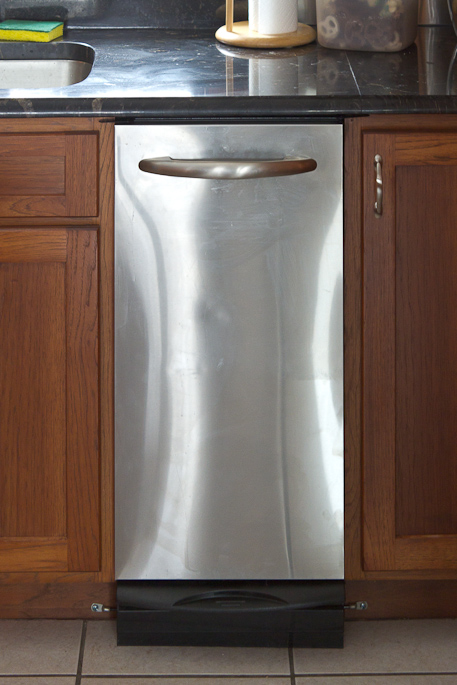
 The problem is really with GE Profile appliances and how they're presented and sold. We specifically went with GE because they offered a complete set of appliances from their Profile line. What the salesman didn't know is that there are actually two or more style lines within the Profile group. So, while all of the appliances say GE Profile, some have curved fronts, others have flat fronts. Some, like the dishwasher, have large radius edges and corners while the trash compactor five feet away has sharp edges and corners.
The issue isn't confined to just these two appliances. The stove has coarse grain, black trim and large-radius corners. The microwave right above it has very fine, smooth grain and sharp corners. All the appliances have horizontal grain, except the refrigerator, which has vertical grain. The refrigerator has dark gray trim but the dishwasher has light gray trim. All of the appliances have matching handles except the dishwasher, which doesn't have any handle.
We've discussed our issues with GE and with Sherman's. GE says Sherman's salespeople should have known about the different styles. Sherman's claims there aren't different styles, and they all go together. You can check out this dishwasher comparison page on the GE web site and decide for yourself, but I think you'll come to the same conclusion I did. There are two different designs, they cost about the same amount, and nobody told us about it.
Now, I'm not pretending this is an easy issue to resolve. The appliances are all installed and being used, so it's not a simple matter of just changing an order. But I'm amazed that Sherman's isn't even going to try. Paul's reasoning is A) most customers don't complain, therefore we should be satisfied with the appliances and B) we got a "really good deal" and he can't afford to spend the time or money to address our concerns. I'm not an expert in customer relations, but that sure doesn't seem like the way to keep your customer coming back. What I'm most surprised at though is the lack of trying. All of his energy seems to have gone into explaining why he can't do anything rather than trying to understand the issue and find a creative solution.
We'll continue to work the issue with GE's Customer Service department. In the mean time, we've had to do our own research to find options. We're asking GE to replace the dishwasher with a comparable unit that matches the design of the other appliances. The compactor doesn't have different lines, so our request is to send me the front panel adapter so that we can replace the stainless steel panel (which already has a half dozen dents) with a matching cabinet door panel. Then the compactor will at least match something in the kitchen.
Only time will tell if GE is up to the challenge.
December
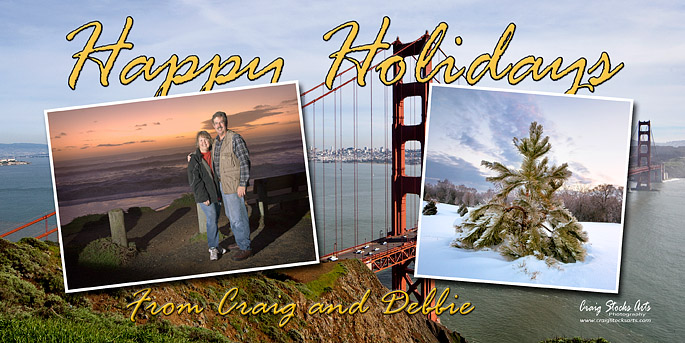
We want to take this opportunity to wish a Merry Christmas and Happy New Year to all who occasionally check out this blog.
December
For the last few years, we've had the privilege of doing photos at the Pekin Suzuki Strings annual Christmas Concert. We always get a picture of each of the orchestras, and also do individual portraits for whoever wants one. The prints and packages are very reasonably priced, but more importantly, we donate a significant portion of the proceeds to the Suzuki program. Both of our kids were in the program when they were young, and all three of our grandchildren are in the program now, so we enjoy continuing to play a part. This year, we were able to donate over $225 to the program.

This year, the Concert Orchestra was smaller than usual and the kids wanted to do something a little different. Since it was a smaller group, I took a white seamless background and photographed them in groups of three. The final image was a composite of five individual frames, and I then added the text and reflection in Photoshop.
You can see copies of all of the photos in this web gallery and you can see more photos from past events on my Suzuki web page.
December
My son, Chris, just bought a house. Like most people, there were a few things he wanted to do to "fix it up" before moving in. The bad news - the furnace and air conditioner in his new house were well past their prime and both needed to be replaced. The good news - he installs geothermal heating and cooling systems for a living. His part of the process is drilling the "well" where he then installs the loop of pipe that transfers the heat between the house heating system and the ground.
As a father, this gave me an opportunity to see my son doing is job. As an engineer, it was interesting to see how the process all comes together. And, as a photographer, it was a great opportunity to document the process. The photo below shows Chris (on the right) and his assistant Norman as they're just about ready to start drilling the first of three holes. Their plan was to drill three holes, each 300 feet deep.
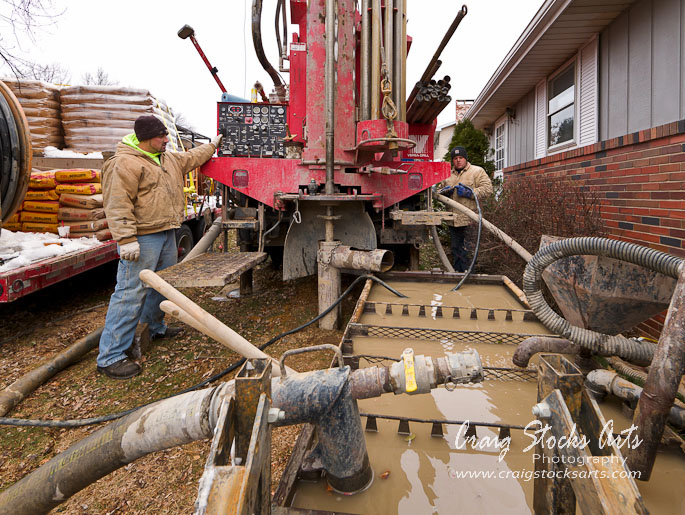
The second step in the process is to install the loop of pipe that actually does the energy transfer. The trick to getting a loop of 300 feet of plastic pipe into the hole is to attach a heavy pipe to the loop so that gravity pulls it down. As they slowly lower the weighted pipe, the loop simply follows it into the hole. Then, they use the cable hoist on the drilling rig to pull the weighted pipe back up.
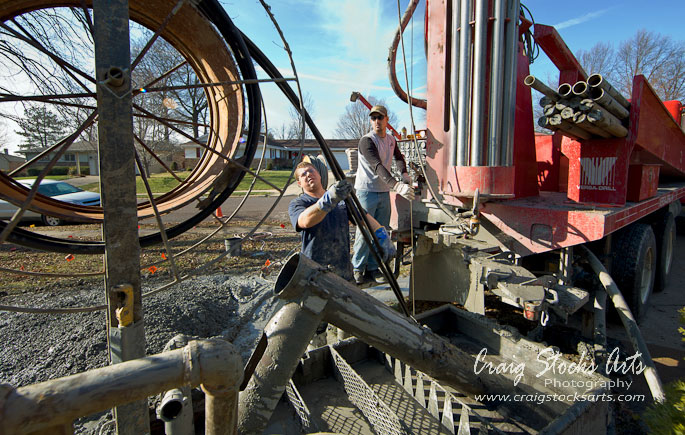
The last step is to connect the three ground loops and run the pipe into the house. They were trying to beat an approaching winter storm, so they worked into the evening to finish up. As you can see, the process makes a bit of a mess in the yard while they're working, but most of the drill tailing will get buried with the pipe. After a little grading and some grass seed, the yard will look as good as new.
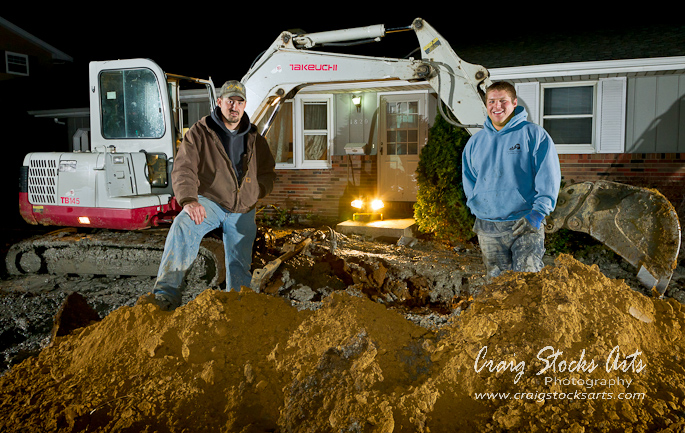
December
I recently posted a new tutorial describing the techniques to making this architectural interior photo. Hint - it's not really a sunny day.
December
 Our grandsons spent the night with us the other day, and Caden, the eight year old, wanted to build a project in the shop. There's nothing unusual about that, he always wants to build something. But, in this case, he wanted to make a birthday present for his mom. What I think is unusual for an eight year old is that he knew exactly what he wanted to make, and had a pretty good idea how to make it.
His idea was metal flowers in a vase. I had a simple flower pattern from several years ago, so I knew we were on pretty safe footing. As soon as we went to the shop, he started looking for materials. He quickly found a piece of 3/16 round rod that he said was perfect for the flower stem. Then he started looking for vase material and spotted some old brass handrail tubes in the rack. He wanted a base for the vase and found a disk of 1/4 plate that I use as a spacer.
Once the design decisions were made, we went to work. I still do the cutting and welding, but I don't think it will be too long before he takes over. He has an imagination that never stops. He can always dream up something to create. What amazes me is that he can also describe how to make it. He may not know (yet) which tool to grab, or how to use a welder or a plasma cutter, but he certainly knows what pattern needs cut out, and which pieces need welded together.
November
I recently posted a new tutorial and a companion video to describe some of the advantages of setting your camera to raw mode rather than its default JPEG mode. If you want more control over your images, more flexibility in how they're processed, and better overall results, then shooting in raw mode is something you should consider.
November
As I've mentioned before, one of the big advantages of digital photography is the ability to go back to old images and reprocess them with new software. Software keeps getting better and better each year, and there's constantly new software coming along. Add to that your new skills and it's almost like being to go back and retake the picture with a new, greatly improved film.
One caveat though, the ability to reprocess old images only holds true if your camera is set to shoot in raw mode. Most higher-end cameras can record the image in one of two ways, either raw, or jpeg. In raw mode, the cameras captures all of the data from the image sensor and records the raw data to the memory card. At that point, it's not a picture, it's just data. You then load the memory card data to your computer, and use special software to process the raw data into a finished image. In jpeg mode, the camera processes the sensor data into a finished image and then saves the image to the memory card.
Shooting in raw mode takes a little more work, but gives you a lot more flexibility. It's a little like buying a cake mix versus buying a ready-baked cake. If I buy a cake mix, I can still modify the recipe, add goodies to the mix, and choose to make a round or square cake, or even cupcakes. If I buy a ready-baked cake, it's pretty hard to add ingredients. If it came as a square cake, but I wanted a round cake, I'm pretty limited to the size of square I can cut out of the circle.
That's the drawback to shooting in jpeg mode. All of the processing parameters are baked into the file by the camera. You can make some changes after the fact, but you're pretty limited. And you certainly loose the ability to reprocess the image when better tools are available.
The finished photo below was taken in September 2006 in Jekyll Island, Georgia. The sun was still well below the horizon to the left, and the yellow glow is from sodium vapor lights in a motel parking lot. In fact, it was so dark that I couldn't really see well to frame the image. The total exposure was at ISO 200, f2.8 for 1/30th of a second. The exposure time was long enough to pick up the stars, but short enough that they appear as points of light rather than short streaks. Needless to say, it was captured in raw mode.

Now, compare it to the original version shown below, before any adjustments have been applied. In particular, notice how much detail is actually in the nearly black areas in the foreground. That's one of the areas where modern software for processing raw images really shines. If I had captured this image as a jpeg, those dark areas would have been recorded as pure black, and there's no way to extract details and color out of a solid black area.
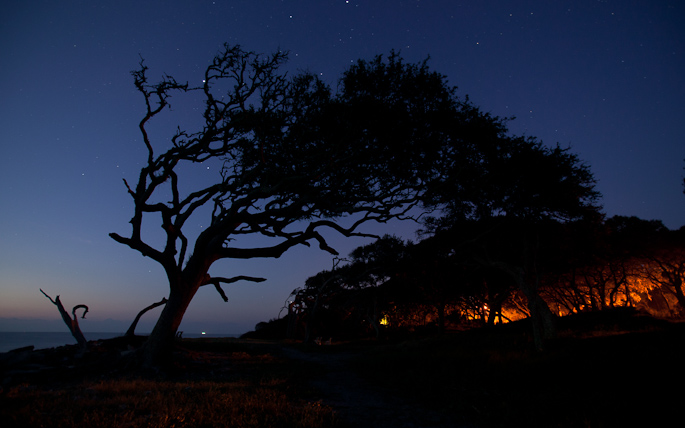
If you want to learn more about using your camera in raw mode, feel free to get in touch with me. I offer very reasonably priced one-on-one training including camera settings and post processing. I also have a a number of tutorials on my web site, including a set of Powerpoint slides that I've used for training.
November
Here's another photo from our trip to West Texas. We had just arrived at the Guadalupe Mountains National Park in time for one hike. Fortunately, the trail head into this canyon is right at the campground, so we were able to hike a couple of miles out and back before sunset. I played with a number of different versions of this image trying to accentuate the warm glow on the mountains on the right side of the canyon. In the end, though, I left the photo pretty much as it was from the camera.
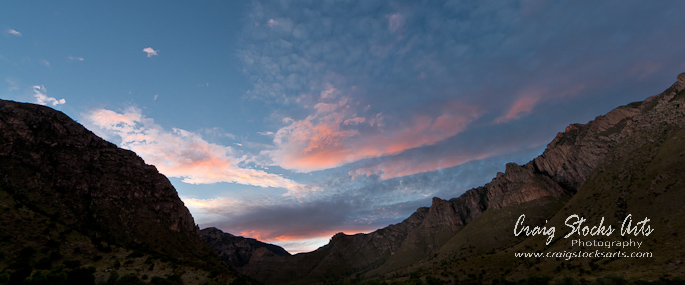
November
It's been a while since I posted a simple, landscape photo. This photo is from our trip to the parks in West Texas. We spent two nights at the Guadalupe Mountains National Park in the western corner of Texas, just a few miles from Carlsbad, New Mexico. This particular spot is at the Dog Canyon campgrounds. This isn't a spot you come across by accident, you have to work at to get here. It's only about 10 miles as the crow files from the visitor center to Dog Canyon, but we had to drive well over 100 miles to get there. But it was sure worth the trip! We were the only people there. Even the ranger who lives there was gone for the day. I wish we'd had more time to enjoy and explore, but it was time to start for home.
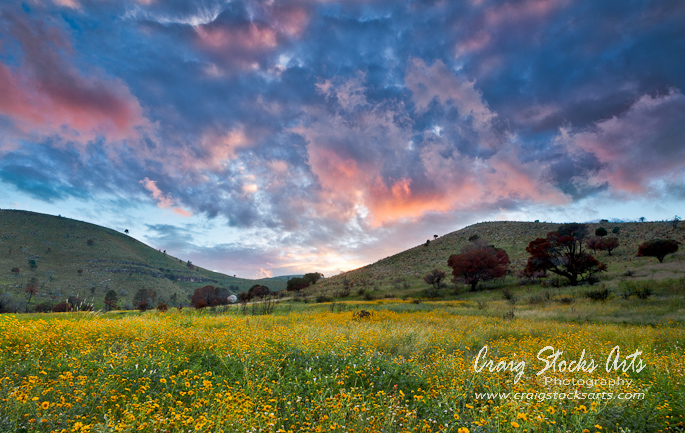
October
 My senior photo packages include a complimentary custom photo composite. A composite is a great way to feature a number of different photos in one frame. Since we did a number of different looks and locations, we had plenty to choose from. In fact, the bigger problem seems to be narrowing the selection down to a manageable number.
Boy, has senior photography changed a lot over the years. In the mid-1970's, I worked for Rembrandt Studios in Peoria. The studio specialized in school photography, and probably did most of the schools in Central Illinois. As a result, we did lots of seniors. As I recall, we had one scheduled every 15 minutes, and we did the same set of seven poses for each senior. It was basically an assembly line. The closest thing we did to a composite was a double exposure combination of a full face and a profile.
Today's seniors sure have it better. A senior session typically includes a wide variety of clothing and scene changes. Many are even done in locations that are meaningful to the senior. To top it off, there are lots of options for delivery formats. Composites, slide shows, business cards, albums... the list goes on and on.
It almost makes me wish I were a senior again. (Almost, but not really.)
October
Here's another image from the senior photo session last week. Notice how Laura is framed by the soccer goal behind her, creating a frame within the frame. I also replace the scoreboard using Photoshop so that it reflected the proper school colors and name.
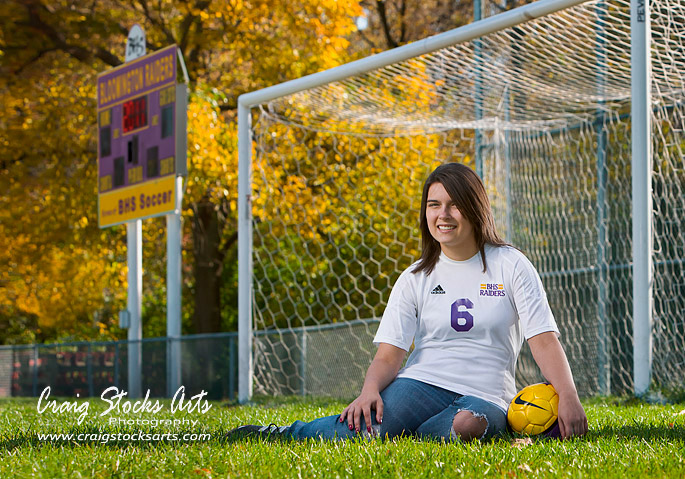
The setup for the photo was pretty similar to the other one. Laura's father is holding a large collapsible panel to block the harsh sunlight. The main light is from a strobe positioned camera left, creating the loop lighting pattern on Laura's face. The accent light from camera right is from a second strobe behind Laura to camera right. It creates separation and emulates the natural sun, but is more controllable and far less harsh.
October
The combination of beautiful fall weather and a high school senior photo shoot makes for a great opportunities. This week has been particularly nice, with clear skies, fall rich fall colors and cool nights. I recently did a senior photo session for a gal who plays soccer for Bloomington High School. She wanted a few photos on the soccer field, but her home field is literally just that... an open field. And to make matters worse, it doesn't have a scoreboard or any identifying signs.
No problem, we simply went to another soccer field, in this case, we used the Pekin High School field in Coal Miner's Park. The photo below shows one of the frames, pretty much straight out of the camera. You can even see her father holding a collapsible panel to block the harsh sunlight. The light on Laura is coming from camera left from an off-camera strobe.
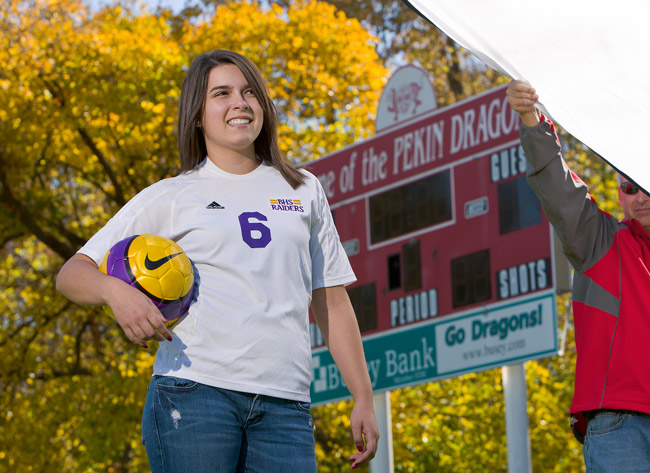
The problem, of course, is that the scoreboard says "Pekin Dragons" instead of "Bloomington Raiders." The photo below shows the result of some retouching on the scoreboard. Now it has the Bloomington school name and colors. Notice that the time clock even displays 2011, her class year. The switch-out was made easier since I had taken a picture of just the scoreboard before I moved from my shooting position. That gave me an unobstructed view of the scoreboard so that I could retouch it, and then use it as the master in any of the frames.
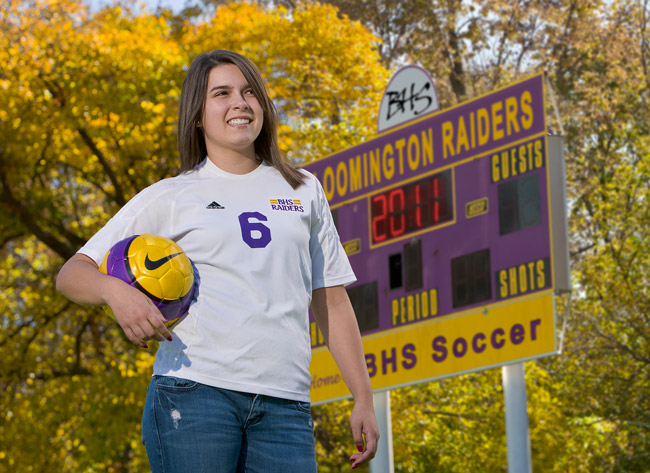
If you're interested in even more, behind-the-scenes Photoshop details, I also posted a tutorial showing how I extracted the BHS logo at the top of the scoreboard. It's available on YouTube or on my Tutorials page of my main web site.
October
Do you own your own business, or work in a small business office? If so, do you have professional quality photos and head shots? Business photos are an ideal addition to any small business office. What a great way to introduce the staff and help customers to feel at home. It's also critical for advertising, business cards or even social media. Studies have shown that professional quality photos even increase your effectiveness on dating sites.

If you're thinking about business portraits, be sure to understand what you're getting for you time and money. Make sure the photographer can work quickly with a minimum of disruption to the workplace. Also, be sure to understand exactly what services the photographer can offer. Do you want prints, or simply digital files. If you're getting prints, do you also want the photographer to supply professional framing? If you get digital files, be sure to get a variety of image sizes for each file so that you don't have to deal with resizing them yourself. Lastly, ask about retouching, building composites or simply adding text and logos to the images.
The photo above was part of a set done for the Dirk Madison Agency in Pekin. Since Dirk just recently took over this office, the sign on the front still has the previous agents name, so I updated it digitally. A little minor retouching to the background was about all that this image needed to make an inviting and professional portrait.
October
Sometimes, photography is about having fun, and that was the case with this photo of Caden, our middle grandson. It was his turn to spend the night Saturday, and then we did a shop project on Sunday. He originally suggested we build a tank, or an airplane, but we eventually settled on the spear he's holding in the picture.
Once the front yard was sufficiently speared into submission, he asked if we could do a picture with his new weaponry. The original photo was pretty bland, so I resorted to Photoshop to spice it up a little. I had just taken the photo of Andromeda the other day, so it made a good digital background. Then all we needed was a little touching-up on his skin tone, hair color and arms to complete the effect..
October
Here's another photo from our trip to West Texas. Can you find the deer in the picture?
The photo was taken at the Dog Canyon campground at Guadalupe Mountains National Park. It's a very secluded campground about 80 miles southeast of Carlsbad, New Mexico, but the campground is actually in Texas. We were the only people in the campground, so I didn't have to worry about disturbing anyone else when I was out at sunset and sunrise for photography. I don't think I've ever had a National Park to myself before, and probably never will again.
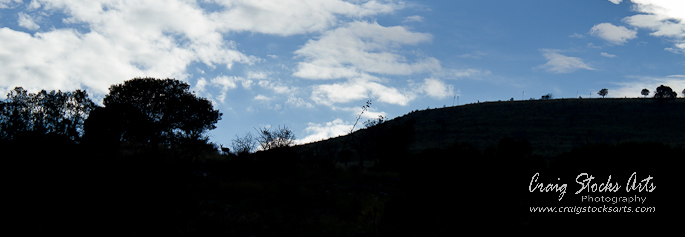
September
We just got back from a photo trip to West Texas, and we saw some wonderful sights along the way. We divided our time between the Davis Mountains State Park and the Guadalupe Mountains National Park.
In keeping with the nature theme of the previous post, I thought I'd start with this photo of a toad we found while hiking at the Chihuahuan Desert Nature Center near Fort Davis, Texas. We probably would not have seen the toad if it hadn't just jumped onto the rock. It sure shows how camouflage works to the toad's benefit.
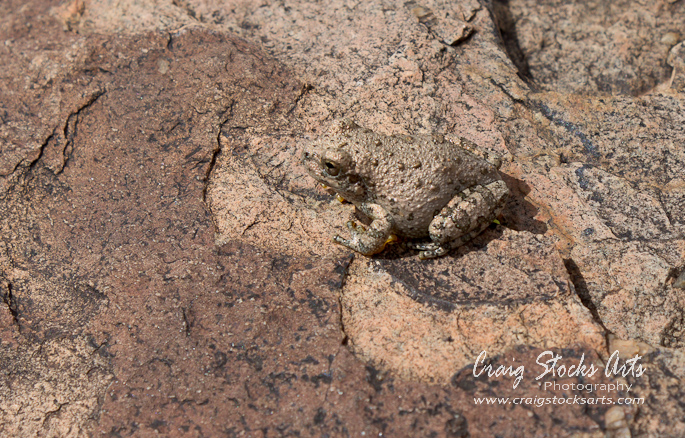
September
Here's another photo inspired by my own backyard. We've got a couple of these plants behind the house, and right now, they must be full of nectar. On a nice day, they'll be covered with butterflies, moths, bees and any other critter that likes sweet and easy food. I don't know the name of the plant, and I'm not really sure if the bug in the picture is a butterfly or a moth, but it sure make for an interesting photo.
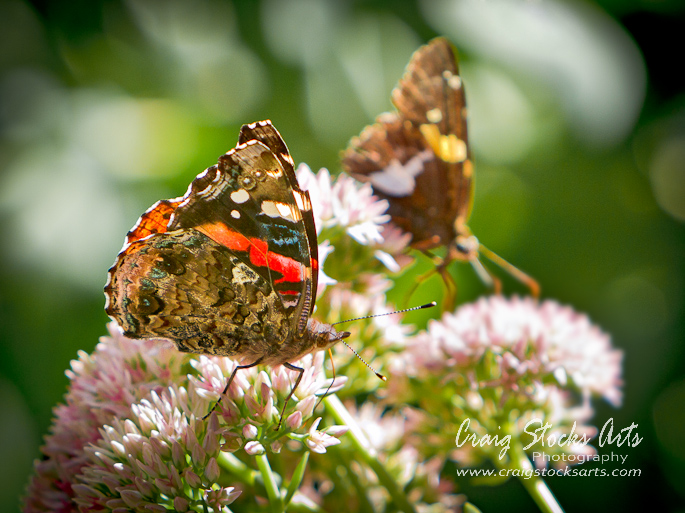
September
Whose picture is that? If I took the picture, does it belong to me? If you're in the picture, does it belong to you? It's a common question, and like so many things, the answer may vary. I'm certainly not a lawyer, but as a photographer, it's important for me to have a basic understanding of how to answer that question. If you're a bride-to-be, it's also important for you to understand the issue as well, since photographers vary in how they handle the issue.

First, a little background, then we'll look at what it means to me, as a photographer, and to you, as a client.
In very simple terms, when I take a picture, the copyright belongs to me. In other words, I "own" the rights to all copies of that photograph or digital image. But, that doesn't mean I can do anything I want with it. As individuals, we all own the rights to our own name and likeness, and have some say as to how, and by whom, they can be used. So, if I take a picture of you, we both have some rights, and some say, as to what happens to the image.
Starting with a very simple example, suppose I take a picture of a cloud. Since nobody owns the cloud, it can be considered to be in the public domain. And, since I took the photo, I own the copyright to the image. I can publish the photo, or I can choose to let someone else use the photo for their own purposes. Maybe a company wants to use that picture of a cloud in an advertisement, so they will pay me a fee to use that photo. The usage agreement could be exclusive, meaning I won't let anyone else use that same photo, or it could be non-exclusive, meaning I'm free to license others to use the same photo. Since I own the copyright, I get to decide who can make copies of the image.
Now, suppose I make a poster of that photo of a cloud, and you buy a copy to hang in your office. You didn't buy the rights to the photo, you only bought an instance of the photo. It's your poster, so you can hang it up, you can give it away, you can throw it away. You can even sell your poster to someone else. But, you can't make copies of it, since you don't own the rights to the image.
But, what happens if I take a picture of you? As the photographer, my rights are the same as above, but with one big exception. You have rights as to how your likeness is used. So, I own the copyright to the image, but I'm limited in what I can do with it without your permission. If that same company as above wants to use the picture of you in their ad, they still need to license the photo from me, but now I need explicit permission from you, the model, to use that photo for commercial purposes. In this example, I would need a signed model release that clearly states how I can use that photo. As the model, you may or may not be paid. You might grant unlimited usage, or you might only allow usage for one particular use. The terms of the model release can be whatever we agree.
By the way, editorial usage (think newspaper article) has different rules. If I take a picture of you winning a 10K race, I can sell that photo to the local newspaper, and they can use the photo as news coverage of the race. That's editorial usage, and they would not need a model release. However, they could not use that same photo in an ad for running shoes unless they had a model release from you, and every other person in the photo who could recognize themselves.
So, what does that mean to us as photographers and clients? If you pose for a portrait session, we expect that you'll want to buy copies of the image, but you probably wouldn't expect me to sell copies to anyone else. Weddings are more public, so you might expect others to be able to buy copies of photos from your wedding. In either case, you certainly wouldn't expect for me to license the photos to someone else for an ad campaign. You have rights to determine how your likeness is used.
As the photographer, I own the copyright to the images. In the "old days" it was quite simple, Photographers always retained the copyright, and clients were not allowed to make copies. Today, photographers take a variety of approaches. Some photographers will retain all rights, others will give the client unlimited usage rights to the photos. There isn't a right or wrong way to do it, just different ways.
As a bride-to-be, it becomes especially important for you to understand how your photographer views these issues. You'll especially want to discuss DVD's and online web galleries. If you have an online gallery, do you want other people to be able to buy prints? Do you want a the web gallery to be accessible only through a password? If you receive a DVD of images, will they have the photographer's logo on them? Are you allowed to make your own prints and distribute copies?
I would also urge you to be realistic about your intentions. Since some photographers will allow unrestricted usage of the images on the DVD, many couples decide that they'll just make their own prints and album. There's nothing wrong with that, but do you really have the time and tools to follow through? Remember too, most photo lab and consumer ink jets prints and DVD's all fade over time, sometimes in just a year or two. In a few years, you may not have any photos from your wedding. It's not uncommon to spend thousands of dollars on a wedding dress that's worn one time, but then skimp on the photos that should last a lifetime.
September
The 2010 Morton Pumpkin Festival Photo Contest in Morton, Illinois appeared to be another great success. There were over 160 photos entered in three categories, Junior, Amateur and Professional. The quality of the photos was outstanding. I was especially impressed with what I saw in the Junior category, which is 12 to 18 year olds. I'm sure the judge had a difficult time picking the winners. A different judge might have chosen a completely different set of winners, and they'd still be photos to be proud of.
After some debate, I decided to enter my photo of the surprise lily rather than the beach sunset. I was pleased that it was awarded 2nd place in the Professional Division.

September
I've posted this photo before, but I thought it would be interesting to go through the photo's evolution. It's sometimes the little things that can make a big difference in the finished image.
The first photo below is the starting point. The composition places the couple near the back of the sanctuary so that a wide angle lens takes in the entire setting. That also creates a number of leading lines that all converge to the center, so the bride and groom are easily the center of attention.
The main light on the bride and groom is coming from camera left where my assistant is holding a strobe shooting through an umbrella. That creates the direction of light on the couple so that they have depth and dimension. It also causes the colors of the dress and the flowers to be rendered naturally. Again, the colors lead your eyes right to the couple. The gold colors of the background are from the tungsten lights in the church. Since I was using a relatively high ISO and slow shutter speed (ISO 800, 1/20th of a second at f/5.6) the background is under exposed a little bit, again so that the couple stand out.
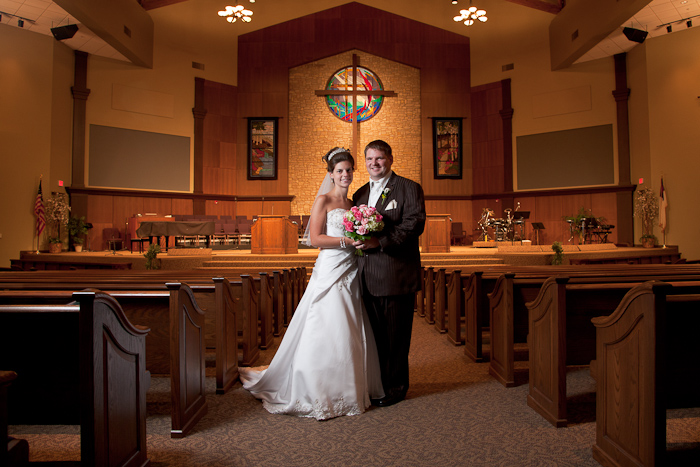
It's a good starting point, but the next step was to add a second strobe behind the couple (see the photo below). It's the same basic picture, but the addition of the backlight creates a glow around the couple, and especially, it adds reflections to the ends of the pews. Now, the line of pews is another strong graphical element that helps lead you eyes right to the bride and groom.
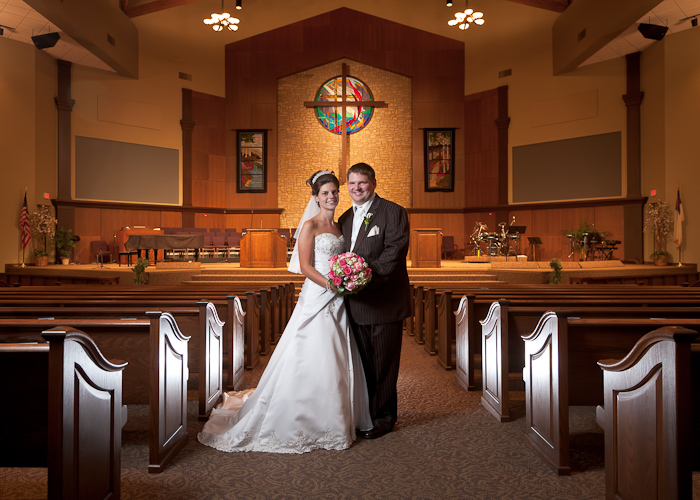
But, there are a few distractions in the photo, and I feel like the background is too gold, so it's Photoshop's turn. No real dramatic changes. I adjusted the color of the background separately from the foreground. I didn't completely neutralize the warm tones, but it's about half way to neutral. I also removed the two light fixtures at the top of the frame, and the two Exit signs on either side. That last big change in Photoshop was to brighten the two hanging tapestries on either side of the cross.
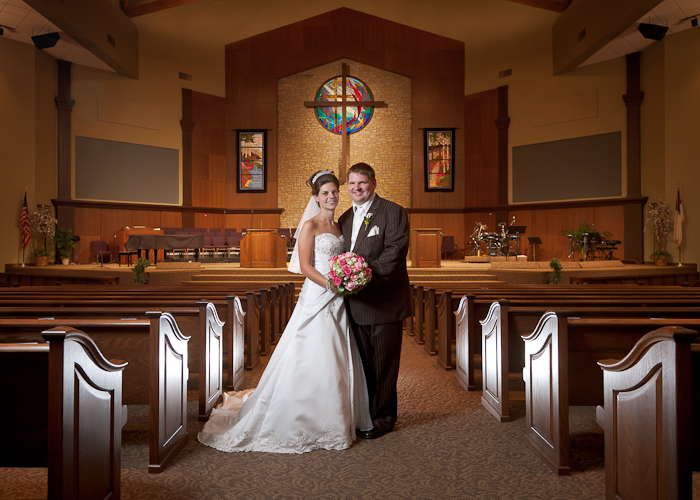
August
I don't normally enter photography contests, but the annual Morton Pumpkin Festival Photography Show is an exception. I started entering there by a rather round-about way. A few years ago, my mother took a couple of my photos off of her wall and entered them in my name while I was away on a business trip. I didn't know about it until she called to tell me I'd won second place.
I don't know how many years it takes to become a tradition, but I've entered the contest each of the next three years. I guess I've done pretty well since I've earned four more ribbons in the Professional division, including a Best of Show and a 1st Place. I think my mother would say it's become a tradition.
So, now I'm preparing for this years contest on September 11, so I have to decide which photos to enter. I'm on the fence about the image below. I really like the story, and the unanswered questions. There's a woman taking in the sun on the horizon, but the body language and the solitary set of tracks on the beach leave you to wonder what she's thinking. Is she pondering some of life's biggest questions? Is she sad? Or lonely?
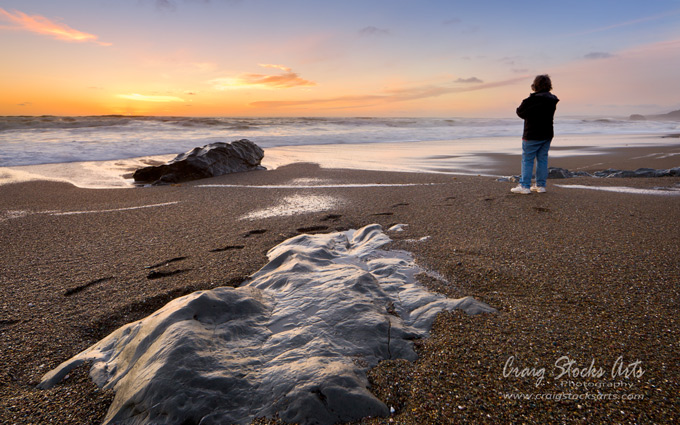
Of course, the real story is somewhat less dramatic. The woman is my wife, and we were enjoying a quick trip to the San Simeon area, which is along the Big Sur coastline in central California. I was busy with the camera, and she had walked ahead to enjoy the sunset. When I saw the composition of the large rock, sunset and her, I quickly set up the tripod. She started to move out of the frame, but I asked her to stay there. The body language is a reaction to the cold January weather.
August
I've started advertising my wedding photography on Facebook. You may never see the add on your Facebook page, but you can see the linked page right here.
Digital processes have been something of a two-edged sword for both photographers and brides. For photographers, it has lowered the cost of getting into the business, but it's still pretty expensive if you want equipment that will produce professional results. The bigger change is post processing. Instead of simply sending rolls of film off to a lab, most photographers spend hours in front of the computer. I typically spend as more time processing images than I spent photographing the wedding.
There are big changes for brides as well. Proofs can be viewed online, and they're normally available in just a few days. That makes it really easy for out of town guests and relatives to see the images. But even with online proofs, most of my brides still request a set of printed proofs, which I provide in a convenient proof book. That gives her something to take to work, or to dinner with friends. It can be passed around, and she doesn't need a computer to show them off.
Albums are another huge change. Today's albums are a far cry from the one from my wedding in the 1970's. Modern albums look more like high-end photo books or magazines, with full-page and double-page layouts, text and graphics. They're truly a keepsake that will last for years.
I do worry about brides who opt to not get an album. I think many couples simply settle for a DVD of images, and they probably have good intentions of putting together some sort of album. But, I'll bet most never get around to doing it. And, most DVD's will fade over time. In as little as a couple of years, the images may be gone, and then it's too late. That's why I also offer album design as service, whether with my photography or your own images.
August
And now, as they say, for something completely different. I saw this surprise lily growing in the back yard the other day while I was mowing. They're a strange flower. When they pop up late in the season, it's just a stalk with the flower on top - no leaves anywhere. I guess I'm not really a plant lover since I searched out the nicest one I could find, and then cut it down to take a picture.
I played with a number of different arrangements, but settled on the cobalt blue bud vase and a simple, white seamless background as my favorite. Lighting is very simple, just a medium softbox just a foot or so to the left of the flowers, and a second light on the background.
August
The proofs from Michael and Janea's wedding are now available online. You can click on the link here, or you can select Client Proofs on my main web site and find a link there. The proofs are divided into six separate galleries, so you can go directly to the section you want to see.
August
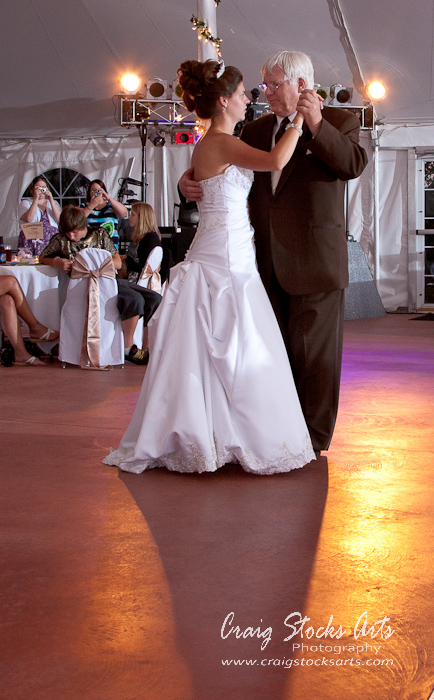 I really like this photo of the bride and her father during their dance at the reception. It represents a special time for both the bride and her father. It symbolizes the change in her life, and give the father one last chance to be her Daddy. Of course, in modern times, that's not really the case anymore, but the tradition continues on.
Of course, I also want to comment on the lighting. Receptions can be very difficult to manage. Normally, the lights are down very low and the people are moving quickly. The traditional approach is simple flash on camera, and that produces a usable record of the events. But, it doesn't capture the depth of the feel of the event.
My approach is to set up a "room light" which is a studio strobe mounted high on a light stand and positioned at one end of the room. Then, my assistant provides a mobile light from the opposite direction, and I fill in the shadows with a third flash on my camera. All of the strobes are linked by a radio signal so they all go off at once.
In this image, the room light (coming from camera right) did a perfect job of highlighting the brides face. The direction of light also gives some form to her dress by creating highlights and shadows. The father's face is in the shadow, but frankly, he's just not as important.
Another big advantage of the room light is called "depth of light." Since the light is rather far away, the light doesn't fall off nearly as much as if it were placed close to the action. The big advantage is that the background is well lit as well. In this example, we can clearly see the crowd in the background, so they're not just dancing in a black void.
I also used a relatively slow shutter speed to pick up the ambient light. In this case, the lights from the DJ's setup create beautiful patterns of shadow and light on the floor and help recreate the mood of the dance.
August
OK, one more post from last weekend's wedding. The bride had seen a photo of a bride and groom walking on railroad tracks, and she wanted to do a similar photo. Of course, what the bride wants, the bride gets. But I really do like the result. It's not a typical setting, but it's not way out either. I particularly like the interaction between the bride and groom, and the groom holding her shoes.
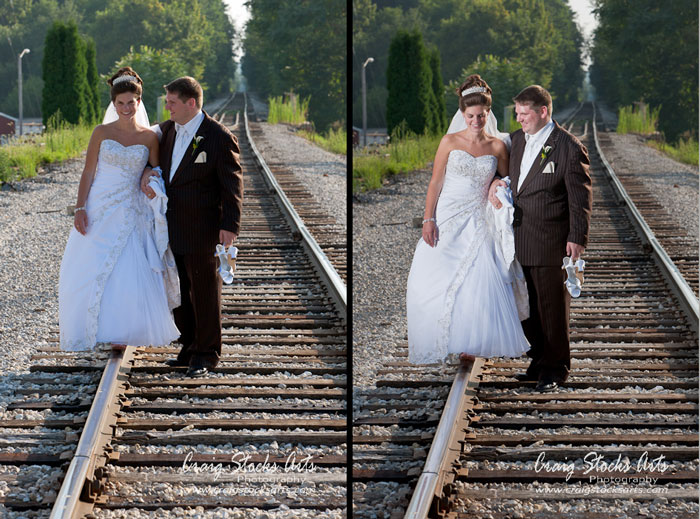
So, why did I post two photos? These aren't necessarily my favorites from the set, but they illustrate the difference in lighting. As with nearly all of the photos, my assistant is holding an off-camera flash to add direction to the light. For whatever reason, it failed to fire for the image on the left, so you can easily see the difference lighting makes. To me, the photo on the left shows railroad tracks with a bride and groom nearly silhouetted. However, there's no mistaking the subject in the image on the right - it's the bride and groom. They're brighter than the background, and the colors are much richer and vibrant.
With modern tools, shots like this are so much easier than they were in the "old days." Digital cameras are great, but the photographer sill has to choose the tools and create the photograph. If you want more information, you can see a recent tutorial I posted about using fill flash outdoors.
August
This is a more traditional wedding day photo, and the day just wouldn't be complete without a few portraits of the bride and groom. You can easily tell that the couple are thrilled with their special day. They've spent countless hours planning and preparing, and and it's all paid off. They even had beautiful weather for their wedding day.
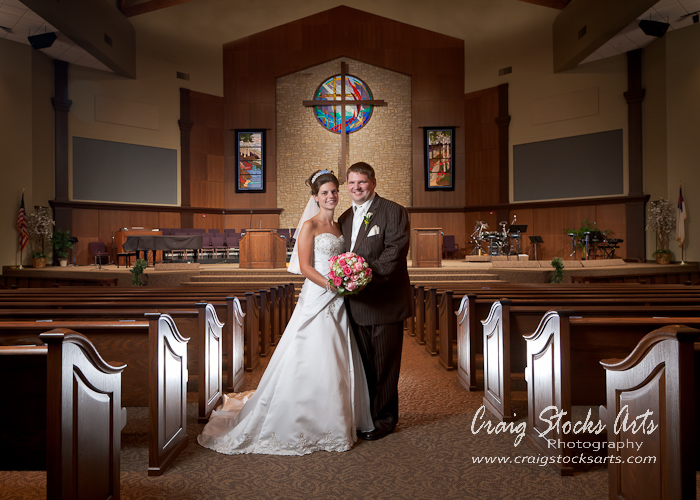
There are a few things about the photo that make it different from most wedding photography. First, notice their position. Rather than staying at the front of the church, we're near the back. That allows a wide view of the beautiful sanctuary, and lets the image tell you about the couple and the setting. It also creates a composition with leading lines all around that point right to the bride and groom and lead your eye right to them.
I also really like the lighting. The bride and groom are being lit by an off-camera flash shooting through a umbrella. The umbrella creates a soft light with soft shadows, and the off-camera direction creates depth and dimension. I also added a second off-camera flash directly behind the couple pointing back toward the camera. That creates a little glow around the veil, and also adds the reflections to the ends of the pews.
I know I sound like a broken record, but lighting is so important. I see too many photographers shooting with simple, on-camera flash, and the result is harsh lighting with no depth. Recently, another photographer told me that he did mostly weddings, and only had time to use on-camera flash. I don't buy it. For this photo, my assistant was holding the light, and it takes no time at all for him to move to the correct position. If you're investing the time and money in a photograph, you should do it right and get the best possible result.
August
Here's another wedding photo you don't see every day. The point of view is from behind the alter, looking out over the bride and groom into the sanctuary. No, I didn't go up there to take the photo, I'd never do something like that. Before the ceremony, I positioned a remote camera on top of a 12 foot light stand. The camera was rigged with a Pocket Wizard remote that could be triggered by pressing a button on a matching Pocket Wizard transceiver. The result is a view of the ceremony that no on else has.
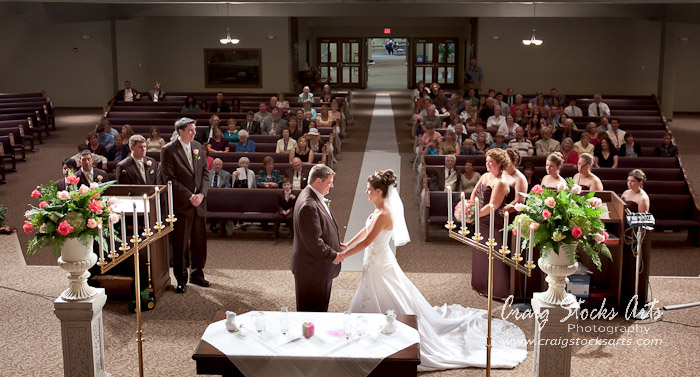
I wanted to make sure the camera wouldn't interfere with anything, so I had check with the couple, the minister, the wedding planner and the church videographer before hand. I've heard some real horror stories from ministers about the behavior of some wedding photographers, so I wanted to assure them that I wasn't going to tread into sacred territory. During the ceremony, I stayed at the back of the church or in the balcony. I also avoided using a flash at any time during the ceremony.
Modern digital cameras have really affected the wedding photography market. Many brides are questioning why they should pay a professional when their friend or relative has a good digital camera and can take good photos. To an extent, they're right, anyone can take a sharp, well exposed photo. But, a good wedding photographer provides more than that. They should be giving you something you can't get from everyone else.
Next time, I'll post a more traditional picture of the bride and groom, but with a couple of twists to improve the photo.
August
Here's another image from Saturday's wedding. It was obviously done later in the day near the end of the reception. Again, it's not your typical wedding photo. It might seem a little gimmicky to some people, but I think the bride and groom liked it.
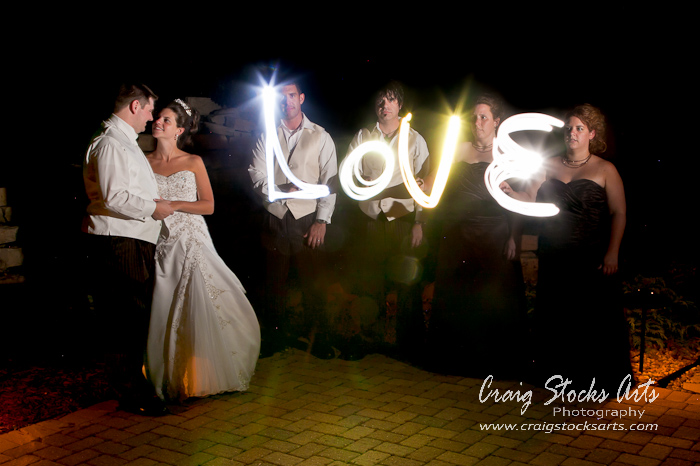
I think part of the appeal of this image is the way the bride and groom are looking at each other. You can certainly see the "love" in the picture. I also like that it features the bride's four brothers and sisters spelling out the word.
The setup for the picture is pretty straightforward. The camera is on a tripod and I held the shutter open for five seconds. That allowed the flashlights to trace out the letters. At the end of the exposure, my wife triggered the off-camera flash she was holding, and that flash of light illuminated the people and froze them in time.
This was the first time I'd done this shot, so I learned a few things along the way. It was easier than I expected to show the folks how to make their letters, but I forgot to let them know that they would be visible in the final image. I also whish I had placed a second flash out of the frame to camera-left and slightly behind them to outline their shadow sides.
Keep checking back for more samples from the wedding. If you want to see some extreme examples of painting with flashlights, check out the Sprint commercial on YouTube featuring a group of artists who've taken the idea to a whole new level.
August
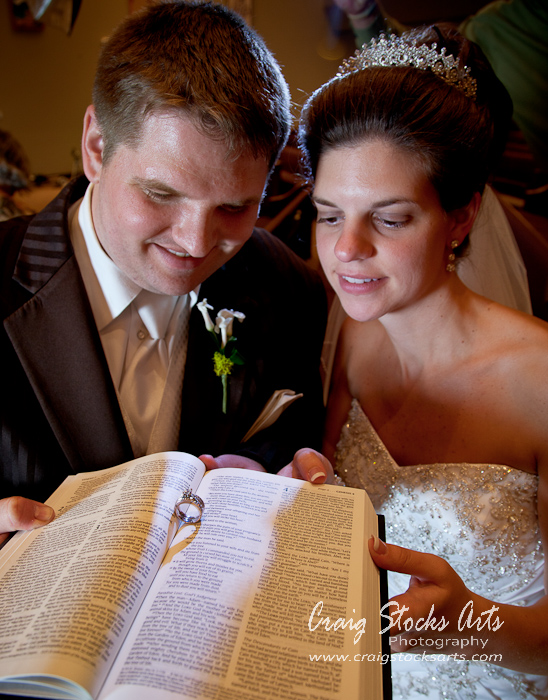 We had the opportunity to photograph a beautiful wedding this past weekend, so I thought I'd post a few of my favorite images. Along with the photos, I'd like to share some of my thoughts about why I like the image, and some of the background of how we made the image. I hope you'll agree with me that the photos are different from most wedding photography. I think it's the difference that make all the difference..
The image on the right shows the bride and groom with the Bible passage from Genesis that was read by her father during the service. Notice also that her wedding ring is sitting in the fold of the Bible, and the ring is casing a heart shaped shadow.
I really like the mood this image captures. The warm tones and contrast between the shadows and highlights gives the image a real sense of depth and dimension. Normally, I'd want to be able to see the subjects eyes, but in this case, I like their gaze directing us to the Bible and the ring.
Pictures like this take some extra work and understanding of exposure. The light on their faces is from an off-camera flash shooting through an umbrella. The light on the Bible is from an LED flashlight being held above and behind the couple. The trick is balancing the two different type of light (one continuous, the other instantaneous) into a single, balanced exposure. There was also a small amount of Photoshop work to balance the colors of the two lights, since the LED flashlight tends to have a blue color cast.
As I work through the nearly 2000 frames, I'll post a few more of my favorites.
August
These are a few of my favorite things! I love my Pocket Wizard Mini TT1. It lets me cheat my camera's synch speed up to 1/1000th of a second, and even beyond if I'm careful. If you're not a photographer, you probably don't appreciate what that means to me. In simple terms, it give me the creative freedom to add off-camera flash to outdoor scenes, even in bright sunlight. It's the off-camera flash that makes the image pop.
I just posted a new tutorial where you can read more about the TT1 and how to balance off-camera flash with bright sunlight.
July
The old homestead. Roll your mouse over the picture to see it today.
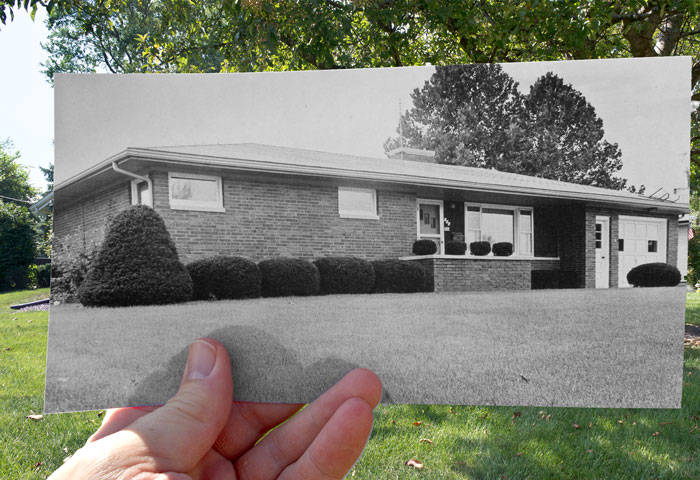
July
Ah, the heat and humidity of July in Illinois. I've been wanting to get out to a local corn field at sunset, but it's been too clear or too cloudy. We finally had a decent day last week, but the heat and humidity were a challenge. The temperature was close to 90, and the humidity was about 90%. I was already running later than I wanted, and as soon as I got the camera out, the lens fogged up, so I spent the next several minutes dealing with that.
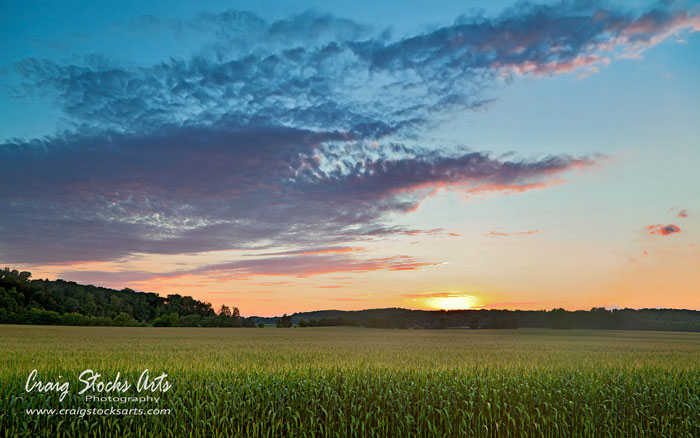
I've gone through a number of iterations with the images, and finally settled on the one above as my favorite, or maybe it's just my least unfavorite. I like the balance with the horizon right at 1/3 of the way up, and the bright spot of the sun is about 1/3 of the way from the right side. In terms of composition, the 1/3 points are referred to as "power points" and are usually a good choice for locating the main subject in a photo. Of course, rules are made to be broken, but you generally want to avoid placing items of interest in the middle.
July
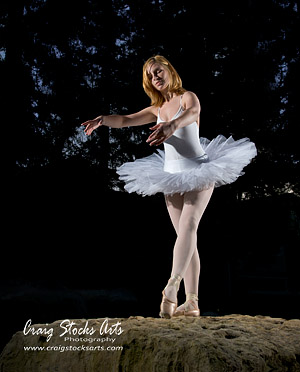 Among photographers, Ansel_Adams is known as much for his masterful darkroom technique as for his photography. He once said that the negative is the score and the print is the performance. Being a musician as well as a photographer, he understood the similarities of the processes. Like the musical score, the negative doesn't change. But translating the negative into a finished image is a very personal thing, Given the same negative, different expert printers will produce different prints, sometimes drastically different. Even the same person may print an image differently from day to day, or year to year. And even if you try to make two identical prints, there may be differences.
How many people really appreciate a good, well-finished photograph? I believe overall print quality is declining, and with it, peoples' expectations are lower than ever. In this digital age, most photos are never actually printed, they're simply viewed and shared on a computer. So, I'm really talking about finished image quality, not just physical print quality.
They say that if you want to produce good finished images, you have to look at a lot of good finished images to know what one looks like. I think that's true for everyone. The more good images we see, the better we can judge. I'm afraid the converse is true as well, the more we're exposed to lower quality, the lower our expectations become.
In the "old days" nearly every image we would see was done by a professional photographer, and most were processed into printed form by a darkroom or graphics expert . Newspapers, magazines, and billboards were the most common media, and all images were professionally prepared. Most photos that were framed and hanging on walls were done by professional portrait or wedding photographers, and printed by custom labs that specialized in serving the photo industry. The only exceptions were our family snapshots and slide shows, but how often did you really look at snapshots? We probably saw thousands of high-quality images in a week, and maybe a handful of snapshots. We were accustomed to looking at well executed images.
Today, our online world is different. E-mail, Facebook, Flickr, and all of the other online photo sites specialize in sharing our snapshots. News organizations frequently publish bystander cell phone photos. The majority of images we see on a daily basis are snapshots, so we get used to that level of image quality.
Even the commercial, online sources don't seem to have the level of quality control that magazines had. Maybe they can't afford the cost, or the time. Look at the array of images you'll find on Yahoo for instance. Rather than looking at closely at each image, back up and look at the page overall. The density and color balance of the images won't match. Some will be too red, others too yellow or green.
And, of course, everyone's monitor is different. What looks good on your monitor may look terrible on mine. To really judge an image on a computer, you need a large, high resolution monitor that's been properly calibrated and profiled.
As good as they are, cameras don't make finished images. Using today's digital SLR cameras, it really doesn't matter which camera you use. They'll all produce a good starting point. Whether on film or digital, capturing a good photo requires a certain set of skills, composition, lighting, exposure, posing, etc. Making a good finished image is another set of skills. The best photographers have mastered both sets of skills.
July
Our house was full of kids the other day when our grandsons and nieces were all visiting. The cousins don't all get together very often, but when they do, they always have a good time. I wanted to get a shot of the group, so I took them into the studio for a quick group photo. They were pretty wound up from playing all afternoon, and I quickly realized that I wasn't going to get a typical portrait. So instead, I told them to do a group hug, and they responded enthusiastically! When I went through the images on the computer, I decided the four-up presentation was the best way to show the moment.
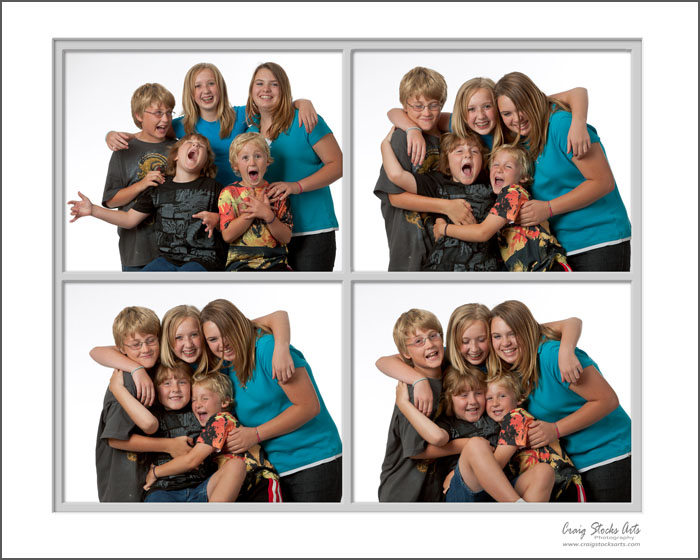
July
I recently posted a new tutorial explaining some of the story behind the photo below. One of the unusual aspects of the photo is that I used a strobe off-camera to light up the tuffa. Without the flash, the tuffa would have appeared as a silhouette and would have blended into the silhouette of the mountains in the background.
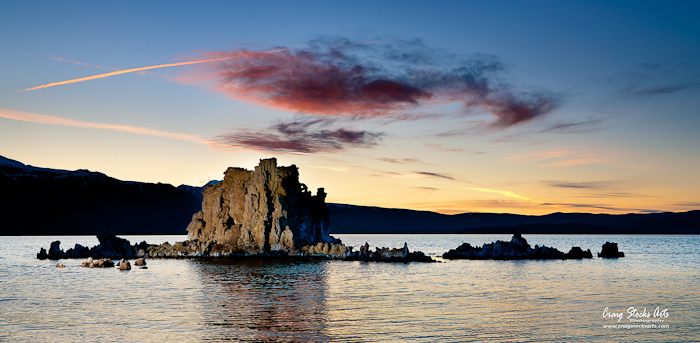
I just finished matting and framing a rather larger version of this photo, and it reminds me again about the difference between "taking" a picture and "making" a picture. I'm not talking about Photoshop manipulation. I'm referring to all of the work that needs to be done between capturing the exposure and producing a final, professional quality print.
It was also a good reminder that finished prints is a part of photography that is disappearing. In the old days (i.e. film era) you had to make a print of your photograph if you wanted to easily share or display the image. A print is a tangible thing you can hold in your hand. You can look at it any time you want, and you don't depend on some other technology to create the experience, you just look at it. When you're done looking at it, you can choose to display it somewhere, or you can put it away out of sight. But, it's still a thing, and it still exists.
A print is also a permanent rendering of the artists intent. The blue sky and the red clouds are the colors I intended. I even choose the size of the display, and an appropriate mat and frame to show the print at its best.
I worry that digital photography is taking that experience away from us. It's certainly not an inherent flaw of digital photography, it's our reaction to the perceived ease of sharing digital images online. It's certainly cheaper to simply upload an image on the internet, and let people look at it. In theory, every person in the world could look at the picture. But their experiences will be different. Some will see the picture on a large, clear monitor where the colors closely match what I saw on my monitor. Others will look at the picture on the tiny screen of their super-duper cell phone, and they'll have a different experience. As an artist, I want to create and share a visual experience, but I can only control the experience if I make an image into a finished print.
I think there will also be a very different perception of value. I doubt if anyone would pay to view the image online. And, an image file doesn't have much value as an object. I can make as many free copies as I like. I can make backup copies, so that I don't have to worry about losing it. Digital pictures displayed online, or even stored on a DVD just don't have much perceived value.
But a framed and matted print is a different matter. Certainly there's the cost of the materials. Then, there's the cost of my time to make the print and assemble the whole thing. There's also the artistic value that comes from my choices of color, size, materials, and precision in putting it all together. Hopefully, the artistic value raises the value of the whole thing to something more than the cost of materials. But even if it doesn't, I have the satisfaction of knowing I produced a thing, and I'm happy with the result.
June
It's summer, and the wedding season is in full bloom. We shot a real interesting wedding a couple weeks ago. The bride's father performed a rather traditional Lakota ceremony, complete with food offerings to represent the four seasons (water, meat, corn and berries) and a ceremonial pipe. It was also a challenge since the ceremony was outside at Wildlife Prairie State Park near Peoria.
The park is a beautiful venue, but we were in the midst of a midwest heat wave (and a humidity wave), so it was rather uncomfortable. Hot summer afternoons also mean bright, unforgiving sunlight.

We did a couple of things to deal with the weather. When you're shooting outside, the main thing to avoid is having the sun shining on the subjects face. You can either position them so the sun is behind them, or better yet, find a shaded area. In the example above, we positioned the bridal group in the shade of some trees and a building. That allowed me to bring in the off-camera flash from camera left to light the group while balancing the exposure for the background.
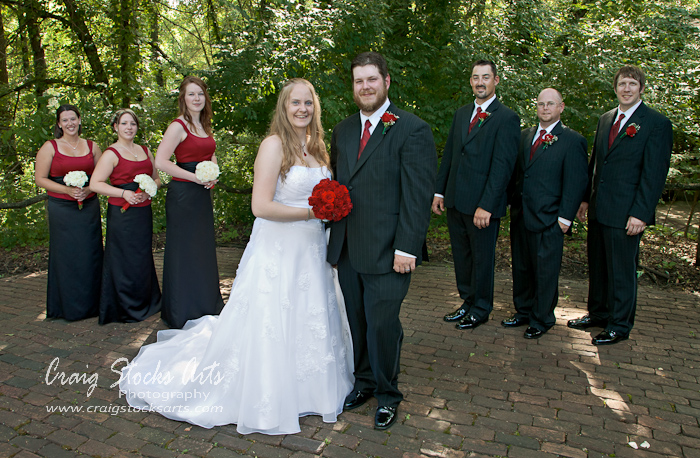
By the time we got to the larger groups and alter return shots, it was later in the afternoon and most of the ceremony area was falling into shade. Here, we used both techniques by having the groups in the shade, and we're positioned so the sun is behind them. Again, we used the off-camera flash coming from camera left to create a more pleasing light than we'd get just from the available light.
June
This time, I'm writing about photography, and patience. The old saying that "good things come to those who wait" is certainly true when applied to taking landscape photos late in the day. Look at the sequence of photos below and notice how dramatically the scene changes as the sun gets lower in the sky.
All of the photos here were taken at Donner Lake in East-Central California, just off of I-80. Donner Lake is named for the famously failed Donner Party who spent the winter of 1847 trapped in 24 feet of snow at Donner Pass, freezing, dying, and eating each other to survive.
We were on our way home from California and were spending the night in Truckee, California. After checking into the motel, we toured the Donner Pass State Park, and then went down to the lake (also in the park) to do some hiking around the lake. It was so beautiful and peaceful we decided to just eat dinner there at the picnic tables, then hang around for sunset.
All three photos were taken with a 24mm focal length, which is just on the verge of being an extreme wide angle. The wide field of view helps give the photos a sense of depth, with objects in the foreground, middle ground and background. I also used a 2-stop graduated neutral density filter to keep the sky from getting too bright. It's kind of like wearing sunglasses that are only shaded on the top.
The first photo in the series (see below) was taken about two hours before sunset. It's not a bad picture, but the sun is still pretty high in the sky, which creates a lot of dark shadows. Personally, I'd consider this a nice snapshot, but not a great landscape photo, and certainly not a fine art photo.

Now look at the second in the series. It was taken about an hour and a half after the one above, but still about 15 minutes till sunset. It's also from a little different location, but that's not the point. The point is that the lower angle of the sun allows the light to skim across the tops of the rocks, which gives more depth and dimension. The light is also becoming softer, so the shadows aren't quite so deep.The lower angle also helps to tame the sun's glare on the water. Lastly, notice how the color of the light has changed, so the entire scene is a little warmer.
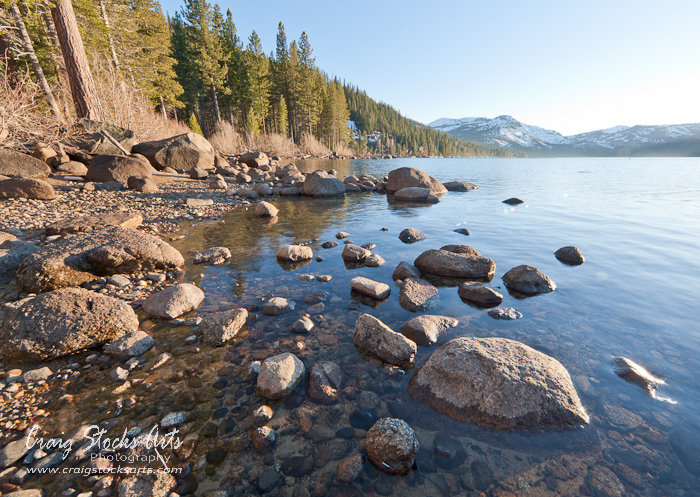
The last photo was taken just three minutes later. The sun was just slipping behind the mountains, so the foreground was now falling into the shadow, but the trees and mountains in the distant were still getting some sunlight. The setting sun's light is now quite warm, making the trees appear more gold than green, but the cool color of the shadow keeps the foreground a cool shade of blue. The resulting color contrast between gold and blue creates an additional layer of interest in the photo.
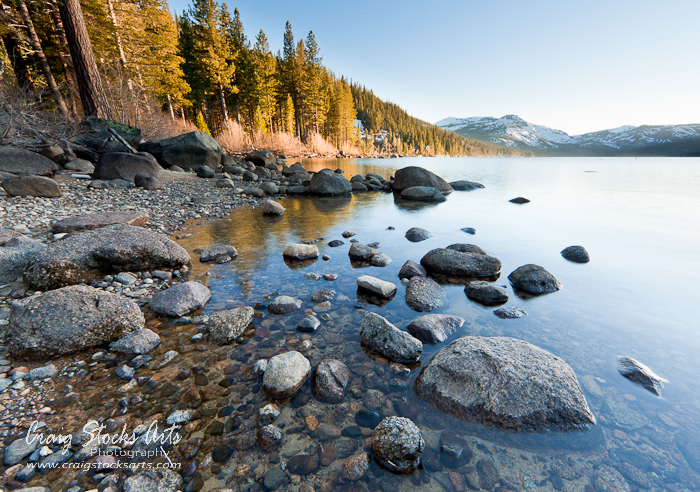
One other item of interest. Notice how the water becomes much smoother in the last photo. The wind had calmed some, but the biggest change is the shutter speed. As the sun got lower in the sky, there wasn't as much light, so I was able to use a slower shutter speed. The shutter speed for the top photo was 1/45th of a second so the ripples in the water were pretty well frozen in time. The bottom photo had a shutter speed of 1/2 second. The much slower shutter speed allowed the ripples to average out, giving the water more of a smooth, silky appearance, and the smoother surface helped accentuate the trees' reflections.
June
After two days of driving, we finally made it back home to Delavan, just in time for a couple of Midwest thunderstorms. After spending the last year and a half in Phoenix, Boston and San Francisco, I have a better appreciation for the Midwest's reputation as "tornado alley." We never saw storms in any of our travels to even come close to the last two days.
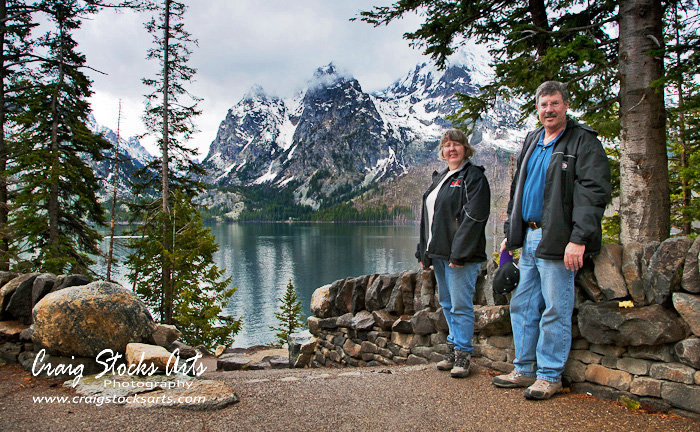
I thought I'd go ahead and post one more photo from Grand Teton National Park. This is another of the composites where we took turns taking each others pictures. People occasionally offer to take our picture, but I always decline. I've seen too many cameras dropped in the handoff from one person to the next, and I'd just as soon get home with mine still in one piece.
June
We had another outstanding day, but then, it's probably hard to have a bad day while you're touring Grand Teton National Park. We spent the night in Jackson, Wyoming, and then went thru the park today from one end to the other. The weather was still rainy with broken overcast most of the day. In a way though, it was nice to see the Tetons shrouded in clouds and fog.
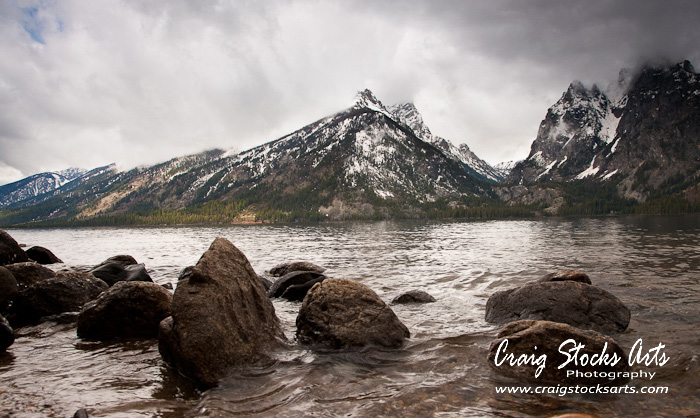
We also had pretty good luck finding critters. We saw lots of elk, a couple of moose, and a few herds of bison. We also some a variety of white tail and pronghorn on the road south from Jackson.
May
We sure covered a lot of ground on Tuesday. We started the day at the Bonneville Salt Flats, also known as Mecca for those who believe true sports involve burning fossil fuels and require hearing protection. Unfortunately, it was raining, and the salt flat was a 1/2 inch deep salt lake. Oh well.
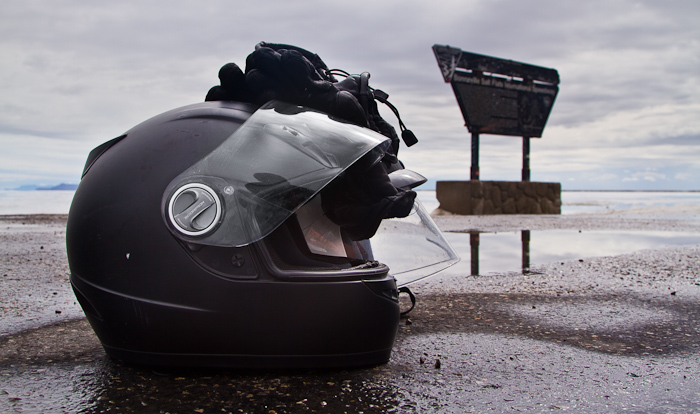
From there, we toured through Salt Lake City, and then headed north to Jackson, Wyoming. Today we'll hike in the Grand Teton National Park, then get back on the road for home.
May
Bodie, California is one of the largest ghost towns in the West, and it's just a few miles north of Lee Vining. It's sure an interesting place to walk around, everything is left just as it was when the last residents left. There's furniture in some of the houses, drinks, on the bar, all kinds of stuff. Unfortunately,
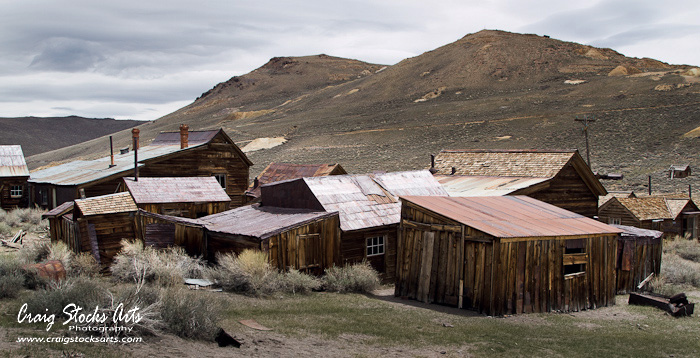
The town is slowly falling apart, which raises the question of how to maintain a ghost town. It's being cared for by the California State Parks as a State Historic Site. Their approach is to maintain roofs and windows to keep the buildings dry. They also have added some support beams. Other than that, they pretty much let it go.
May
We had a couple of good stops along the road today. The day started off with a trip up the mountain in a cable car at Squaw Valley. We didn't try skiing, but the view was tremendous. From there, we drove around the northern half of Lake Tahoe. It's beautiful, but pretty built-up and full of tourists.
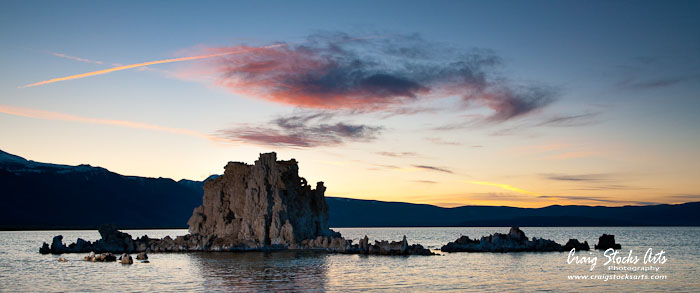
We ended the day at Lee Vining, CA, which is the home of Mono Lake. As the water level in Mono Lake has been drawn down to water Los Angeles, the calcite deposits on the bottom have been exposed. These tufas and common photo subjects in the area. It almost looks like a moonscape. Imagine a cave turned inside-out.
May
We're headed back to Illinois. Today, we drove up into the Sierra-Nevada Mountains, and are spending the night at Truckee, CA, home of the Donner Pass.
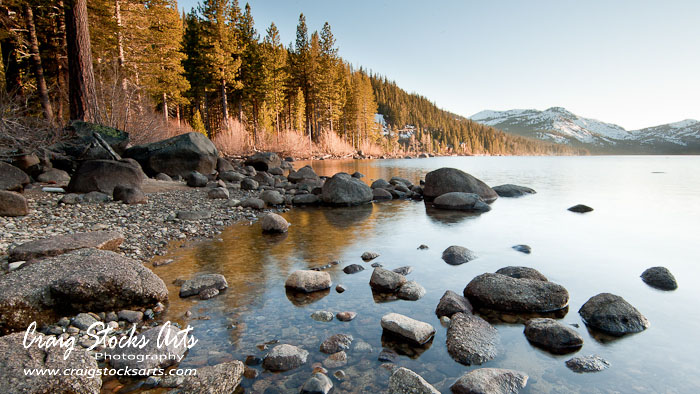
If you remember your history, the ill-fated Donner Party got trapped by winter storms in the winter of 1846. After they ate all of their food, and all of their animals, they started on each other. Tomorrow we head south through the Lake Tahoe area to Lee Vining, Ca. Lee Vining is the town closest to Mono Lake.
May
One of the aspects of digital that I really like is that as the tools get better, you can go back to your older images and re-processes them with new software. The image below is a good example. I took the picture in April 2006 along the Mississippi River near Dyersburg, Tennessee. The camera I was using at the time was pretty good, but not great by today's standards. More importantly, the software at the time was at least three generations behind the current state of the art. It had about half the resolution of today's cameras. More importantly, it had a tendency to exhibit quite a bit of noise in the image, especially in dark areas.
I happened to run across the original file, and wondered how the new Photoshop CS5 would do with it. One of CS5's new features is greatly improved noise reduction, and it really did the trick with this image. When I processed the file four years ago, I found there was a lot of noise in the grass area, and it really detracted from the image. With the new CS5, the noise is gone.
This was never an option with film. Once the film was developed, it was what it was. You could make new prints from the negative, but you couldn't go back and develop the negative again with a newer chemical. Just another reason I like digital.
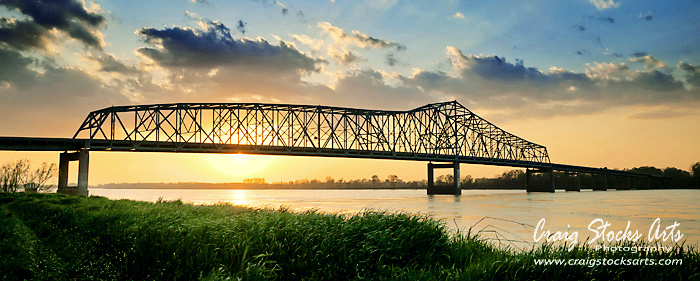
May
The other day, Yahoo! featured a story about America's Top 10 Road Trips. It was very satisfying to see that we've managed to have driven on eight of the top 10. The only two we're missing are the Huna Highway in Hawaii and the Million Dollar Highway in Colorado.
They listed California's Big Sur at the top of the list, and I have to agree. Highway 1 along the coast of California is filled with truly spectacular scenery. And it's not limited to just the Big Sur area. The Northern stretch of Highway 1 from San Francisco to the Redwood Forest National Park area has scenery that rivals its more famous southern sibling.
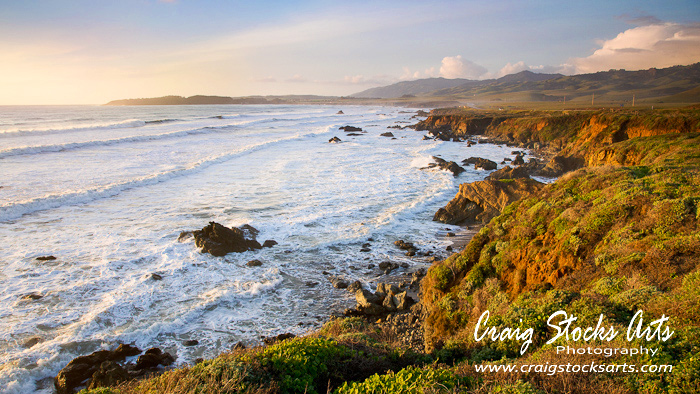
May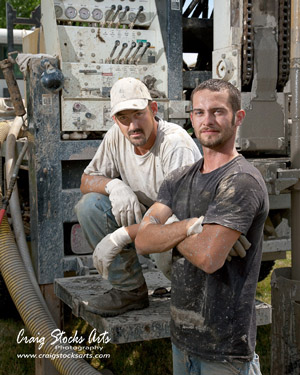
The other day, I watched another of the seemingly endless videos teaching how to control your automatic exposure camera and TTL flash to get the right balance. I don't have anything against auto-exposure, or TTL flash. But when I listen to the contortions people go through to trick the auto system, which was itself tricked by the scene..... well, wouldn't it be easier to just set the camera and flash manually?
In the video, the photographer was trying to balance flash with daylight. To pull it off, he ended up dialing in minus 2 to 3 stops of exposure compensation in the camera (just to get back to a sunny-16 base exposure) and then plus 2 to 3 stops in the flash compensation to get to a good flash exposure. And that, after a lot of trial and error and chimping. And he's the teacher!
The photo to the right is a good example. The photo was taken in mid-June, just a little after noon. I would have had a difficult time getting the "auto" exposure features to figure it all out. Instead, I just set the camera and strobe using a few, simple rules-of-thumb.
It's hard for beginners to get their heads around why the camera misleads them, and then how to dial in an offset to adjust for it. My hypothesis is that it would be easier to learn just a few basics of exposure, and then set the camera and flash for what you want. Quick, done, get what you want.
Maybe it's fear of having to learn something they think will be hard that scares people off. If only they understood how hard they were working, just to avoid working a little. I'm sure the same is true of human nature in other areas of learning as well.
May
Can you guess from the photo below that we were off hiking in the redwoods again? This time, we went to the Humboldt Redwoods State Park in Northern California. It's a beautiful park with a number of groves of old growth Coastal Redwoods. The world record tree is somewhere in the park, standing over 370 feet tall. They keep its location a secret to avoid the crowds of people trampling its roots. But we sure saw plenty of giant trees, a number of them more than 360 feet tall.
The picture below was taken looking almost straight up with an extreme wide angle lens. I know it's a very common technique, but to me, it's the best way to convey the trees reaching for the sky. National Geographic took a different approach by creating a top to bottom panorama of a tree to show it in its entirety. But, they also had a team of people working together over a period of weeks to make the photo. You can see the result on the National Geographic web site.
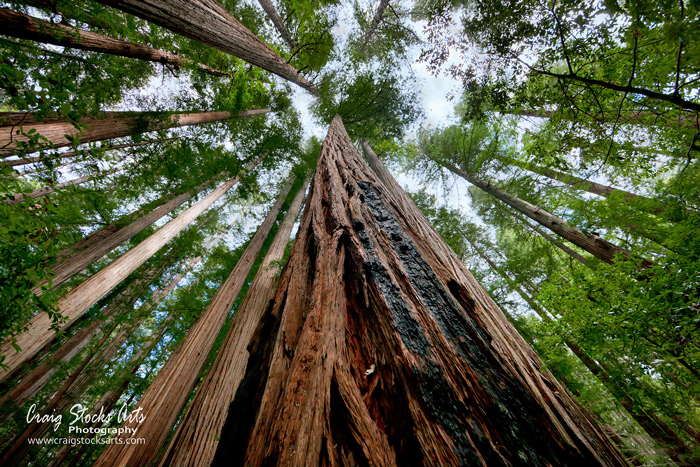
April
This particular image was taken in December 2009 on Jekyll Island in Georgia. It's another high dynamic range (HDR) image done with Photoshop CS5's new HDR Pro. I've also included the three separate exposures that were used to create the final image. I really like the results from HDR Pro. In particular, I seem to be able to get much more realistic results. I also like that it is tightly integrated with Photoshop, which I see as an advantage versus Photomatix Pro.
The sequence of exposures shows the challenge. The first shows the foreground nice and bright, but the clouds and sky in the background are completely washed out. The last image captures the details in the clouds, but the foreground is completely black. The middle exposure shows the middle ground between the two extremes, but even there, the foreground is too dark and the sky is too bright.

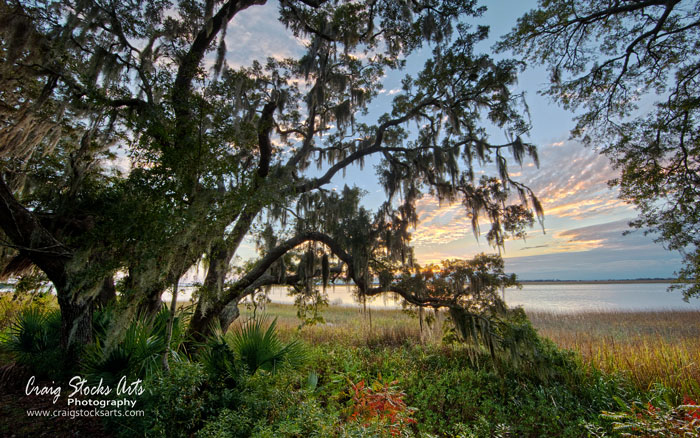
April
If you like tutorials, be sure to check out my latest entry to learn the tricks to green screen photography.
April
Here's one last image from last week's session with Asha and Nailah. Again, it's a posed picture showcasing the acting skills of the twins. Like all digital photos, it started out as a color image, but I felt the warm tones just didn't sit right with the mood of the picture, so I converted it to a fairly high contrast black and white.
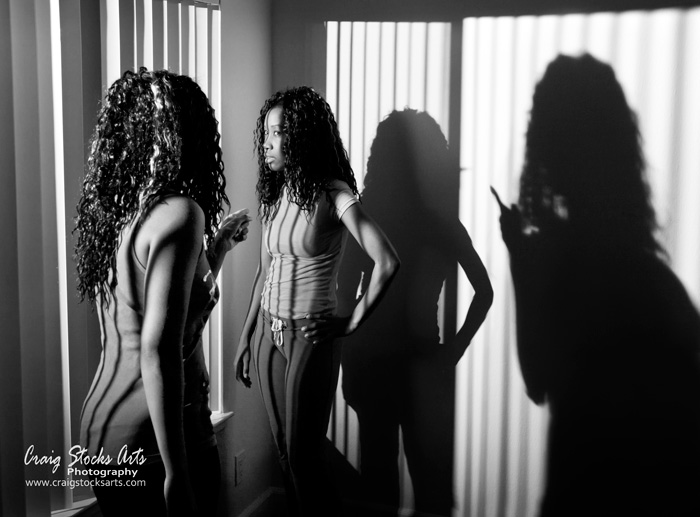
April
Lately, I've been doing some portfolio photos for actors and models. Besides the standard photos, each session usually includes some fun photos. That was the case yesterday with the twins shown here. Asha and Nailah are not only models, they're quite adept at acting and dancing as well. It was amazing to watch them play off of each other.
We also tried something a little different. Hopefully, when you look at the photo below, you'll begin to wonder what's happening outside. What is she seeing? Who's the second person, and how does she enter into the story? The photo doesn't offer any clues, so you have to make up your own story.
The photo is entirely setup. Asha is looking out the window toward a flash I've located outside about 10 feet away. Nailah is inside, positioned to add a second shadow, creating a little mystery in the final image.
Quite a bit different from nature and landscape photography. But, that's one of the great things about photography, you don't have to focus on just one style (no pun intended).
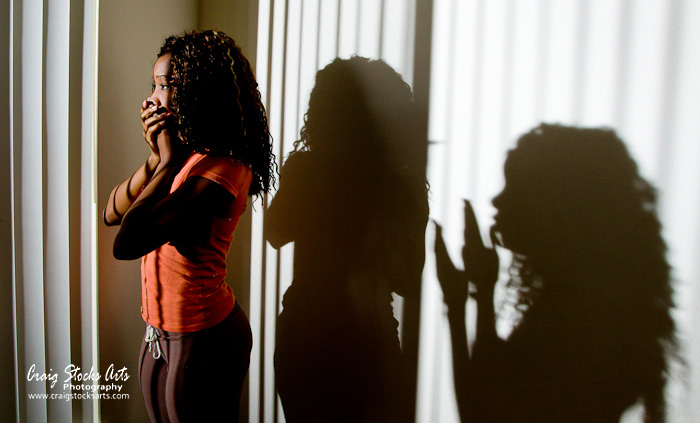
April
One of the new features in Photoshop CS5 is HDR PRo. I've posted High Dynamic Range photos in the past, and there are a variety of ways to produce one. Up till now, the standard, professional tool has been Photomatix Pro. But now, Photoshop has upped their HDR game with the new HDR Pro that's included in the new CS5 version.
The question then becomes which to use. To help answer the question for myself, I processed the same three-frame HDR image shown below in both Photomatix and Photoshop CS5. (Roll your mouse pointer over the image to see the Photomatix version.) The verdict, I like the CS5 version better. Grain wasn't too much of an issue with this image, but I found the tones much more believable and workable from CS5. In particular, the shadows in the foreground grasses were rendered much better by CS5.
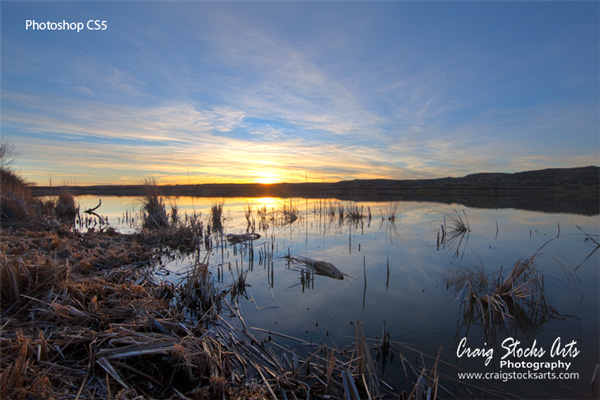
April
Be sure to check out my Tutorials page. I've just added a link to my basic photography instruction material that I prepared last year while I was at the Organ Pipe Cactus National Monument.
April
We like to use our weekends to explore the area, so this past weekend we went north to the Point Reyes National Seashore, which is about 30 miles north of San Francisco. The photo below shows the old boathouse from the Castle Rock trail. It's about as far as you can get from the entrance, since it's the end of the trail that extends from the end of the road.
We had beautiful weather on Saturday, but Easter Sunday was cloudy, windy and rainy. We didn't have much luck with Point Reyes biggest attraction - whale watching. Deb's usually pretty good at spotting whales, so I assume they just weren't there. Oh well, it was still a nice weekend, even with all the rain and wind on Sunday.
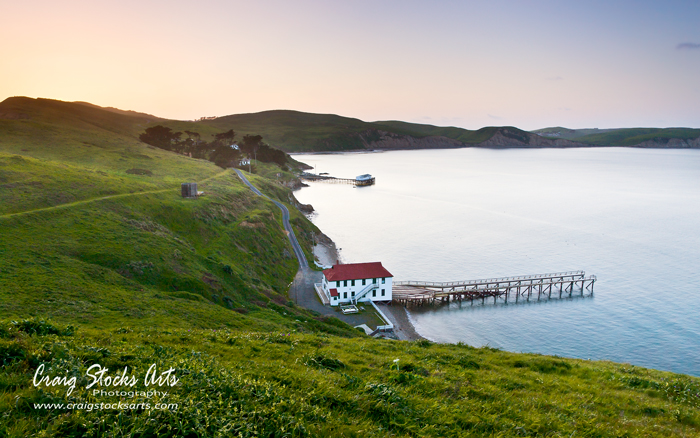
April
Here's another photo from our excursion in the Marin Headlands. This is the Point Bonita Lighthouse which is located in the Marin Headlands. We were fortunate to be able to tag along with an Earth Sciences class that was there to see the lighthouse and study the various types of rocks. Of course, our timing was off. We had already made the trip down and back up the rather steep trail when we met the class group, so we repeated the trip.
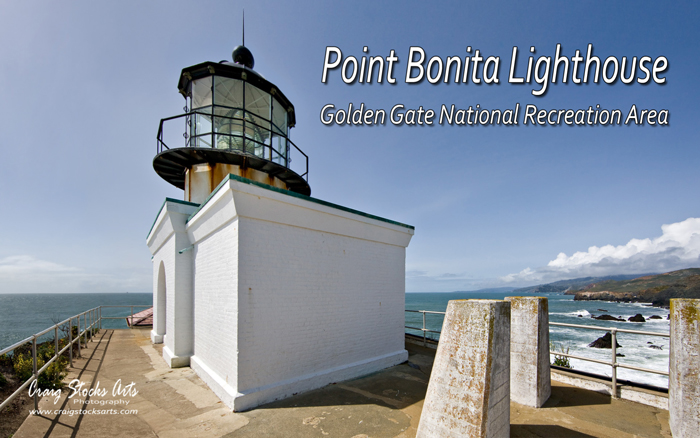
March
In life, you never know what's around the corner. And in a big city, a wrong turn can turn into an unforeseen opportunity. The photo below of the San Francisco skyline was just such an opportunity. In the process of getting from the Marin Headlands (north of SF across the Golden Gate Bridge) back to Santa Clara (60 miles south of SF) we decided to just take Lombard Street from the GG Bridge to the Embarcadero. What we didn't realize was that Lombard doesn't go all the way, it comes to a dead end at the parking lot for the Coit Tower.
Ten dollars and an elevator ride later, we were at the top of the 210 foot tower, which sits atop Telegraph Hill, which is 273 feet high all by itself. The end result is some great 360 degree views of San Francisco. The only drawback is that the windows in the Coit Tower are very deep, and sealed with Plexiglas, so you can only see narrow areas at once, or about one fifth of the panorama below.
So, How did I get a panorama showing everything from the Bay Bridge on the left to Chinatown on the right? I went from window to window taking separate frames. Then I used Photoshop to combine them into a single panorama.
This image also had some special treatment in the newest version of Photoshop. I'm one of the beta testers for Adobe Photoshop CS5, which will be officially announced on April 12th. Beginning today, I can post images that were edited in CS5, and also confirm that the image was edited in CS5. Unfortunately, I can't tell you about the feature that helped improve this image. For that, you'll have to wait until April 12.
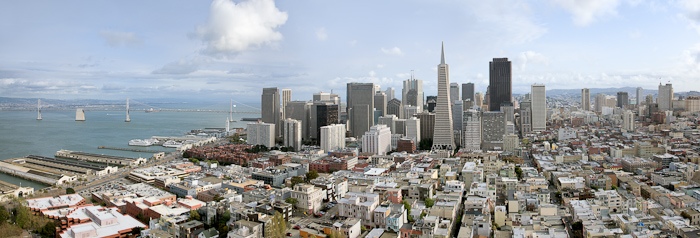
March
You can tell it's spring - flowers are really starting to bloom everywhere. Deb and I spent the day yesterday exploring the Marin Headlands. We found these calla lilies along the trail to the Point Bonita Lighthouse. Also, as usual, we found a lots of folks enjoying the park. We even had the opportunity to tag along with an Earth Sciences class.
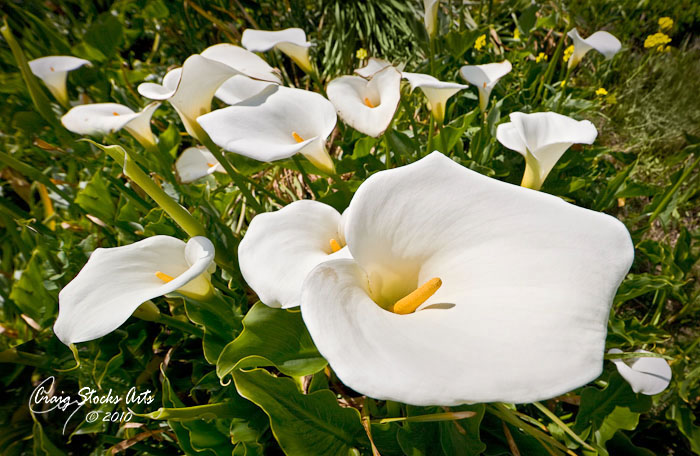
March
Did you notice the new look? I frequently tinker with the web site, but I decided it was time for a complete overhaul. I wanted to give the site a more current and professional look. My design goal was to minimize distractions and let the viewer focus on the photography. I also wanted to better showcase my portfolios, and help guide the viewer to their area of interest. Once the template was completed, the majority of the content was moved from the old site pretty much as-is. If you find any problems with the new design, please let me know at craig@craigstocksarts.com
March
If you've been following my blog, you'll already know that I'm currently serving as a volunteer photographer for the National Park Service at the Golden Gate National Recreation Area. What a great deal! They send me out to explore and photograph some of the best scenery in the Bay area. They get pictures to use in publications and web sites, and I get to contribute while doing something I love.
Actually, the NPS relies very heavily on volunteers, and the GGNRA has the largest volunteer program in the park service. It seems like I run into volunteers nearly everywhere I go. Unlike me though, most of them are doing real work, like pulling weeds or planting trees.
Spring is starting to arrive, and the flowers along the beach area are beginning to bloom. I took the photo below yesterday at Montara State Beach while out "on assignment" for the GGNRA. Montara State Beach is along Highway 1 just north of Half Moon Bay. It's one of the many beach areas that are easily accessible from the highway.

March
I thought I'd post an image in black and white for a change. I haven't posted many in B&W. I really do like B&W, but I don't tend to use it very often. I think it's a holdover from my early days when everything at the newspaper was black and white. In those days, color seemed like a true luxury.
This photo was taken while we were hiking along a stream in the Napa Valley last weekend. The flowing water is blurred due to the long (4 second) shutter speed, which gives it that cotton-candy look. The large rock is covered with green lichens, which is what originally drew me to the subject. In the color image, I like the color contrast between the bright green lichens and the cool blue of the sky reflecting in the water. I also like the image without color when it becomes about the texture and tone of the subjects.
Roll your mouse pointer over the image to see the color version. Which do you like best, and why?
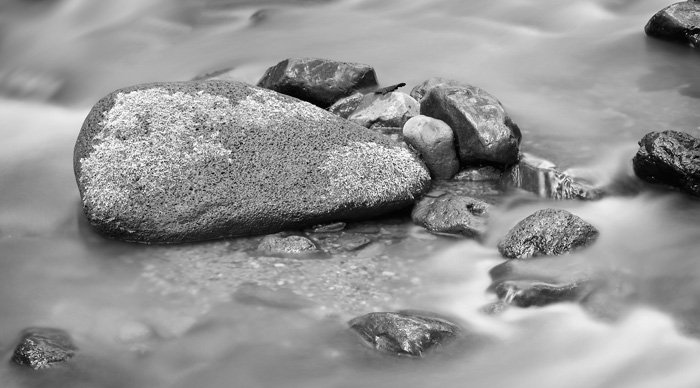
March
During this time of year, the Napa Valley has their annual Mustard Festival. The point of the festival is the mustard plants that are grown between the rows in the vineyards. The purpose is to refresh the soil. The mustard plants compliment the grape plants and return needed nutrients to the soil. We expected to see sights like the vineyard shown above all along the valley. What we found was only a few of the vineyards had mustard growing, and lush scenes like this were rare.

We didn't stop at many of the wineries, and we were a little surprised that nearly all of them charge $10 to $25 for samples. But, at the end of the day we decided to head up into the mountains to one of the more remote wineries. We figured that at least we would have some great scenery.
We ended up at the Pope Valley Wines vineyard, and it was by far the best stop of the day. Not only did they offer complimentary tasting, they practically insisted we try everything. Then, the took us on a tour of the facility and explained the history of the area. If you're in the area, we highly recommend the trip into the Pope Valley.
February
Here's another photo from our outing last week. This one was taken from the Marin Headlands on the north side of the Golden Gate Bridge. The wide angle view shows the entire north shore of the San Francisco peninsula. Alcatraz is visible on the left side of the frame, and downtown SF shows through the vertical cable supports on the bridge. Moving further to the right is the Presidio and Fort Point, which sit at the southern end of the bridge. Beaches line the shoreline extending from the end of the bridge to the right. The first is Bake Beach, which is also part of the Golden Gate National Recreation Area. Surprisingly, it's also a clothing-optional beach at the north end.
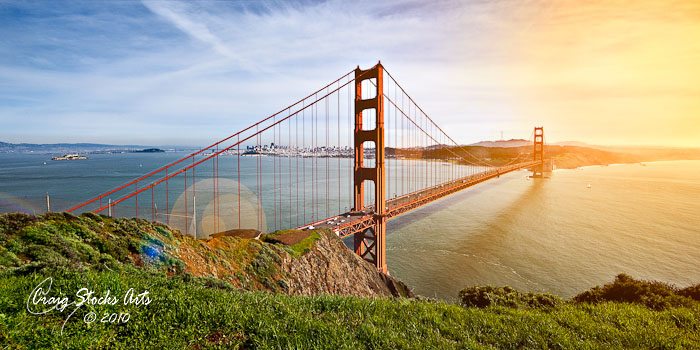
February
It's been a while since my last post. The reason? My computer died and it's taken Dell almost two weeks to get it fixed. I was triple fortunate though. First of all, it was covered by warranty, so it didn't cost me anything but time. Second, it was some combination of the mother board, CPU or graphics card that died, so all of the data on the hard drive was safe. And thirdly, I had just finished running a backup about an hour earlier, so I felt confident that I would recover, no matter what. I certainly reinforces the importance of keeping current backups.
Of course, we've made good use of our time. We've been able to visit a number of local parks. One of our new favorites is Big Basin Redwoods State Park near Santa Cruz. It has about the only remaining giant redwoods south of San Francisco.
The photo below is (obviously) from San Francisco. it's actually along the bay near Fort Point, which is part of the Golden Gate National Recreation Area. You can't really tell it from the photo, but I was only about 3 feet from the seagull. When I saw the seagull sitting on the column, this was the picture I envisioned. But, to get all of the background, I needed the extreme wide angle provided by my 14mm lens. And, with an extreme wide angle, I had to get close to the seagull to keep it from just being a dot. I walked slowly to the angle I wanted, and then slowly crept up closer and closer, taking frames as I went. Eventually, I got close, the bird posed, and Deb kept a watch for the occasional rogue wave.
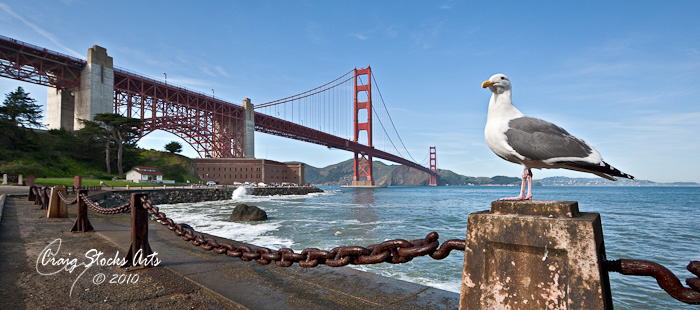
January
After a week of one rain storm after another, we were blessed with fair weather for the weekend. We took advantage of the weather and drove down to the San Simeon area of Big Sur. Needless to say, the scenery is breathtaking. One of the highlights was Elephant Seal Vista. This is an parking area along Highway 1 that overlooks a beach that used by hundreds of elephant seals. They gather here in the winter and spring to rest, mate and give birth.
Click on the picture below to view the photo gallery including photos of the elephant seals and an assortment of birds.
I've also added a new tutorial describing how I use High Dynamic Range photography techniuqes for one of the images in the gallery.
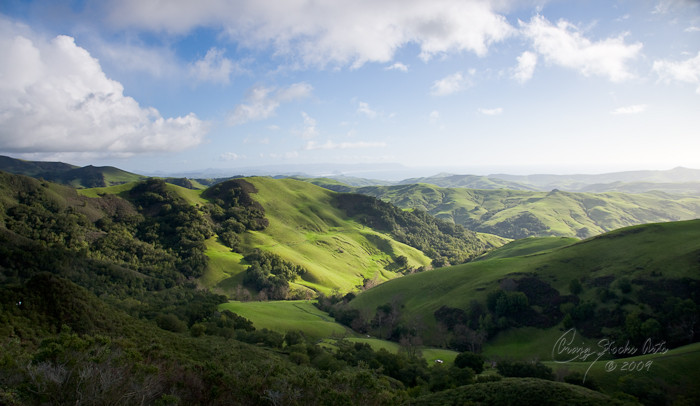
January
Here's another photo from our visit to Bosque del Apache in New Mexico. I like the abstract simplicity of this shot. It was taken at dusk as the Sandhill cranes were flying in for the night. The cranes spend the day grazing in the fields throughout the park. At sunset, they fly back to one of the shallow wet areas for the night where they protect themselves from predators as they sleep standing in the water. Then, at sunrise, they fly out for another day of grazing.
The challenge with this photo is digital noise. Roll you mouse pointer over the image to see the before version.
Noise is most obvious when shooting in dark settings, such as indoors or late in the day. In the days of shooting film, we had to deal with grain in an image. Some people liked it, others dedicated their craft to avoiding it. The same is true with digital, it's somewhat a matter of taste.
In this image, I felt the noise was very distracting. The imge is about the birds and the peach to blue color gradation of the sky. The excessive noise became another subject competing for the viewers attention. Because the noise was so severe, I had to use a variety of techniques in Photoshop to smooth the sky, but I think it makes it a much stronger image.
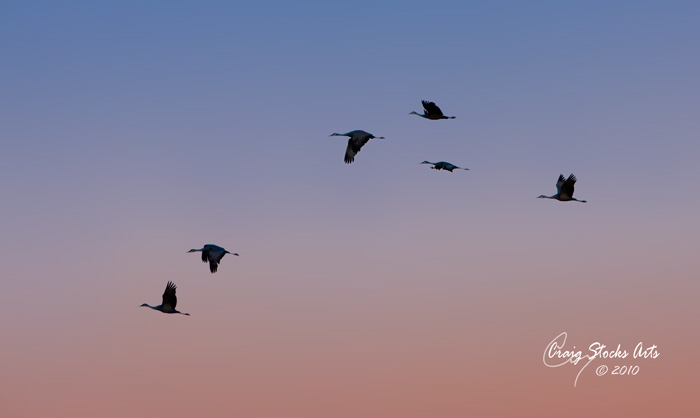
January
I've set up a very small gallery with a few images from the Golden Gate National Recreation Area. The first few are from last week when I went scouting in the Marin Headlands area. There had been reports of a bobcat around the stables, and there were frequent reports of coyotes. I was lucky and managed to find both of them, along with some quail.
The rest are from the Martin Luther King Day activities. The park scheduled a number of volunteer events, mostly cleanup and trail maintenence. I covered the activities at the Presidio. Unfortunately, the rain showed up in full force, and we even had a little hail. The foul weather didn't seem to slow anyone down, they just put on rain suits and went to work.
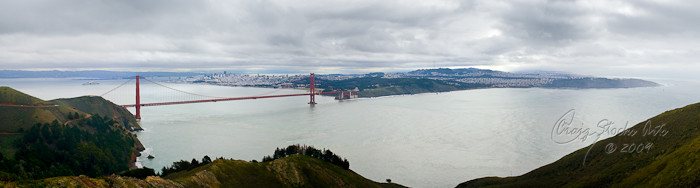
January
California here we come. We're now settled in our apartment in San jose and we're starting to explore the area. It's always exciting to start new jobs in a new area. Today, we'll locate Deb's work locations, and then go explore San Francisco and the Golden Gate area.
During the trip west, we decided to take an extra day for the trip and visited the Bosque del Apache National Wildlife Refuge near Socorro, New Mexico. What a place! It's managed as a wetland bird habitat and provides wintering grounds for tens of thousands of ducks, geese and sandhill cranes. We also spotted eagles, road runners, coyotes, deer and elk. You can see a small web gallery right here or by clicking on the photo below.
The last two photos in the gallery are from the Very Large Array Radio Telescope located 50 miles west of Socorro.
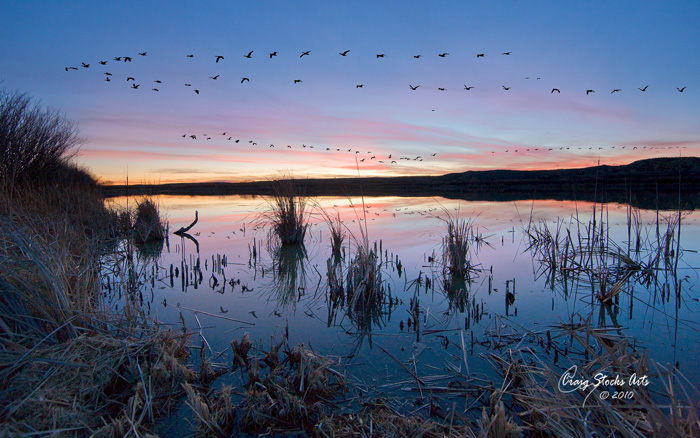
January
We had some late-night visitors in our front yard late on New Year's Day. As I waked past the kitchen window on my way to bed, I noticed a shadowy figure in the snow. At first I thought it was a large dog, but quickly realized it was a deer. I called Deb to come for a look, figuring that they would quickly scamper off. Instead, they moved closer to the house to some barberry bushes about 15 feet from the kitchen window.

Even with the full moon, it was hard to see more than just a silhouette. I grabbed the closest camera (a Canon G10) and tried grabbing a photo through the window. But, it just wasn't up to the challenge. The on-camera flash caused too much glare, and the full moon didn't provide enough light without the strobe.
I assumed they'd take off after the flash, but they completely ignored it and just kept munching on our shrubs. Realizing I had more time, I retrieved my "big" camera and set it up to trigger a flash remotely. Then we could hold the flash up to one window and take the pictures through a different one to light the deer and avoid glare. The biggest challenge was to focus - auto focus doesn't work in the dark. So, I had to focus as best I could, then check the photo on the LCD, and adjust the focus manually.
Sights like this are a big part of why we like living in the country. A few days ago, we had two foxes playing in the woods just beyond our driveway, and birds and squirrels are everywhere. As Deb said, we'll never walk past that kitchen window again without looking out to see who's looking back.
January
Well, it's a new year and our time at home in Illinois is drawing to a close. One of the highpoints for me was building a project with each of my three grandsons. They all enjoy being in the shop with me, so each one got to to choose a project. The oldest wanted some shelves for his video games. The youngest wanted to make a gun, and the third wanted to make a sword. Of course, he wanted a "real" sword made out of steel!

Now that the holidays are behind us, it's time to get back on the road. Deb's new assignment is in Santa Clara, California. (Santa Clara is just outside of San Jose, which is at the southern tip of the San Francisco Bay.) As always, she'll be doing home health nursing. I'll spend part time as a volunteer photographer for the National Park Service at the Golden Gate National Recreational Area, which includes a number of parks and historic sites, such as Alcatraz. I'll also be on the lookout for freelance photography and teaching opportunities.
December
Happy Holidays!
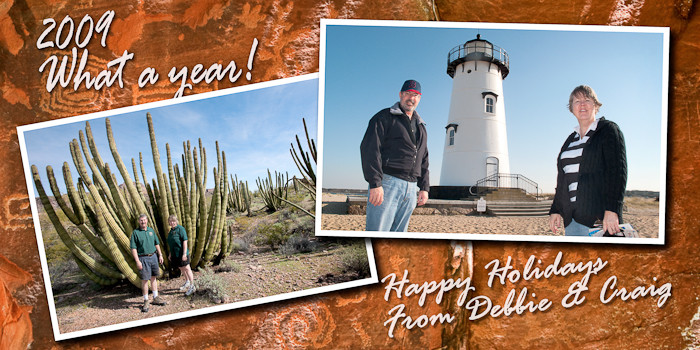
What a year this has been. Both Deb and I began new chapters in our lives when I retired at the end of 2008 and Deb began to work as a traveling nurse. During the first half of 2009 we were in Southern Arizona where Deb did home health nursing in the western Phoenix suburbs while I volunteered as the Artist in Residence at the Organ Pipe Cactus National Monument. The second half of the year took us to Boston where Deb had the opportunity to visit patients while surrounded by historic sites and I did freelance photography, teaching and consulting.
We've found we really like the travel nursing experience. It's a great way to see a part of the U.S. in enough depth to feel like you've really had the experience. At the same time, we both greatly enjoy the work we're doing. For me, it's an opportunity to return to my creative roots in photography. For Deb, even after more than 30 years of nursing, she's still gets excited when she can help someone. (That's why she serves as a volunteer EMT on the local rescue squad where we're home.)
I'd like to take this opportunity to say thank you to all of the visitors to my web site, and wish you all a Merry Christmas and a Happy New Year.
By the way, I also added a quick tutorial describing how we take pictures of the two of us, using the photo from Martha's Vineyard as an example. You can see it here.
December
Photos from the Pekin Suzuki Strings 2009 Christmas Concert on now on-line. You can read more about the program and see the photos here.
December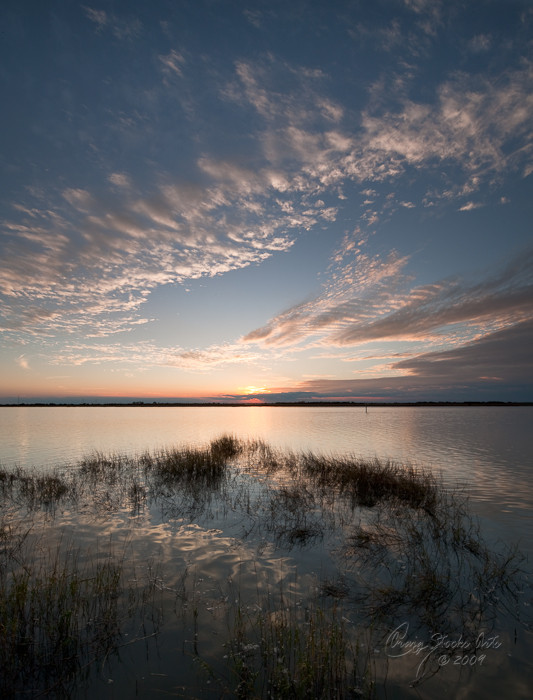
It's vacation time. My father and I are in Jekyll Island, Georgia for what is becoming an annual golf outing. We've each been here a few times in the past, starting over 40 years ago when I was 15. We came again in the 80's when he retired, and again last year to celebrate my retirement.
The weather today was perfect with a high around 70. The forecast is calling for rain on Wednesday, but generally nice otherwise.
Besides golfing, I enjoy getting out for sunrise and sunset photo opportunities. The photo to the right was taken today along the north shore of the island.
I've set up a new web gallery with a selection of photos from Jekyll Island. You can see it here.
November
Our last weekend outing was to Martha's Vineyard. The island is just off the shore of Cape Cod, just a little south of Woods Hole. We took a ferry from Woods Hole to the island, and then used buses to get around. Since it was so late in the season, most of the shops were closed.
The photo below is at the lighthouse at Edgartown, which is along the south-east shore of Martha's Vineyard.