
Remove the Background using Lab Color Mode
Another approach to creating the mask is to use Lab color mode. In the normal RGB color mode, the image is made up by combining three channels, Red, Green and Blue. In Lab color mode, the RGB channels are replaced by a Lightness channel and two color channels, a and b. We'll use the "a" channel as a starting point to build our mask.

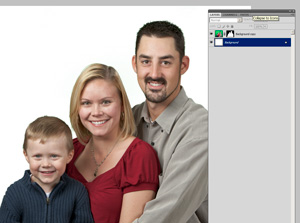
Load the image into Photoshop to get started. By default, the image will start out as a locked Background layer. But, the end result we want is to have just the subjects in front of a new background. That means we'll want them on a new layer above the background. The easiest way to get that is to duplicate the background layer by pressing Ctrl-J (Cmd-J on a Mac).
Now we can create a layer mask on the Background Copy layer to hide the green backdrop. In the end, we'll drop in a new Background to finish the image.
To create the mask, we'll first create a selection of just the subjects, and then use the Add Layer Mask command to turn that selection into a mask.

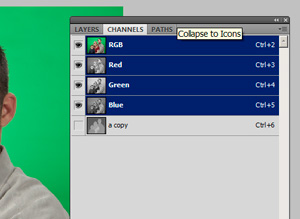
First, switch to the Channels pallet. If it's not visible, select Window - Channels. The initial view will show a composite view on top, and the three RGB channels below.
Select Image - Mode - Lab Color to convert the image. You'll get a dialog box asking if you want to flatten the image, select Don't Flatten.
Click in the box just to the right of the "a" to select just the "a" channel, then right click and choose Duplicate channel to create the new "a copy" channel.
Don't worry that the image is looking a little funky right now. What you're seeing is just the "a" channel, which is just one component of the full image.
At this point, we're done with Lab mode, so click on the Lab channel to select the top four channels. The "a copy" channel won't be selected. Then select Image - Mode - RGB to convert back to RGB mode. Again, choose "Don't Flatten" from the dialog box.
.
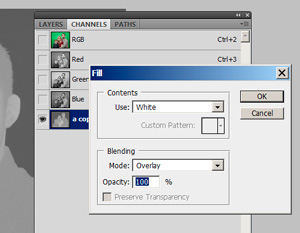
Here's where the magic happen. Select just the "a copy" channel, and again your image will look like a black and white negative. We're going to use the special properties of Overlay mode to refine this layer into something we can use as a mask.
Select Edit - Fill to open the dialog box. For Contents, choose White as the fill color, and for Blending Mode, choose Overlay. You'll see the light gray areas instantly turn white, but the dark gray background is unaffected. That's the magic of overlay mode, when you fill with white, it makes light colors lighter, but doesn't affect dark colors.
Now, repeat the fill step, but this time fill with black to drive the dark grays to nearly black. Lastly, fill two more times, once with black, and then finish by filling with white.
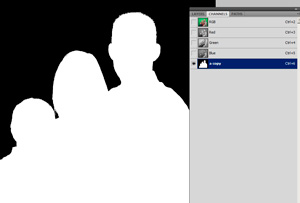
When you're done, the "a copy" channel will have a nearly perfect black background with the subjects shown as white silhouettes. We just need to turn it into a selection, and then a mask.
Click on the top, RGB channel and you'll see the image return to its normal appearance.
Now, Ctrl-click on the "a copy" thumbnail to load that channel as a selection. You'll see the marching ants outline that indicates that the white areas are selected.
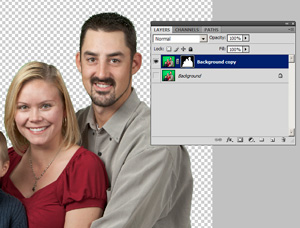
Now, return to the Layers pallet. Make sure the Background copy layer is selected and click on the Add Layer Mask icon at the bottom of the Layers pallet. It's the one third from the left, a circle inside a square.
Turn off the original background layer, and you'll see that the green has been magically masked out of the image.
As before, you want to fill the original background layer with a solid color, such as white, to get a critical view of the result. You'll probably see some green fringe around the subjects. That's normal. This technique is good, but it's not perfect. In the section on refining the mask we'll go over some techniques to perfect the result.
This approach is somewhat less direct than using Select Color Range, but it does have some advantages. First, it seems to do a better job of masking out the green background. Also, it can easily be recorded as an Action, so it can be repeated with just one click. Creating an Action also lets you use it in an automated process where it could be applied to a series of images.
If you're like me, you may be wondering if you need to do the conversion to Lab color mode. After all, shouldn't the green channel of an RGB image work better? The short answer, at least for this image, is "No." The RGB green channel appears to have too much contrast and detail to work well. The Lab a channel, on the other hand, is rather flat in appearance.