
Remove the Background Using New Tools in Photoshop CS5
The new Photoshop CS5 is expected to begin shipping sometime in May 2010. It includes a number of really great, new features, but here we'll focus on how the new Refine Edge command makes green screen extraction even better. In fact, it's so good, you may find that you don't need any additional cleanup work on the mask.

Load the image into Photoshop to get started. Unlike with previous versions, you don't need to duplicate the background layer. CS5 will do that for us, and automatically create the mask.
The first step is to create a selection. You can use either Select Color Range, or the Lab color mode described earlier. Actually, any selection tool will work as a starting point. Many times you can get outstanding results using the Quick Selection tool as well. With the new Refine Edge tool, the quality of the initial selection is less important than it was with earlier versions.
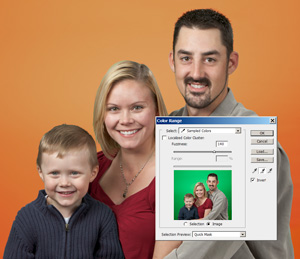
Create an initial selection using the Select Color Range command, which will open the dialog box shown here. To see the selected area, I've chosen the Quick Mask preview mode. I've also checked the Invert box to invert the selection. That way, the colors I choose will be masked out, and the remainder will be actually be the selected region.
Click on the leftt-most eyedropper tool and click on the image in the green area. To fill in the entire green area, click on the middle eyedropper and continue clicking in other areas of the background to add those colors to the selection.
The last step in this dialog box is to adjust the Fuzziness slider back and forth until you get a good selection where all of the background is masked, and all of the subject is visible.
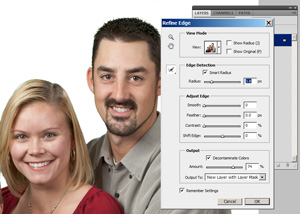
Now the CS5 magic! Select the new Select - Refine Edge tool from the menu. As shown here, I've chosen to view the resulting image on a white background, so it's easy to see how the settings will be applied. There is also a new Smart Radius setting that tells Photoshop how far out to look for adjoining details. I've also used the Paint Edge tool (just to the left of the Edge Detection box) to paint around the hair where I want CS5 to look a little further out. I've also checked the box to remove color contamination, which does even more to perfect the selection.
Lastly, I've chosen output to New Layer with Layer Mask. With this setting, CS5 will automatically duplicate the Background layer and add the mask. Talk about easy! Just fill the Background layer with white and you're ready to move on.
Even as amazing as the new Refine Edge command is, there may still be some areas of the mask that need to be cleaned up. It really depends on the size and resolution of the finished image. If it's going to be used as a small avatar on Facebook, then you're probably done here. If you want to print an 8 X 10 inch portrait, you'll probably need to fine tune the mask.
Next - Refine the layer mask