Craig Stocks Arts Fine Art Photography and Artwork Duplication Services in Peoria and Central Illinois
December 4, 2010
We recently finished remodeling our kitchen and, like many remodelers, we wanted some before and after photos. The normal routine is to take a before photo that accurately shows the area, but you don't want to work too hard at making the area look good. The after photo is the one that gets the special attention. Of course, you want it to be pretty accurate, but make sure the area is clean and well organized. And especially, you need to pay attention to the lighting.
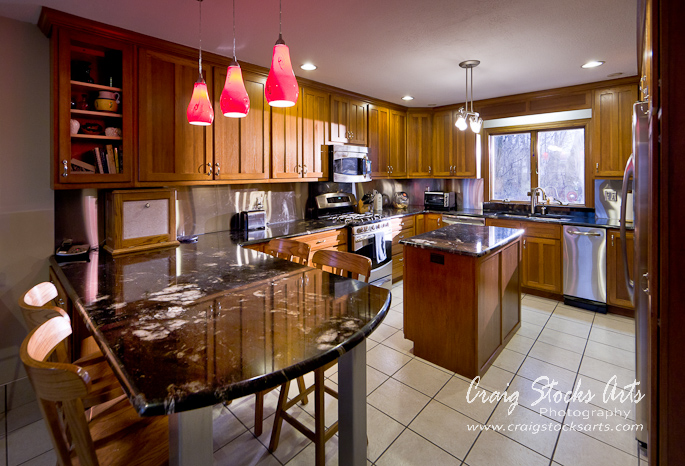
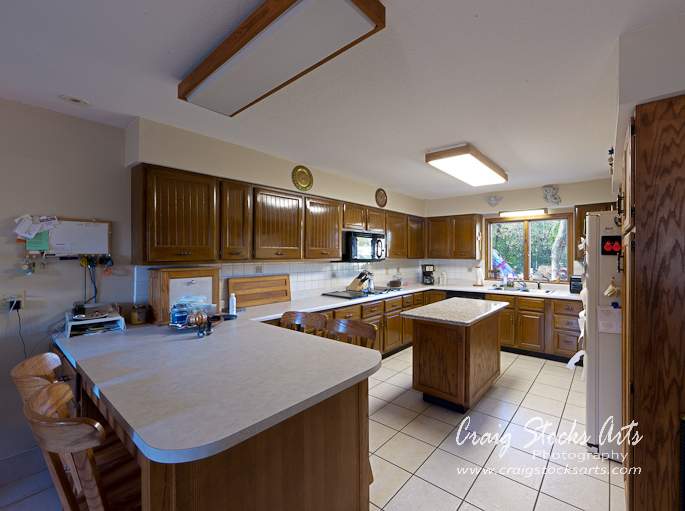
The photo above shows the finished result. There are a couple of tricks that help to make this image stand out. First, take a look at the photo below, which shows the starting point. This photo was shot with a 14mm lens on a full-frame camera, so it's an extreme wide angle. Since the camera was tilted down slightly, there is a strong keystone distortion which we need to address.
Lightroom 3 (as well as Adobe Camera Raw) has an excellent tool for correcting lens distortion, which I used for the photo below. Just by correcting the keystone effect, the photo moves closer to its finished form. But compare this photo to the one at the top of the post, and I think you'll agree that the kitchen looks warmer and more inviting in the top image. The reason is the block of window light on the far side of the room. It helps define the shape of the room, and gives the image more depth.

That's not really sunlight. In fact, it was actually snowing outside when I took the photo. The trick? The sunlight streaming in the window is actually a strobe positioned high up on a light stand outside on the front porch being triggered by a wireless remote. Since I knew the interior was being lit primarily with incandescent light, I added a full tungsten gel to the strobe so that it would match the interior light color. Without the gel, the strobe light would have been very blue.
I did have to make some exposure adjustments to get everything to balance. The strobe was on 1/2 power, and the gel also absorbs about a stop of light. In order to balance the strobe with the interior, I had to use a combination of ISO and f-stop to get the right exposure for the strobe. In this case, I wanted the strobe to be slightly overexposed, so I ended up with ISO 800 and f-4.5. Once that was set, it was a simple matter of finding a shutter speed that would give me the right exposure for the rest of the room, which turned out to be 1/45th of a second. As luck would have it, that setting also nicely overexposed the scene outside the window so that it looks natural.
As far as other finishing touches, I used Photoshop to remove the light fixture at the very top of the photo, and also removed the light switch and wall socket at the far left. I also did a small amount of selective lightening and darkening, and also added just a bit more yellow to the window light on the far cabinet.
By the way, here's the kitchen's before photo.