Craig Stocks Arts Fine Art Photography and Artwork Duplication Services in Peoria and Central Illinois
September 15, 2009
Fixing Severe Chromatic Aberrations
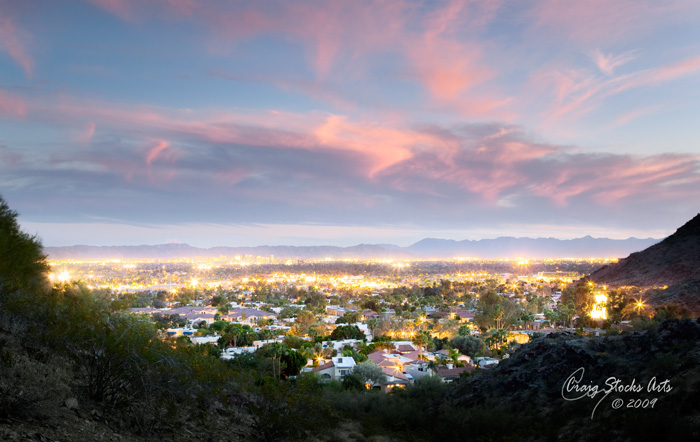
This is a night photo of downtown Phoenix, Arizona taken from the hills in the North Mountain Park area. The starting image is pretty good, but there are two areas that need improved. The most noticeable issue is the sky. I positioned myself along this trail and took a series of exposures over a 45 minute period. The peak of the colors in the sky was about 30 minutes before the peak of the city lights, so I wanted to blend the two exposures together to get the best sky with the best of the city lights.
The second issue is chromatic aberrations around the lights. The point sources of bright light are all are suffering from intense red-green chromatic aberration (CA) which caused a dark red halo around each light. For images intended for stock sales, such as through iStockphoto, that would have to be fixed.
(Chromatic aberration is a lens focusing defect, or aberration, where different colors of light don't focus correctly. Ideally, all colors (wavelengths) of light should focus to exactly the same point on the surface of the film or digital sensor. Chromatic aberrations occur when the different wavelengths of light focus to slightly different distances which creates colored halos along sharp edges between bright and dark areas.)
The fix, thanks to Photoshop CS4. Roll your mouse pointer on and off the image above to see the before version. You can also click on the photo to see a larger version.
The first issue to deal with was the CA. If that isn't fixed, the rest doesn't matter. Normally, you can get pretty good results using the CA correction tools on the raw image in either Lightroom or Adobe Camera Raw. Alternatively you can also use the lens correction filter in Photoshop to correct CA. They tend to work by adjusting the red and green channels along strong edges, fixing red on one side and green on the other. In this case, none of those would work since the CA completely surrounded each light source.
The solution in this case was to create a Hue-Saturation adjustment layer and focus the adjustment on just the pure red that was mostly in just the CA. I could then reduce the red saturation, and adjust the hue of the red so that it appeared yellow. That allowed the CA to match the color of the light it surrounded. Since there were places where the red was actually the color of the subject, I then needed to add a layer mask to localize the CA correction to just the areas around the lights. It was a little tedious, but not terribly so, and I was done in a few minutes. In this case, I actually needed two separate Hue-Saturation adjustment layers, and just a little bit of cleanup with the clone stamp tool.
The second step was pretty straightforward. I placed the frame with the best sky as a Smart Object layer and added a layer mask so that the final image is made up of the best of both.
The end result has been one of my best selling photos on both iStockphoto and Shutterstock.
