
Replace the Background
Now it's time for the creative fun - dropping in a new background. I'll show a couple of options, but you're only limited by your imagination, and perhaps good taste.
There are three broad categories of replacement background. You can create a background entirely within Photoshop by applying filters and layer styles to a new layer. You can also use images of traditional backgrounds. You may have a background you can photograph, but you'll probably want to get one from a company such as Wetzel & Company that specializes in providing high quality files that can be used as a digital background.
Of course, you can also place your subjects in an entirely new setting. Here's where taste and judgment comes into play. If you want a natural looking result, you'll need to choose a setting that's appropriate for the subject's pose, style and lighting. The example shown here would look very out of place with a beach sunset as a background, whereas a model in a swimsuit would look out of place with a formal studio background.
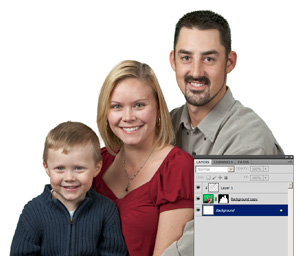
White backgrounds tend to have a very clean and modern appeal. If that's your goal, you're done at this point.
It may be hard to see the details in the sample photos, so I've prepared a larger image as well. Notice in particular the fine details around the hair. Normally, I've found dark, solid color backgrounds are the most demanding.

If you're after a plain, classical background, it's easy to create in Photoshop. In this example, I added a Solid Color layer just below the subjects and chose a medium-dark blue-grey color.
Then, I added a Gradient Fill layer style to create the background light effect. In the Layer Style dialog box, I changed the Gradient Style to Radial, and selected the Reverse option. I also changed the Blend Mode to Hard Light, Opacity to 59% and the Scale to 150%. I also repositioned the center of the glow my moving my mouse pointer over the image and click-dragging the layer effect down so it appears to be directly behind the subjects.
Note also that I still have the original white background in the layer stack. If I want to go back to the plain white background, I can just turn off the Solid Color layer and turn on the Background layer.
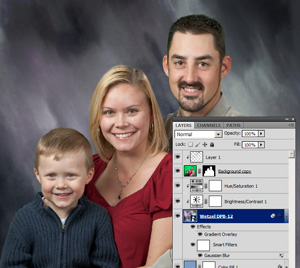
Next, let's try a background with a more current feel. Here, I've chosen the Wetzel DPB-12 from the Digital Pastel collection. I chose this background because it has the look of a traditional hand-painted canvas backdrop.
I've added the new background image as a Smart Object, which provides continued flexibility. As in the previous example, I added a Gradient Overlay layer effect. I also added a Gaussian Blur as a Smart Filter so that the background will appear out of focus.
To fine tune the brightness, contrast and color of the background, I added two additional adjustment layers, both clipped to the layer with the new background.
Again, notice that I haven't deleted any of the earlier alternatives. I can easily go back to either of the earlier backgrounds.
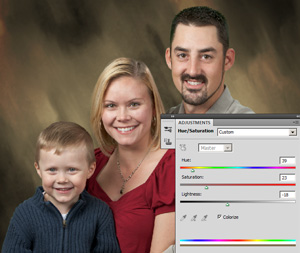
One really nice feature of digital backgrounds is their flexibility. If you like the pattern, but the color doesn't fit the subject, you can easily change it. In this example, I've simply clipped a Hue Saturation adjustment layer to the background Smart Object and shifted adjusted the Hue, Saturation and Brightness sliders to get a completely different look.
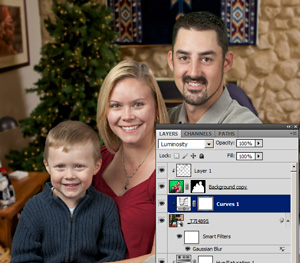
And lastly, an example placing the subjects in an appropriate setting. In this photo, a family room decorated for Christmas. Again, I added the new image as a Smart Object layer and added a Gaussian Blur Smart Filter. I also clipped a Curves adjustment layer to darken and reduce the contrast of the background.
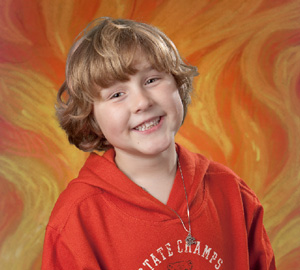
Of course, sometimes you don't want something classical. This subject definitely needed a fun and youthful background, which I also found in the Wetzel & Company Digital Pastel collection. In this case, the DPB-51 background.
As with the earlier examples, I added the background as a Smart Object and applied a radial Gradient Effect layer style and a Gaussian Blur Smart Filter.
In all cases, when you add the Gaussian Blur to the background, you may find that it becomes too smooth, especially if you you're using a relatively low resolution camera, or a high ISO setting. In that case, the background won't have the same level of noise as the rest of the image. The solution is to also add a Noise Smart Filter so that the noise in the background matches the subject. Just be sure to add the noise filter after you add the blur filter, so that they're applied in the correct order.
So, there you have it, green screen photography in just a few easy steps. Getting a good result requires some extra care, but the payoff is infinite possibilities. You can literally offer every client a different background, selected and tuned to fit their taste and style.
For more information, be sure to visit my web site at www.craigstocksarts.com, where you can follow my blog and read additional tutorials.