
Refine the Mask for a Perfect Selection
No matter which process you use to create the mask, you probably still need to do some fine tuning. In this tutorial, I'll describe the two most common tasks, fine tuning the mask to perfect the cutout and fixing color contamination that may occur. The most difficult area is around hair, so we'll concentrate on those areas.
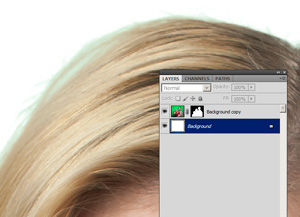
This area exhibits both kinds of problems. There are some areas where the green background is still partially visible through the mask. Also, notice that some of the fine hair has taken on a green color cast. The detail is there, it's just the wrong color.

First, let's work on the mask. Just like we used Overlay mode when we filled the "a copy" channel with white and black, we can paint in overlay mode to fine tune the edges. First, make sure the mask is selected in the Layers pallet, and choose a soft brush. Set your foreground color to black. Lastly, change the brush's Mode to Overlay
As you begin to brush over the offending areas on the mask, the mask edges will contract and increase in contrast. In this example, I made one stroke at 100% oppacity, but that was too much of an adjustment. I immediately selected Edit - Fade to adjust the brush's opacity to 15%.
If you to make the opposite adjustment, simply change the brush color to white. Then, painting on the mask will reveal the detail.
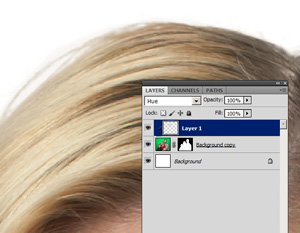
Next, we'll deal with the color contamination. The goal here is to restore the correct color to the fine hairs by painting the color on a new layer.
Add a new layer and set its blending mode to "Hue." Then, right-click to the right of the layer name and select "Create Clipping Mask." That will ensure that whatever is on this layer only affects the visible pixels on the layer below.
Now, select a soft edged brush and set the foreground color by Alt-clicking on a nearby region of hair. Then simply paint that color onto the layer. The color you paint only affects the color (because of Hue blending mode ) of the visible hair (because the layer is clipped to the one below).
Of course, you can also use your standard tools to refine the mask. The Mask Edge panel in CS4 allows you to grow or shrink the masked area as well as apply a softer feather to the edge. You can also use the CS4 Quick Selection tool to add or remove areas from the mask. In some cases, you may need to resort to painting on the mask or using the Pen tool to create a path.
Prior to CS4 and the new Masks panel, we used the Filter - Other - Maximum and - Minimum controls to grow or shrink a mask, and Gaussian Blur to feather a mask. Those tools didn't seem to work very well around fine details, like hair, but could be really great around smoother areas, such as clothing.
The big advantage of the traditional filter tools is that they can be applied to just a portion of the mask. The Masks panel works on the entire mask - all or nothing. But, the Filter tools can be applied to just a selected area of the mask. With the mask active, select the region to be affected (using the Rectangular Marquee or Polygonal Lasso tool) and apply the filters. A typical change is to grow or shrink the mask by 1 or 2 pixels, then apply a gaussian blur of that amount or less.
It's that easy. Just work your way around the subject inspecting and fine tuning as you go. You may also find it useful to occasionally invert the white background to black to make sure the result looks good on different backgrounds. Depending on the subject, some backgrounds are much more forgiving than others.
Next - Replacing the background